> ## Documentation Index
> Fetch the complete documentation index at: https://docs.newenergycoder.club/llms.txt
> Use this file to discover all available pages before exploring further.

# 狗王5天带你上手 Isaac Gym 与 RL 强化学习

> 从 3D 模型构建、URDF 导出、ROS 校验、Isaac Gym 训练到 MuJoCo Sim2Sim 迁移的强化学习入门教程，以 Tinymal 四足机器人为例。

> 🚩 学如逆水行舟，不进则退。 —— 《华北舵狗王》

# \*\*2024年6月1日 星期三 我正式开始了学习RL \*\*

***

**公告：**

20250302：更新V1.1版本代码，详情查看，附录更新日志，优化了代码结构，增加了Taitan包含上肢的机器人，Tinker样机目前可以在群主获取DIY材料信息

原文及文中涉及资源均在百度云中可下载：

链接: [https://pan.baidu.com/s/16SiaTsPg5DgqVBoS\_1M1gw](https://pan.baidu.com/s/16SiaTsPg5DgqVBoS_1M1gw) 提取码: d43h

> **外链资料与其他课程：**
>
> （1）Torch部署模型的教程：在Nvidia Jetson nano上面安装部署torch
>
> （2）**如果想了解人形机器人从传统控制到RL的技术请阅读**：10天借助Tinker学习人形机器人运动控制

\*\*大家好我是华北舵狗王，\*\*实际在博士期间最早课题是强化学习方向，但由于当时导师和实验室并没有相关资源最后还是选择了数据融合方向，但实际也完整的学习莫凡Python强化学习方向的相关课程，并且最终实现了基于DQN驱动2D仿真中无人机完成自动避障和探索的任务，因此有过对马尔科夫过程、Q-Learning和后续深度强化学习基本知识的理解。

在后续某科研项目中涉及到了需要让智能体学习一个策略实现对步态模式、控制参数基于算力和环境、地形复杂度实现自演化的要求，因此最后还是采用了Q学习+RBF网络拟合的方式实现对连续环境特征输入，映射到输出离散动作组指令的RL模型，算是再次捡起了强化学习的相关内容，下面是近期针对强化学习开展学习的记录，里面并不涉及强化学习算法、模型网络设计等基础神经网络和RL知识，更多是从工程层面实现快速上手应用Isacc仿真环境并实现Sim2Sim迁移的过程，可以快速了解采用强化学习这种控制方法实现系统设计的基础流程，**本教程与开源项目参考了很多开源项目，这也是目前学习强化学习的最大好处有越来越多的教程。**

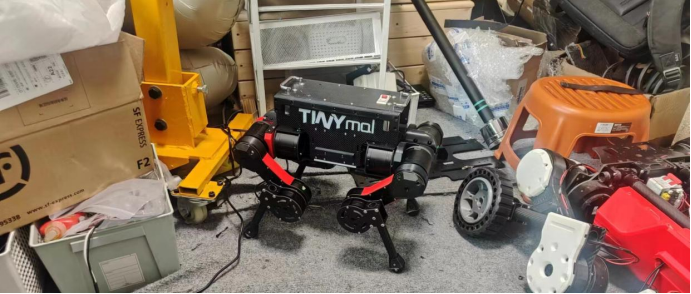
为了更好的学习强化学习，整个教程从3D模型构建、URDF导出、ROS校验、isacc训练和Mujoco迁移完成了整个流程的记录，并且采用了Tinymal四足机器人模型为例进行测试，完整的给出了一个全新的机器人系统如何从建模到训练场，**让大家快速从不了解Isacc Gym到可以完成Mujoco下的Sim2Sim迁移，具体的内容如下表所示**：

> 注：此处原飞书文档包含一个嵌入表格，已省略，详情请查看原文档。

通过学习整个教程，可以快速完成对Isacc Gym的使用并且可以用自己的机器人模型进行测试，当然很多更深层次的细节和RL知识需要更深入的学习，但是起码了解了RL的基本流程并且可以针对很多开源项目进行学习，随着Isacc Lab和Sim的推出，Gym不再做更新维护，未来强化学习的工具链会更加丰富，具身智能系统的开发会变得更加的方便， 当然这也完成了对Tinymal项目整个框架中缺失部分的填充，对于Tinymal相关资料可以关注[https://tinymal.cn/：](https://tinymal.cn/：)

![media](https://pub-7714d99fbd654288a82d7b2f7be01efb.r2.dev/isaac-gym-rl/001-image-image-1.png)

![media](https://pub-7714d99fbd654288a82d7b2f7be01efb.r2.dev/isaac-gym-rl/002-image-image-2.png)

![media](https://pub-7714d99fbd654288a82d7b2f7be01efb.r2.dev/isaac-gym-rl/003-image-image-3.gif)

![media](https://pub-7714d99fbd654288a82d7b2f7be01efb.r2.dev/isaac-gym-rl/004-image-image-4.gif)

![media](https://pub-7714d99fbd654288a82d7b2f7be01efb.r2.dev/isaac-gym-rl/005-image-image-5.png)

***

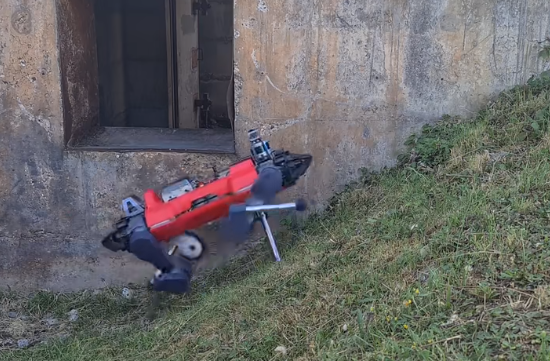
本项目最终实物迁移效果，基本与isacc仿真一致(**目前机器人重量较小，因此迁移起来比较容易**)，另外也将RL算法迁移到小尺寸人形机器人实现了基本的步态控制，**本项目基于OmniRobLab机器人开发环境进行验证，采用OmniRobCtrl运动控制软件包进行算法开发**，在Tinymal四足机器人与Tinker双足机器人平台上均完成了验证：

[20240828-122013.mp4](https://pan.baidu.com/s/16SiaTsPg5DgqVBoS_1M1gw)(提取码：d43h)

Tinymal四足机器人

[bc049b14b193ed8810b80555443b0997.mp4](https://pan.baidu.com/s/16SiaTsPg5DgqVBoS_1M1gw)(提取码：d43h)

Tinker双足人形机器人

**项目软件包:**

（1）四足机器人步态训练代码：

LocomotionWithNP3O-masterV5.zip

[LocomotionWithNP3O-masterV5.zip](https://pan.baidu.com/s/16SiaTsPg5DgqVBoS_1M1gw)(提取码：d43h)

（2）Isaccgym倒立摆训练代码：

[IsaacGymEnvs-main.zip](https://pan.baidu.com/s/16SiaTsPg5DgqVBoS_1M1gw)(提取码：d43h)

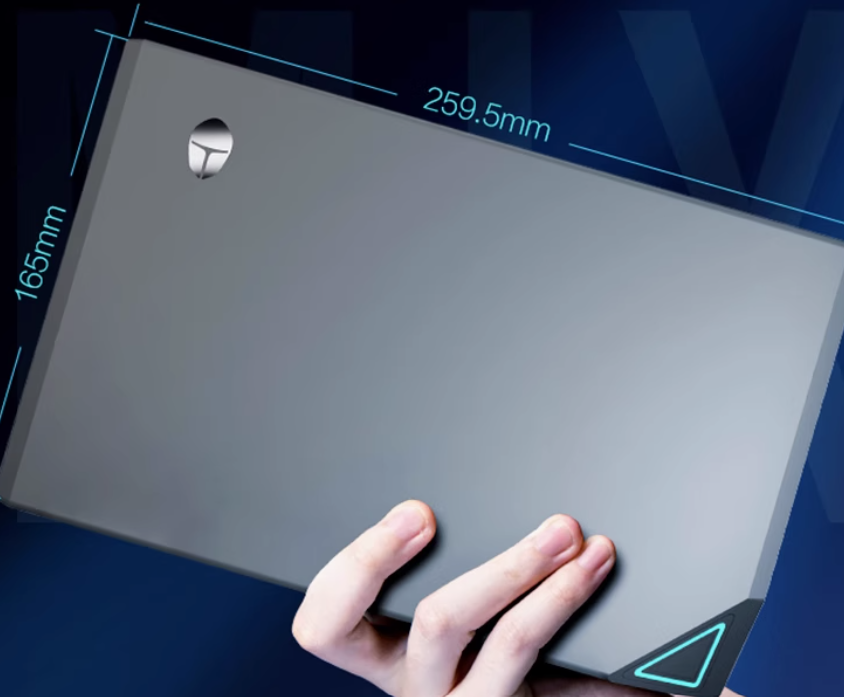
在训练直接我们推荐可以采用如下的训练平台，该计算平台非常小可以满足移动办公与巡逻的需求，同时也可以布置在机器人上完成模型推理：

![media](https://pub-7714d99fbd654288a82d7b2f7be01efb.r2.dev/isaac-gym-rl/006-image-image-10.png)

项目
地址
显示屏
[https://detail.tmall.com/item.htm?\_u=i1klsj89a319\&id=770322924802\&pisk=g6SU\_lmH-kEFvPXV1ixr7v-E15xpc3PbZgOWETXkdBA3ypZo4TWDFJF8pNJlN1e8pH6ka\_566097J7nP\_66cRe15RQvks1XIAQZpz\_WfM\_i7vw9o416Jr\_sPe0JlE\_epNJU1p9KJqSNjao6dpir7prseKADGBKRkKPTn8lWQCSNbcuznI3PUG6O0AwaM3KxkKUYnjRJWFpvlZUXgjCpJEXvoxRyweCmnrexkjdvvUpvlZDcGILvWEvYkZAXMUCAkqDvuQOA9UfsF9\_hXne2PaQ9pqJ46JIXH\_0mqHp8nD93S40P6deAcf\_okCGJe8IXCAsaysdj1bETsFRKGHN1HQnrEMp7G3HvP2-0yaUSpbC54m0pO-6SMzGw-HIjdIiKM5o2VIGCCpGWSEuv1GCXdx3r0HH-HthJOV5nHaNblAeK-t7RRbOjhzg5Swd081g3Zq48HBdRbQR5An7BqpNFOZ43JSEvwGJLoy4LhzdRbQRu-yeeyQIwpk\&spm=a1z09.2.0.0.62e42e8d9VSxez\&sku\_properties=21433%3A8504807](https://detail.tmall.com/item.htm?_u=i1klsj89a319\&id=770322924802\&pisk=g6SU_lmH-kEFvPXV1ixr7v-E15xpc3PbZgOWETXkdBA3ypZo4TWDFJF8pNJlN1e8pH6ka_566097J7nP_66cRe15RQvks1XIAQZpz_WfM_i7vw9o416Jr_sPe0JlE_epNJU1p9KJqSNjao6dpir7prseKADGBKRkKPTn8lWQCSNbcuznI3PUG6O0AwaM3KxkKUYnjRJWFpvlZUXgjCpJEXvoxRyweCmnrexkjdvvUpvlZDcGILvWEvYkZAXMUCAkqDvuQOA9UfsF9_hXne2PaQ9pqJ46JIXH_0mqHp8nD93S40P6deAcf_okCGJe8IXCAsaysdj1bETsFRKGHN1HQnrEMp7G3HvP2-0yaUSpbC54m0pO-6SMzGw-HIjdIiKM5o2VIGCCpGWSEuv1GCXdx3r0HH-HthJOV5nHaNblAeK-t7RRbOjhzg5Swd081g3Zq48HBdRbQR5An7BqpNFOZ43JSEvwGJLoy4LhzdRbQRu-yeeyQIwpk\&spm=a1z09.2.0.0.62e42e8d9VSxez\&sku_properties=21433%3A8504807)
计算训练单元（i9-13900H/4070 8G/32G+4T ）
[https://item.taobao.com/item.htm?spm=a1z09.2.0.0.62e42e8d9VSxez\&id=779228235738&\_u=i1klsj891da7\&pisk=gv1UsGGHKWFF8Q7VfsArQ2REflApiQrbq\_tWrabkRHx3eeNoaa7DPyE8JO8lVGU8JB\_k4gS6XbT7puhPbM\_cdps5d3YkjGbIO3NpUg7fDgG799ToaG\_JEg1Pyb8lrgUpVye1JwdJZoZj4S\_dJsP7J-1erCmGWEgHqR9nL57Q5oZbG7ynSQrUcMt0OCNMuEAk-LvnsP8WPeYlqLAMIhLJrDYotPzwyhcnEpAksFYvzeYlqXmgsU8SqUxH-cxMJhxkZQjlSP8WzIjd2mTDKzSyVeduK7vMmwxZZjuv8p0PSYGSNFLHLLTDbFT1\_eJecdFpkt1hfafC9dFZsQQ13gWlmlMBxt8VbK6U0XSVvUbyrMPxuhfFz1JdCSmwWObCE6IEzbYdOs9yDdzowLOGGKXcY4UASBYl2KC7DXKhrZCAhIPEDeWGuCSzN0Liel1-QbDyKFLwcPzNDZqRu2BTXgD-edvD7napEYHJKT8wcPzZeYpLzF-bJKC](https://item.taobao.com/item.htm?spm=a1z09.2.0.0.62e42e8d9VSxez\&id=779228235738&_u=i1klsj891da7\&pisk=gv1UsGGHKWFF8Q7VfsArQ2REflApiQrbq_tWrabkRHx3eeNoaa7DPyE8JO8lVGU8JB_k4gS6XbT7puhPbM_cdps5d3YkjGbIO3NpUg7fDgG799ToaG_JEg1Pyb8lrgUpVye1JwdJZoZj4S_dJsP7J-1erCmGWEgHqR9nL57Q5oZbG7ynSQrUcMt0OCNMuEAk-LvnsP8WPeYlqLAMIhLJrDYotPzwyhcnEpAksFYvzeYlqXmgsU8SqUxH-cxMJhxkZQjlSP8WzIjd2mTDKzSyVeduK7vMmwxZZjuv8p0PSYGSNFLHLLTDbFT1_eJecdFpkt1hfafC9dFZsQQ13gWlmlMBxt8VbK6U0XSVvUbyrMPxuhfFz1JdCSmwWObCE6IEzbYdOs9yDdzowLOGGKXcY4UASBYl2KC7DXKhrZCAhIPEDeWGuCSzN0Liel1-QbDyKFLwcPzNDZqRu2BTXgD-edvD7napEYHJKT8wcPzZeYpLzF-bJKC)..
建议搭建可以首先按1.1完成软件环境的安装然后采用最新版本的代码运行执行对步态进行训练，在有一定的实践基础后依据教程进行逐步尝试

# 阶段**1 学习IsaccGymEnv 倒立摆例子**

本教程一开始首先还是基于IsaccGym提供的相关例程，安装相关软件与依赖环境，并且开始对基础倒立摆与相关的例程进行学习，**对于传统控制学习来说倒立摆是最典型的例子，其从自动控制系统建模和控制都是传统控制课程首选的代表**，对于RL学习也一样，下面为修改后的gym例子：

```python theme={null}
https://github.com/isaac-sim/IsaacGymEnvs/blob/main/docs/rl_examples.md
```
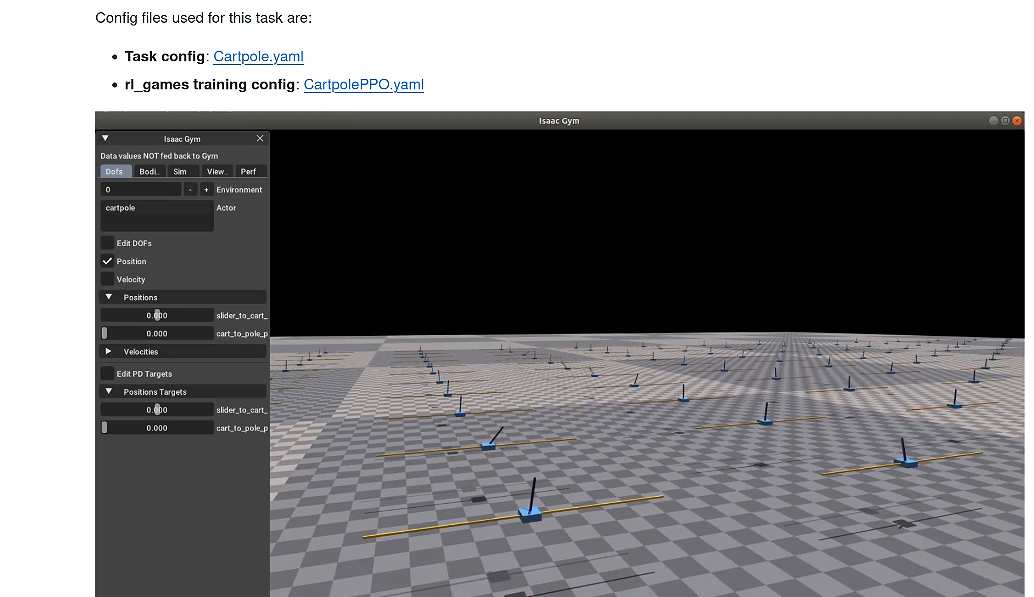
![media](https://pub-7714d99fbd654288a82d7b2f7be01efb.r2.dev/isaac-gym-rl/007-image-image-11.png)

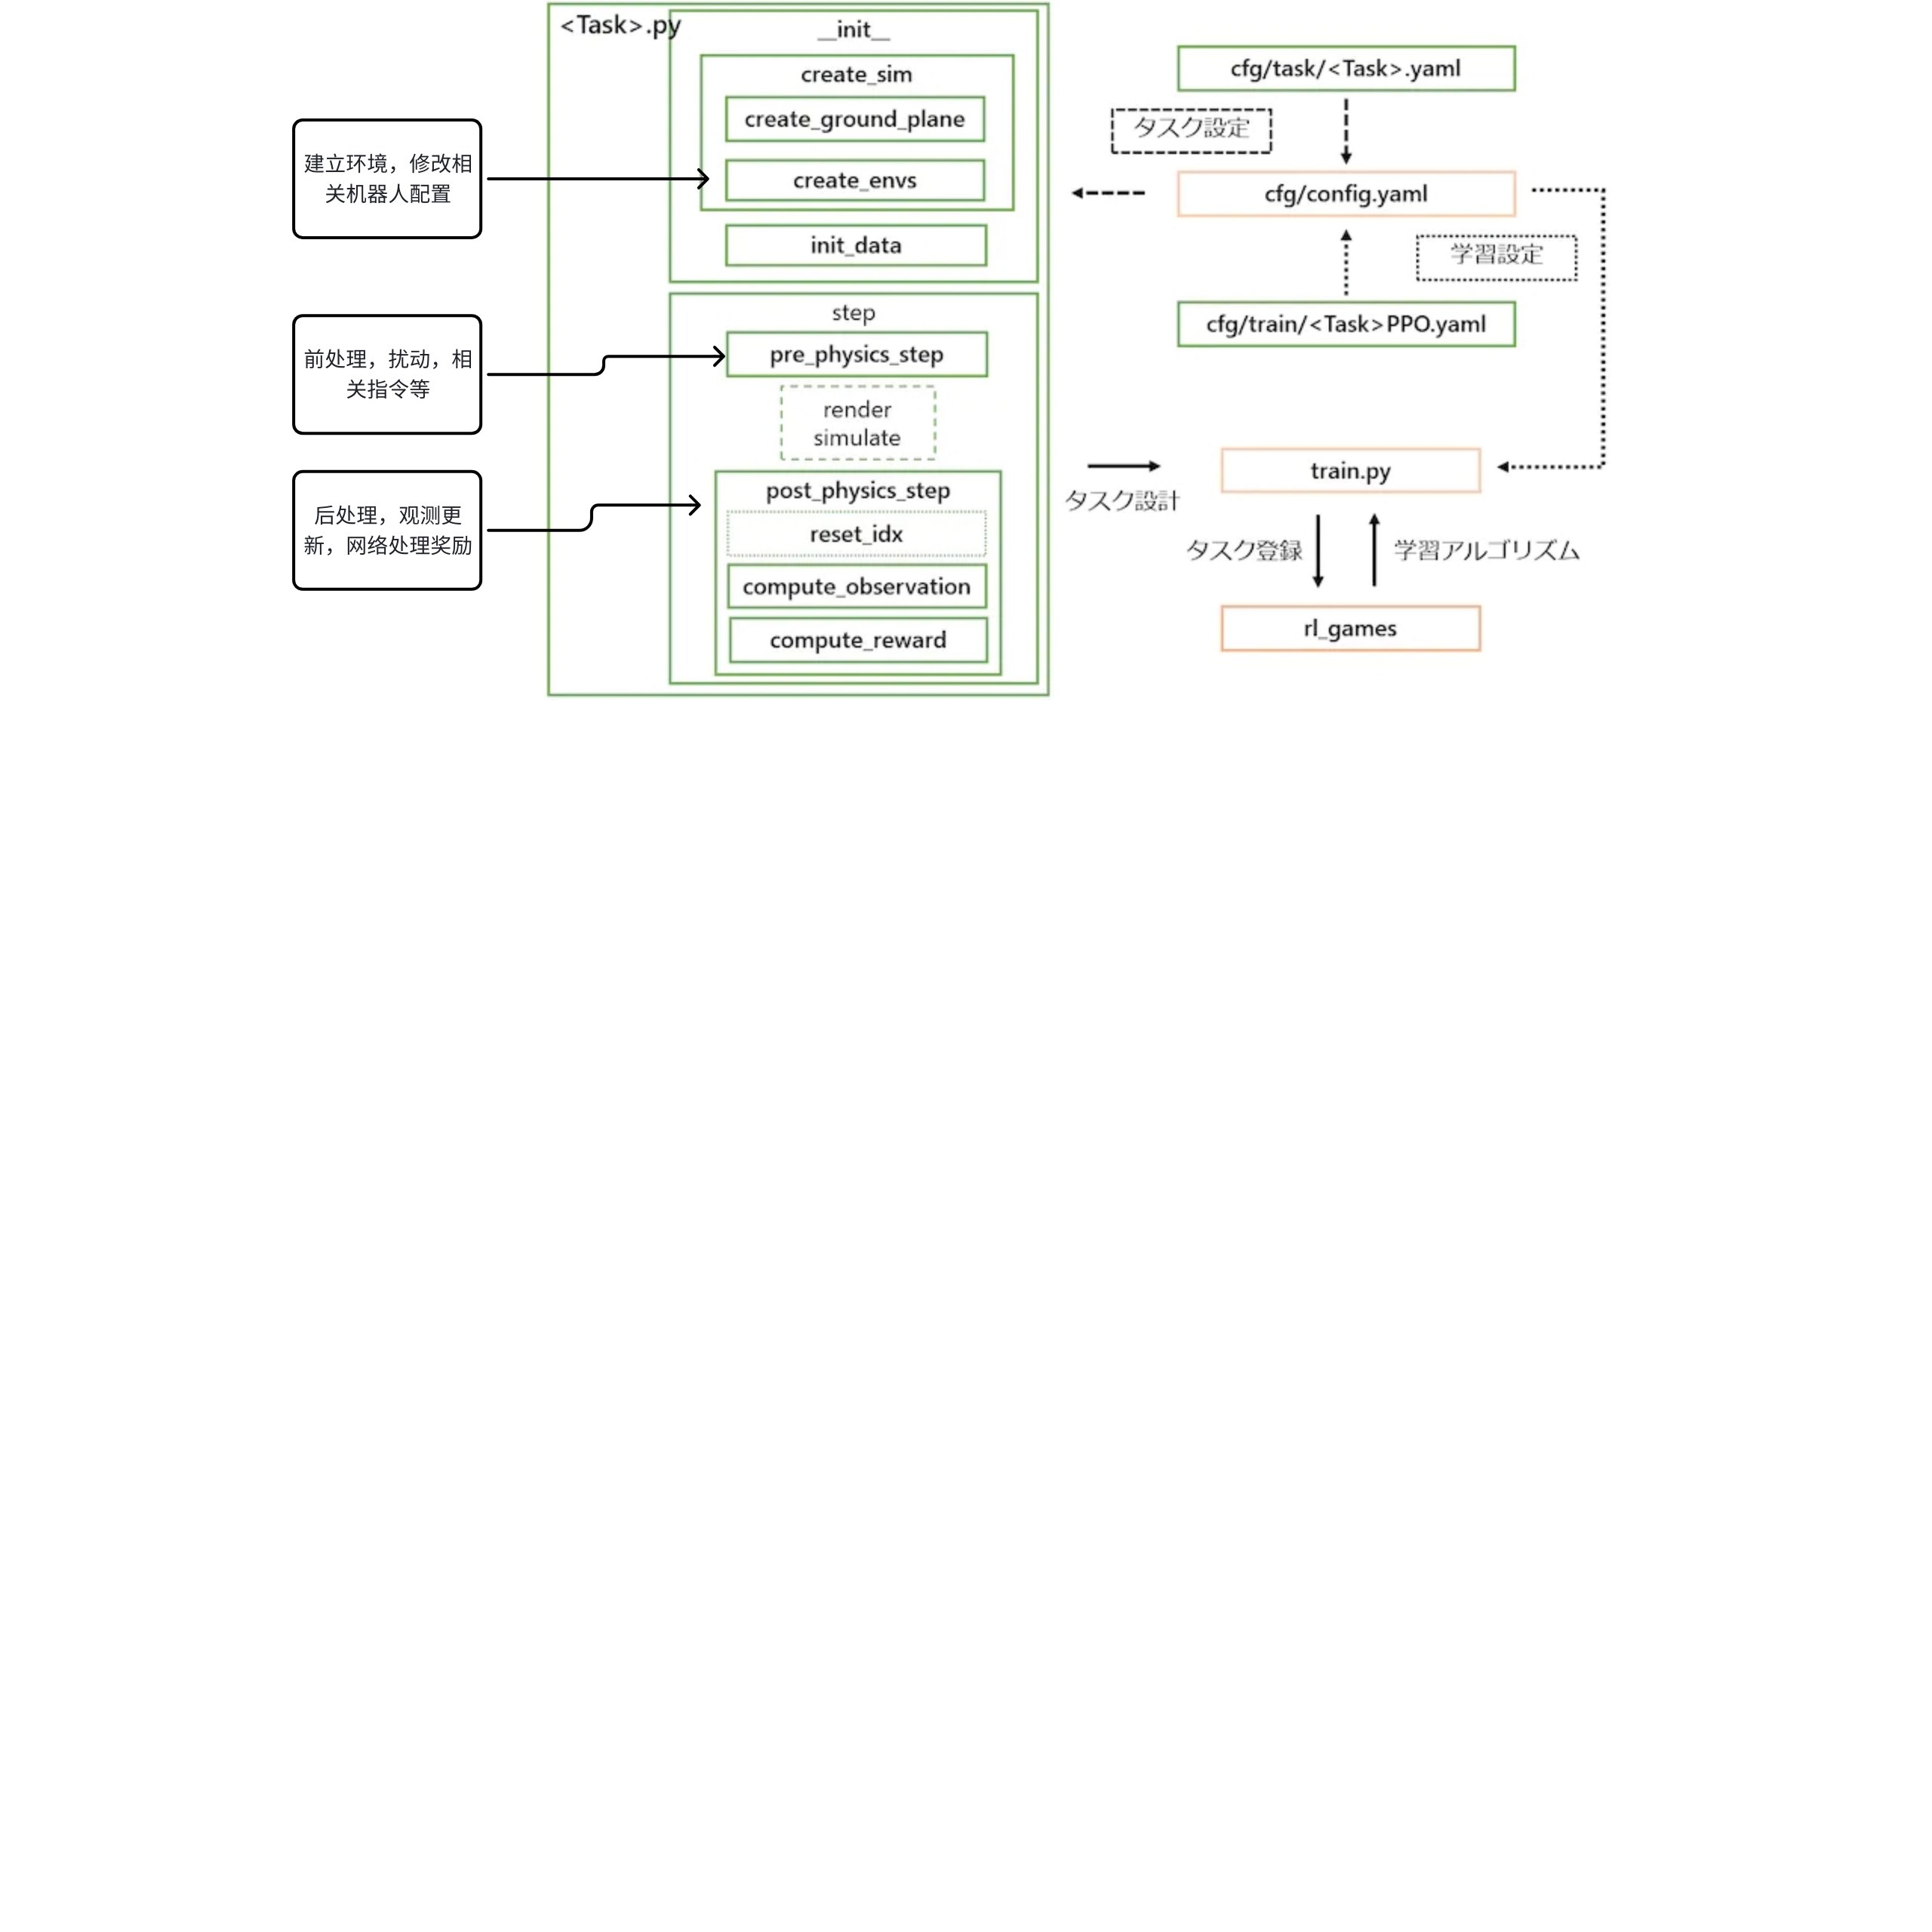
在IsaccGymEnvs中提供了非常多的RL例子包括倒立摆、机械臂控制和火柴人，可以快速了解并且直观的学习Isacc仿真环境、Pytorch下的算法开发，下图介绍了Gym训练框架完整的软件架构，包括了环境建立、场景建立、Step更新，前后处理\*\*，基本上我们在更新软件中主要还是围绕后处理初始化等部分进行软件修改：\*\*

![media](https://pub-7714d99fbd654288a82d7b2f7be01efb.r2.dev/isaac-gym-rl/008-whiteboard-whiteboard-12.jpg)

## 1.1 安装与配置软件开发环境：

参考资料：[Anaconda安装时默认python版本改成其他版本的两种方式\_python\_脚本之家](https://www.jb51.net/python/301746qcc.htm)

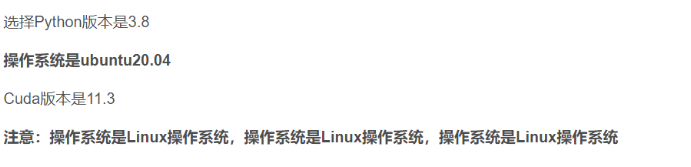
下面给出对IsaccGym下的整体配置环境，首先需要保证Conda安装完毕，**然后需要配置如下的软件环境.bashrc，其中后三个需要修改envs为后面建立虚拟空间的名称**，否则在运行中会保存：

```bash theme={null}
    export PATH=/usr/local/cuda/bin:$PATH
    export LD_LIBRARY_PATH=/usr/local/cuda/lib64:$LD_LIBRARY_PATH
    export LD_LIBRARY_PATH=/usr/lib/x86_64-linux-gnu:$LD_LIBRARY_PATH
    
    export LD_LIBRARY_PATH=~/anaconda3/envs/OmniRobCtrl/lib/:$LD_LIBRARY_PATH
    export LD_LIBRARY_PATH=~/miniconda/envs/OmniRobCtrl/lib/:$LD_LIBRARY_PATH #alternative
    export VK_ICD_FILENAMES=/usr/share/vulkan/icd.d/nvidia_icd.json
```

之后建立虚拟空间，安装相关软件包：

```python theme={null}
    conda create -n OmniRobCtrl python=3.8.10
    conda activate OmniRobCtrl
    pip install torchvision -i https://pypi.tuna.tsinghua.edu.cn/simple
    pip install torch -i https://pypi.tuna.tsinghua.edu.cn/simple
    pip install pyquaternion -i https://pypi.tuna.tsinghua.edu.cn/simple
    pip install pyyaml -i https://pypi.tuna.tsinghua.edu.cn/simple
    pip install rospkg -i https://pypi.tuna.tsinghua.edu.cn/simple
    pip install pexpect -i https://pypi.tuna.tsinghua.edu.cn/simple
    pip install mujoco==2.3.7 -i https://pypi.tuna.tsinghua.edu.cn/simple
    pip install mujoco-py -i https://pypi.tuna.tsinghua.edu.cn/simple
    pip install mujoco-python-viewer -i https://pypi.tuna.tsinghua.edu.cn/simple
    pip install dm_control==1.0.14 -i https://pypi.tuna.tsinghua.edu.cn/simple
    pip install opencv-python -i https://pypi.tuna.tsinghua.edu.cn/simple
    pip install matplotlib -i https://pypi.tuna.tsinghua.edu.cn/simple
    pip install einops -i https://pypi.tuna.tsinghua.edu.cn/simple
    pip install tqdm -i https://pypi.tuna.tsinghua.edu.cn/simple
    pip install packaging -i https://pypi.tuna.tsinghua.edu.cn/simple
    pip install h5py -i https://pypi.tuna.tsinghua.edu.cn/simple
    pip install ipython -i https://pypi.tuna.tsinghua.edu.cn/simple
    pip install getkey -i https://pypi.tuna.tsinghua.edu.cn/simple
    pip install wandb -i https://pypi.tuna.tsinghua.edu.cn/simple
    pip install chardet -i https://pypi.tuna.tsinghua.edu.cn/simple
    pip install matplotlib -i https://pypi.tuna.tsinghua.edu.cn/simple
    pip install numpy==1.23.2 -i https://pypi.tuna.tsinghua.edu.cn/simple
    pip install h5py_cache -i https://pypi.tuna.tsinghua.edu.cn/simple
    pip install opencv-python -i https://pypi.tuna.tsinghua.edu.cn/simple
    pip install tensorboard -i https://pypi.tuna.tsinghua.edu.cn/simple
    pip install lcm -i https://pypi.tuna.tsinghua.edu.cn/simple
```

最后下载软件包，安装isaccgym：

[isaacgym1.zip](https://pan.baidu.com/s/16SiaTsPg5DgqVBoS_1M1gw)(提取码：d43h)

alias a1="conda activate OmniRobCtrl"

```bash theme={null}
    cd isaacgym/python && pip install -e .alias a1="conda activate OmniRobCtrl"
```

最后，为了快速的激活conda空间，原始命令为conda activate OmniRobCtrl，则可以修改.bashrc增加如下的指令快速激活虚拟空间：

```bash theme={null}
    #.bashrc快捷指令刷新环境变量
    alias sd="source devel/setup.bash"
    alias ss="source ~/.bashrc"
    alias a1="conda activate OmniRobCtrl"
```

**注意：Cuda与torch和libtorch（下注配置主要针对运行出错的同学，配置成功可直接跳過）**

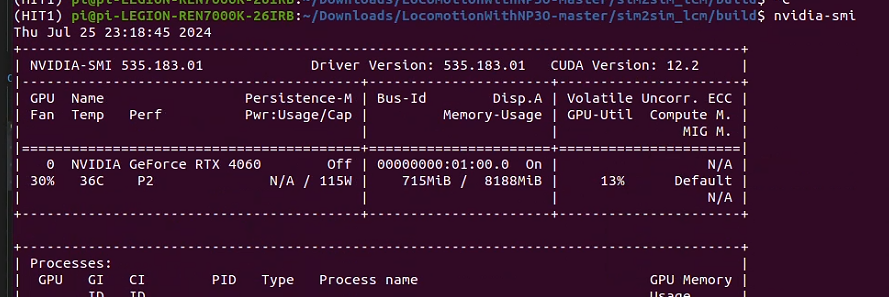
查看显卡驱动情况和支持的最高CUDA版本，**为保证Python和C++版本产生的网络模型一致，最好安装相同的****pytorch****和lib和Cuda，如果出现其他问题请参考如下的流程：**

```plaintext theme={null}
nvidia-smi
```
![media](https://pub-7714d99fbd654288a82d7b2f7be01efb.r2.dev/isaac-gym-rl/009-image-image-14.png)

```python theme={null}
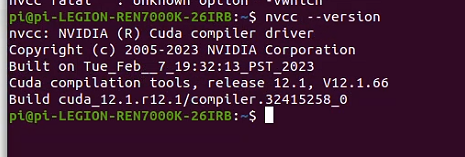
nvcc -V
nvcc: NVIDIA (R) Cuda compiler driver
Copyright (c) 2005-2020 NVIDIA Corporation
Built on Tue_Sep_15_19:10:02_PDT_2020
Cuda compilation tools, release 11.1, V11.1.74
Build cuda_11.1.TC455_06.29069683_0
```

**两个版本不一致：**

**通常，driver api的版本能向下兼容runtime api的版本，即 nvidia-smi 显示的版本大于nvcc --version 的版本通常不会出现大问题。**

其实，只要上去Pytorch官网瞄瞄，细心的你应该能够发现在命令中指定CUDA版本时，用的是 cudatoolkit，而 nvcc --version 显示的版本就是通过CUDA Toolkit Installer在安装时决定的，因此，**我们应该选择与 nvcc --version 对应的CUDA版本匹配的Pytorch**

```python theme={null}
训练代码打印：
PyTorch version 2.3.1+cu121
Device count 1
```

conda create -n OmniRobCtrl python=3.8.10升级CUDA 12.1+pytorch 2.3：

![media](https://pub-7714d99fbd654288a82d7b2f7be01efb.r2.dev/isaac-gym-rl/010-image-image-15.png)

（1）安装CUDA12.1

```python theme={null}
wget https://developer.download.nvidia.com/compute/cuda/12.1.0/local_installers/cuda-repo-ubuntu2004-12-1-local_12.1.0-530.30.02-1_amd64.deb
sudo dpkg -i cuda-repo-ubuntu2004-12-1-local_12.1.0-530.30.02-1_amd64.deb
sudo cp /var/cuda-repo-ubuntu2004-12-1-local/cuda-*-keyring.gpg /usr/share/keyrings/
sudo apt-get update
sudo apt-get -y install cuda
```

修改bashrc：

```python theme={null}
export PATH=/usr/local/cuda/bin:$PATH
export LD_LIBRARY_PATH=/usr/local/cuda/lib64:$LD_LIBRARY_PATH
```

增加软连接，将安装版本对应到系统搜索的目录：

```python theme={null}
sudo ln -s /usr/local/cuda-12.1 /usr/local/cuda
sudo ln -s /usr/local/cuda-10.1 /usr/local/cuda
```

再次查看与Python脚本一致：

![media](https://pub-7714d99fbd654288a82d7b2f7be01efb.r2.dev/isaac-gym-rl/011-image-image-16.png)

（2）安装cudnn版本。注意，这里按照官方即可

[https://developer.nvidia.com/rdp/cudnn-archive#a-collapse805-111](https://developer.nvidia.com/rdp/cudnn-archive#a-collapse805-111)

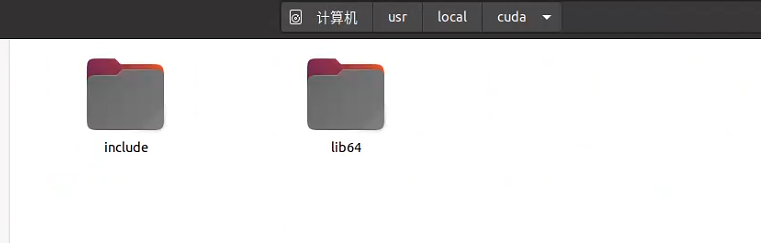
从官网下载执行文件解压，查看软连接后是否存在如下文件夹，没有**在usr/local下新建cuda文件夹**：

![media](https://pub-7714d99fbd654288a82d7b2f7be01efb.r2.dev/isaac-gym-rl/012-image-image-17.png)

采用指令吧全部下载文件复制进去：

```python theme={null}
sudo cp lib64/* /usr/local/cuda/lib64
sudo cp include/* /usr/local/cuda/include
sudo chmod a+r /usr/local/cuda/include/* /usr/local/cuda/lib64/*

sudo cp lib64/* /usr/local/cuda-10.1/lib64
sudo cp include/* /usr/local/cuda-10.1/include
sudo chmod a+r /usr/local/cuda-10.1/include/* /usr/local/cuda-10.1/lib64/*

```

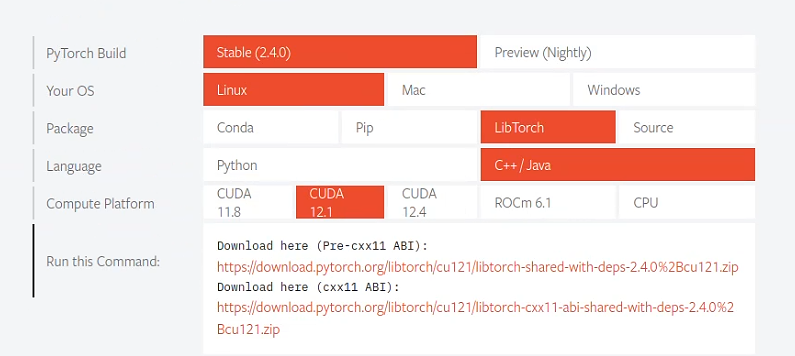
（3）安装libtorch

![media](https://pub-7714d99fbd654288a82d7b2f7be01efb.r2.dev/isaac-gym-rl/013-image-image-18.png)

下载后，修改C++文件的cmakelist：

```python theme={null}
# 找到 CUDA
find_package(CUDA REQUIRED)
rl_examples.md：如何训练RL任务（最常看）​
•
framework.md：整个框架怎么运作​
•
domain_randomization.md：如何随机化环境​
•
factory.md、industreal.md：某些任务的详细介绍set(CUDA_INCLUDE_DIRS "/usr/local/cuda/include")
include_directories(${CUDA_INCLUDE_DIRS})
set(CUDA_LIBRARY_DIRS "/usr/local/cuda/lib64")
link_directories(${CUDA_LIBRARY_DIRS})

# 设置 LibTorch 的路径
set(Torch_DIR "/home/pi/Downloads/troch_env/libtorch/share/cmake/Torch")  # 将此路径替换为你解压 LibTorch 的路径

# 添加 LibTorch 的路径
find_package(Torch REQUIRED)
```

如果替换cuda后cmake出现nvcc查找版本：

```python theme={null}
/usr/bin/nvcc -x cu -c /home/pi/Downloads/LocomotionWithNP3O-master/sim2sim_lcm/build/CMakeFiles/CMakeTmp/main.cu -o CMakeFiles/cmTC_e1b46.dir/main.cu.o
/usr/bin/nvcc: 3: exec: /usr/local/cuda-11.1/bin/nvcc: not found
```

则需要采用新cuda文件bin中的nvcc进行替换：

```python theme={null}
sudo cp /usr/local/cuda/bin/nvcc /usr/bin/nvcc
```

遇到gcc版本问题：

```python theme={null}
rt/host_config.h:138:2: error: #error -- unsupported GNU version! gcc versions later than 8 are not supported!
| #error -- unsupported GNU version! gcc versions later than 8 are not supported!
```

```python theme={null}
gcc --version
gcc (Ubuntu 9.4.0-1ubuntu1~20.04.2) 9.4.0
Copyright (C) 2019 Free Software Foundation, Inc.
This is free software; see the source for copying conditions.  There is NO
warranty; not even for MERCHANTABILITY or FITNESS FOR A PARTICULAR PURPOSE.

ls /usr/bin/gcc*
```

![media](https://pub-7714d99fbd654288a82d7b2f7be01efb.r2.dev/isaac-gym-rl/014-image-image-19.png)

```python theme={null}
sudo update-alternatives --install /usr/bin/gcc gcc /usr/bin/gcc-8 150
sudo update-alternatives --install /usr/bin/gcc gcc /usr/bin/gcc-9 50
sudo update-alternatives --config gcc
```

sh: 1: cicc: not found错误

```python theme={null}
sudo ln -s /usr/local/cuda/nvvm/bin/cicc /usr/bin/cicc
```

python训练找不到nccl：

```python theme={null}
wget https://developer.download.nvidia.com/compute/cuda/repos/ubuntu2004/x86_64/cuda-keyring_1.0-1_all.deb
sudo dpkg -i cuda-keyring_1.0-1_all.deb
sudo apt-get update
sudo apt install libnccl2=2.18.3-1+cuda12.1 libnccl-dev=2.18.3-1+cuda12.1 
```

```python theme={null}
conda install -c pytorch nccl2
```

```python theme={null}
 sudo cp include/* /usr/local/cuda/include 
```

```python theme={null}
 sudo cp lib/* /usr/local/cuda
```

Linking CUDA executable cmTC\_0dd9b错误：

/usr/bin/cmake -E cmake\_link\_script CMakeFiles/cmTC\_0dd9b.dir/link.txt --verbose=1
""   CMakeFiles/cmTC\_0dd9b.dir/main.cu.o -o cmTC\_0dd9b
Error running link command: No such file or directory

```python theme={null}
sudo apt install cuda-command-line-tools-12-1 
```

cmake过程报错：

```bash theme={null}
-- Found CUDA: /usr/local/cuda-12.1 (found version "12.1")  -- Could NOT find CUDA (missing: CUDA_NVCC_EXECUTABLE) (found version "12.1") CMake Warning at /home/pi/Downloads/troch_env/libtorch/share/cmake/Caffe2/public/cuda.cmake:31 (“message):   Caffe2: CUDA cannot be found.  Depending on whether you are building Caffe2   or a Caffe2 dependent library, the next warning / error will give you more   info. Call Stack (most recent call first):   /home/pi/Downloads/troch_env/libtorch/share/cmake/Caffe2/Caffe2Config.cmake:86 (include)   /home/pi/Downloads/troch_env/libtorch/share/cmake/Torch/TorchConfig.cmake:68 (find_package)   CMakeLists.txt:27 (find_package)   CMake Error at /home/pi/Downloads/troch_env/libtorch/share/cmake/Caffe2/Caffe2Config.cmake:90 (message):   Your installed Caffe2 version uses CUDA but I cannot find the CUDA   libraries.  Please set the proper CUDA prefixes and / or install CUDA. Call Stack (most recent call first):   python 1080_balls_of_solitude.py --headless --num_envs=1/home/pi/Downloads/troch_env/libtorch/share/cmake/Torch/TorchConfig.cmake:68 (find_package)   CMakeLists.txt:27 (find_package)   -- Configuring incomplete, errors occurred!
```

但是实际上错误不在Could NOT find CUDA (missing: CUDA\_NVCC\_EXECUTABLE) (found version "12.1") 上，如果采用更高版本的cmake（3.25），就会出现更准确的错误信息如下：

```bash theme={null}
CMake Error at /usr/local/share/cmake-3.25/Modules/CMakeDetermineCompilerId.cmake:739 (message):   Compiling the CUDA compiler identification source file   "CMakeCUDACompilerId.cu" failed.
```

**在cmakelist中添加set(CMAKE\_CUDA\_COMPILER "/usr/local/你的cuda版本/bin/nvcc")**

## 1.2 运行测试（安装正常，跳转这里）：

启动train训练脚本，开始对模型进行训练:

```plaintext theme={null}
python train.py task=Cartpole
```

通过加载模型，load per-train载入预训练结果:

```solidity theme={null}
python train.py task=Ant checkpoint=runs/Ant/nn/Ant.pth
```

***

通过运行例程，首先可以了解train脚本的参数输入：

train.py 文件描述

* `device_type`the type of device used for simulation. `cuda` or `cpu`.
* `device_id`ID of the device used for simulation. eg `0` for a single GPU workstation.
* `rl_device`Full `name:id` string of the device that the RL framework is using.

`headless` - `True`/`False` depending on whether you want the simulation to run the simulation with a viewer.

* `physics_engine`which physics engine to use. Must be `"physx"` or `"flex"`.
* `env`a dictionary with environment-specific parameters. Can include anything in here you want depending on the specific parameters, but key ones which you must provide are:
* `numEnvs`number of environments being simulated in parallel
* `numObservations`size of the observation vector used for each environment.
* `numActions`size of the actions vector.

同时，了解基本的RL框架包括环境参数和强化学习参数：

训练环境包括了环境数量，输入输出维度定义等参数，参数配置env文件yaml为:

```plaintext theme={null}
/home/pi/Downloads/humanplus-main/IsaacGymEnvs-main/isaacgymenvs/cfg/task/Cartpole.yaml
```

强化学习目前一般采用PPO训练方法，其参数yaml为:

```plaintext theme={null}
/home/pi/Downloads/humanplus-main/IsaacGymEnvs-main/isaacgymenvs/cfg/train/CartpolePPO.yaml
```

同时了解了对于一个新RL工程如何建议并注册在Task参数中，新建任务在：

```bash theme={null}
/home/pi/Downloads/humanplus-main/IsaacGymEnvs-main/isaacgymenvs/tasks/__init__.py
```

```bash theme={null}
# Mappings from strings to environments
isaacgym_task_map =
```

新任务建立后，同时需要在task目录下新增learning和task对应名称后缀的yaml文件！

了解了项目框架下机器人模型一般放置在asset目录下：

```bash theme={null}
/home/pi/Downloads/humanplus-main/IsaacGymEnvs-main/assets/urdf/cartpole.urdf
```

对于一个RL项目整体框架代码流程如下：

```bash theme={null}
def create_sim(self):
    # implement sim set up and environment creation here
    #    - set up-axis
    #    - call super().create_sim with device args (see docstring)
    #    - create ground plane
    #    - set up environments
    
#在执行仿真前需要计算的内容，比如智能体的动作计算。我们在这里设置了目标agent受到3个坐标系方向的推力，并且每次增加的是推力的变化量，同时对最大推力进行了限幅。
def pre_physics_step(self, actions):#前处理完成期望和绕道增加
    # implement pre-physics simulation code here
    #    - e.g. apply actions

def post_physics_step(self):#后处理完成观测和奖励更新
    # implement post-physics simulation code here
    #    - e.g. compute reward, compute observations
```

原始项目中通过reset\_buf标志位来判断哪个环境复位，复位条件一般为到达复位摔倒状态或者满足这次回合训练次数：

```python theme={null}
    # adjust reward for reset agents 复位奖励
    reward = torch.where(torch.abs(cart_pos) > reset_dist, torch.ones_like(reward) * -2.0, reward)#小车位置超出偏差给负数奖励
    reward = torch.where(torch.abs(pole_angle) > np.pi / 2, torch.ones_like(reward) * -2.0, reward)#倒立摆摔倒 给负奖励

    reset = torch.where(torch.abs(cart_pos) > reset_dist, torch.ones_like(reset_buf), reset_buf) #当达到前面条件 reset_buf进行赋值 
    reset = torch.where(torch.abs(pole_angle) > np.pi / 2, torch.ones_like(reset_buf), reset)
    reset = torch.where(progress_buf >= max_episode_length - 1, torch.ones_like(reset_buf), reset)
```

因此在post后处理时会实时检测那个reset\_buf为1，则对对应环境复位：

```python theme={null}
    def post_physics_step(self):
        self.progress_buf += 1
  
        self.gym.refresh_actor_root_state_tensor(self.sim)#刷新tensor相关数据
        self.gym.refresh_net_contact_force_tensor(self.sim)
        self.gym.refresh_rigid_body_state_tensor(self.sim)
        env_ids = self.reset_buf.nonzero(as_tuple=False).squeeze(-1)
        if len(env_ids) > 0:#检测满足复位标志位1的环境ID
            self.reset_idx(env_ids)
```

另外是一些常规的配置：

（1）设置最大训练步骤在PPO.yaml中：

```python theme={null}
    score_to_win: 20000
    max_epochs: ${resolve_default:10000,${....max_iterations}}
```

（2）设置训练环境参数如个数、控制范围等，在env的yaml中：

```python theme={null}
env:
  numEnvs: ${resolve_default:512,${...num_envs}}
  envSpacing: 4.0  #空间尺寸
  resetDist: 3.0   #小车位置复位判断
  maxEffort: 400.0 #最大控制量扭矩

  clipObservations: 5.0
  clipActions: 1.0

  randomCommandPosRanges: 1 #控制范围
```

## 1.3 在项目的学习中了解到Gym API和tensor相关用法：

refresh\_dof\_state\_tensor 此函数将使用物理引擎的最新值填充张量。从这个张量创建的所有视图或切片都将自动更新

```bash theme={null}
Sim: “Sim”是指模拟器（simulator），是仿真的核心组件。它负责处理物理计算和仿真的所有细节，如动力学、碰撞检测和其他物理交互。Isaac Gym使用NVIDIA PhysX作为其后端物理引擎，可以高效地在GPU上运行。在代码中的体现是，调用sim可以完成对模拟器的step。

Env: “Env”是指环境（environment），是智能体（agent）进行学习和互动的场所。每个环境包含了特定的任务或场景设置，智能体需要在这些环境中执行操作以获取奖励并学习策略。

Actor: “Actor”是在仿真中表示具有物理属性的对象，如机器人、物体等。每个Actor包括了用于描述其形状、质量、动力学属性等的各种参数。Actors是智能体与环境互动的主体，例如一个机器人的手臂或车辆。

Rigid: “Rigid”，刚体，是一种物理对象，其形状在仿真过程中不会发生变化。在Isaac Gym中，刚体用来表示那些不需要弹性或变形特性的实体。刚体动力学是计算这些对象如何在力和碰撞作用下移动和反应的基础。

Index / indcies: 这是一个很容易混淆的概念，特别是在多env多actor，每个actor拥有1个以上rigid时。理解index的索引获取和它代表的对象非常重要。
```

举例在倒立摆例子中读取观测：

```bash theme={null}
def compute_observations(self, env_ids=None):
        if env_ids is None:
            env_ids = np.arange(self.num_envs)

        self.gym.refresh_dof_state_tensor(self.sim) #从仿真器获取数据

        self.obs_buf[env_ids, 0] = self.dof_pos[env_ids, 0].squeeze()
        self.obs_buf[env_ids, 1] = self.dof_vel[env_ids, 0].squeeze()
        self.obs_buf[env_ids, 2] = self.dof_pos[env_ids, 1].squeeze()
        self.obs_buf[env_ids, 3] = self.dof_vel[env_ids, 1].squeeze()
```

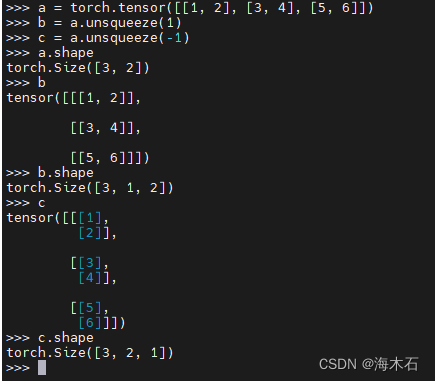
### 1.3.1 squeeze()方法语法

```python theme={null}
numpy.squeeze(a, axis=None)
```

其中，参数a是需要操作的数组，axis是要删除的维度。若不指定axis参数，则squeeze()方法会[删除所有](https://so.csdn.net/so/search?q=%E5%88%A0%E9%99%A4%E6%89%80%E6%9C%89\&spm=1001.2101.3001.7020)长度为1的维度，主要功能时降维排列：

![media](https://pub-7714d99fbd654288a82d7b2f7be01efb.r2.dev/isaac-gym-rl/015-image-image-20.png)

### 1.3.2 torch.where()常规用法

> torch.where(condition, x, y)
>
> 根据条件，也就是condiction，返回从x或y中选择的元素的张量（这里会创建一个新的张量，新张量的元素就是从x或y中选的，形状要符合x和y的广播条件）。
>
> Parameters解释如下：
>
> 1、condition (bool型张量) ：当condition为真，返回x的值，否则返回y的值
>
> 2、x (张量或标量)：当condition=True时选x的值
>
> 2、y (张量或标量)：当condition=False时选y的值

![media](https://pub-7714d99fbd654288a82d7b2f7be01efb.r2.dev/isaac-gym-rl/016-image-image-21.png)

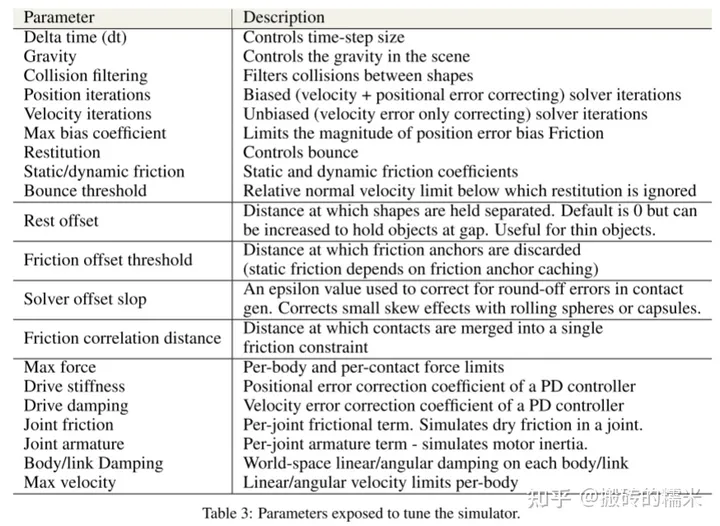
**API说明：**

(API介绍在isaacgym/docs/api/python/gym\_py.html这个文件中，用浏览器打开这个文件查看即可。)

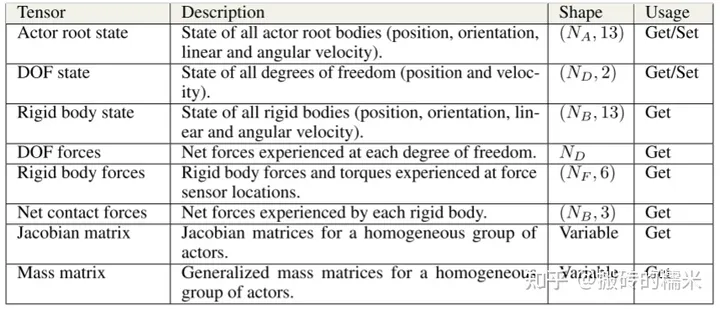
**1) isaacgym.gymapi.Gym.acquire\_actor\_root\_state\_tensor()**

检索Actor root states缓冲区，包含位置\[0:3], 旋转\[3:7], 线速度\[7:10], 角速度\[10:13]

isaacgym.gymapi.Gym.refresh\_actor\_root\_state\_tensor()

更新actor root state缓冲区

**2) saacgym.gymapi.Gym.acquire\_dof\_state\_tensor()**

检索DoF state缓冲区2阿，维度为(num\_dofs,2), 每一个dof state包含位置和速度

isaacgym.gymapi.Gym.refresh\_dof\_state\_tensor()

更新DOF state缓冲区

**3) isaacgym.gymapi.Gym.acquire\_net\_contact\_force\_tensor()**

检索net contact forces缓冲区，维度为(num\_net\_contactes,3), 每个接触力状态包含x,y,z轴的一个值。

isaacgym.gymapi.Gym.refresh\_net\_contact\_force\_tensor()

更新net contact forces缓冲区

**4) isaacgym.gymapi.Gym.acquire\_rigid\_body\_state\_tensor()**

检索rigid body states缓冲区，维度为(num\_rigid\_bodies,13), 每个刚体的状态包含位置\[0:3], 旋转\[3:7], 线速度\[7:10], 角速度\[10:13]

isaacgym.gymapi.Gym.refresh\_rigid\_body\_state\_tensor()

更新rigid body state缓冲区

**5) saacgym.gymapi.Gym.acquire\_force\_sensor\_tensor()**

检索force sensors缓冲区，维度为(num\_force\_sensor, 6)，每个力传感器状态包含3维力，3维力矩。

isaacgym.gymapi.Gym.refresh\_force\_sensor\_tensor

更新force sensors缓冲区
![media](https://pub-7714d99fbd654288a82d7b2f7be01efb.r2.dev/isaac-gym-rl/017-image-image-22.png)

访问张量的内容，可以使用：

```python theme={null}
root_tensor = gymtorch.wrap_tensor(_root_tensor)
```

强化学习模型复位，在计算奖励时候进行判断采用where进行赋值

```bash theme={null}
reset = torch.where(torch.abs(cart_pos) > reset_dist, torch.ones_like(reset_buf), reset_buf) #当达到前面条件 reset_buf进行赋值 为1的张量
```

在判断某个环境满足为1条件时进行复位：

```bash theme={null}
env_ids = self.reset_buf.nonzero(as_tuple=False).squeeze(-1)
if len(env_ids) > 0:
   self.reset_idx(env_ids)
```

倒立摆增加控制指令：

```bash theme={null}
self.command_pos_range = self.cfg["env"]["randomCommandPosRanges"]
self.commands = torch.zeros(self.num_envs, 1, dtype=torch.float, device=self.device, requires_grad=False)#增加控制指令
```
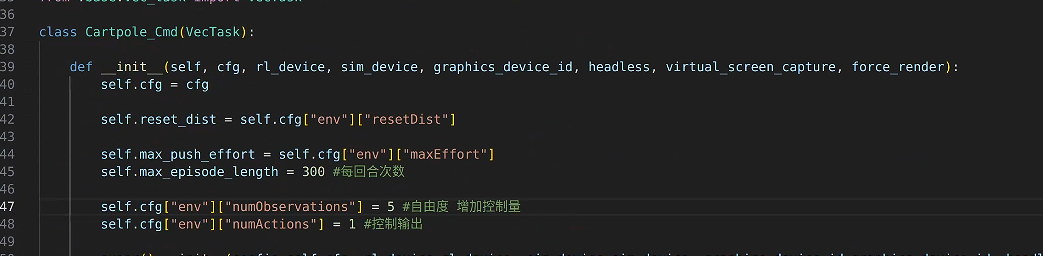
在奖励增加新的变量需要定义接口变量类型：

```bash theme={null}
 # type: (Tensor,Tensor, Tensor, Tensor, Tensor, float, Tensor, Tensor, float) -> Tuple[Tensor, Tensor]
```

参考isaac gym的例程franka\_ cube\_ik\_osc.py其中，涉及使用函数：

```bash theme={null}
gym.get_actor_rigid_body_index，DOMAIN_SIM表示返回sim中的句柄，DOMAIN_ENV则是返回env中的句柄。
box_idx = gym.get_actor_rigid_body_index(env, box_handle, 0, gymapi.DOMAIN_SIM)
box_idxs.append(box_idx)
gym.find_actor_rigid_body_handle，查找给定名称的actor刚体句柄。
hand_handle = gym.find_actor_rigid_body_handle(env, franka_handle, "panda_hand")
hand_pose = gym.get_rigid_transform(env, hand_handle)
gym.find_actor_rigid_body_index，使用此函数可查找状态缓冲区中刚体的索引。
hand_idx = gym.find_actor_rigid_body_index(env, franka_handle, "panda_hand", gymapi.DOMAIN_SIM)
hand_idxs.append(hand_idx)
```

以上带有DOMAIN\_SIM一类参数函数是部分查找函数的集合，所以有更多不同名称的调用方法，具体见handbook。

获取index后即可切片读取信息：

```bash theme={null}
box_pos = rb_states[box_idxs, :3]
box_rot = rb_states[box_idxs, 3:7] 
hand_pos = rb_states[hand_idxs, :3]
hand_rot = rb_states[hand_idxs, 3:7]
hand_vel = rb_states[hand_idxs, 7:]
```

***

# 阶段2 修改倒立摆例子并学习IsaccGymEnv其他项目

## 2.1 尝试修改例程

Gym自带的倒立摆例子中只实现了保证倒立摆的竖直并且要求小车动作Action指令最优化，通过训练很快智能体就可以实现对倒立摆的平衡，但在传统控制课程中除了对倒立摆姿态的平衡外还需要对小车位置进行控制，因此需要对RL例子进行修改：

![media](https://pub-7714d99fbd654288a82d7b2f7be01efb.r2.dev/isaac-gym-rl/018-image-image-23.png)

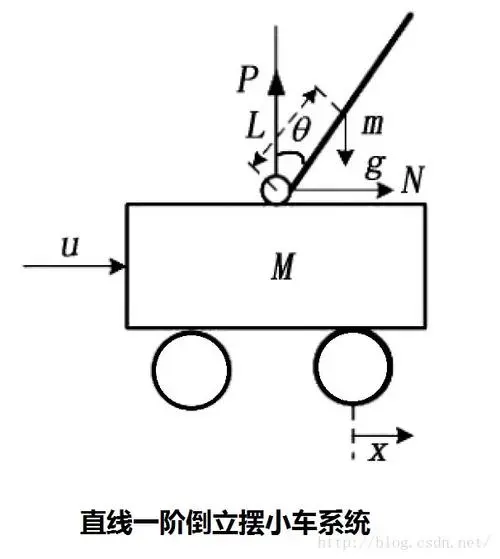
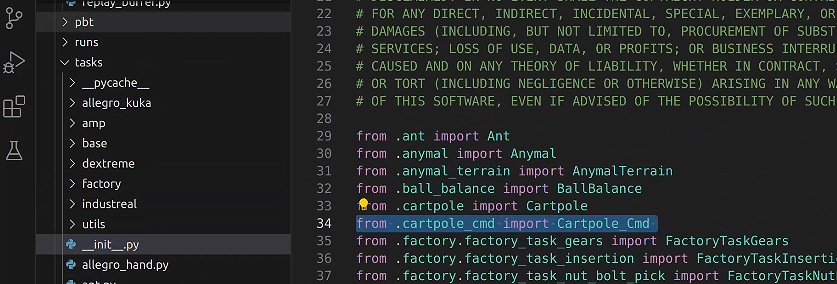
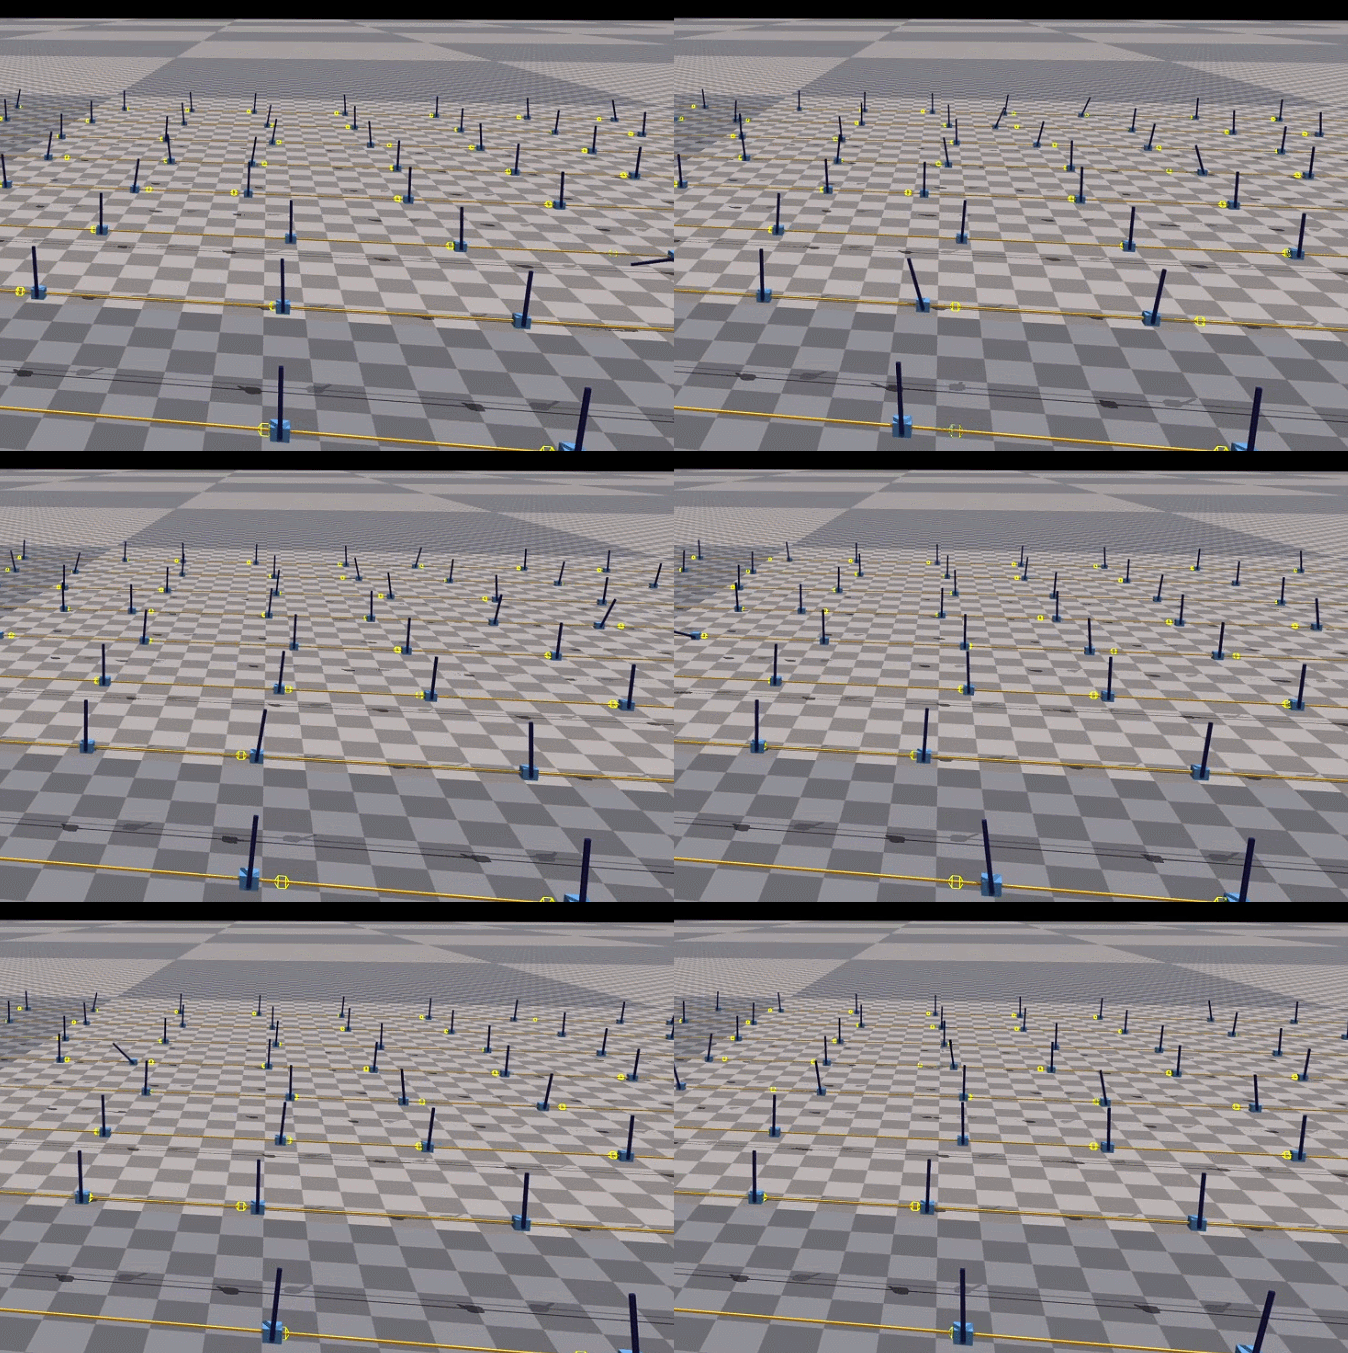
如上图为典型的一阶小车倒立摆carpole的动力学模型，通过控制小车左右的速度或者扭矩实现对倒立摆姿态的控制，其观测包括了小车的位置、速度，倒立摆的角度和角速度，控制输入为小车的速度或者直线电机的力矩，则控制任务为设计一个最优控制器让倒立摆保持竖直，上述例子在IsaccGym中为原始的carpole例子，其可以训练倒立摆完成竖直和启摆过程。在完成对原始例子的学习后可以进一步进行修改尝试，例如进一步完成对在小车竖直情况下对小车位置的控制，则首先依据之前的内容增加相应的任务carpole\_cmd，并在task进行注册，复制修改相应的yaml文件：

![media](https://pub-7714d99fbd654288a82d7b2f7be01efb.r2.dev/isaac-gym-rl/019-image-image-24.png)

在我们提供的例子里，控制任务增加了新的期望指令，因此需要再观测中增加对应的期望位置的观察维度，并修改对应的观察获取程序：

```python theme={null}
def compute_observations(self, env_ids=None):
        if env_ids is None:
            env_ids = np.arange(self.num_envs)

        self.gym.refresh_dof_state_tensor(self.sim) #从仿真器获取数据

        self.obs_buf[env_ids, 0] = self.dof_pos[env_ids, 0].squeeze()#小车位置 相对还是绝对
        self.obs_buf[env_ids, 1] = self.dof_vel[env_ids, 0].squeeze()#小车速度
        self.obs_buf[env_ids, 2] = self.dof_pos[env_ids, 1].squeeze()#倒立摆角度
        self.obs_buf[env_ids, 3] = self.dof_vel[env_ids, 1].squeeze()#倒立摆角速度
        self.obs_buf[env_ids, 4] = self.commands[env_ids].squeeze() #新增观测
```

为了满足控制指令的需求，项目中增加新的控制维度：

```python theme={null}
        self.command_pos_range = self.cfg["env"]["randomCommandPosRanges"]#控制指令
        self.commands = torch.zeros(self.num_envs, 1, dtype=torch.float, device=self.device, requires_grad=False)#增加控制指令
```

![media](https://pub-7714d99fbd654288a82d7b2f7be01efb.r2.dev/isaac-gym-rl/020-image-image-25.png)

在代码中，增加小车位置的奖励：

```python theme={null}
@torch.jit.script
def compute_cartpole_reward(command,pole_angle, pole_vel, cart_vel, cart_pos,
                            reset_dist, reset_buf, progress_buf, max_episode_length):
    # type: (Tensor, Tensor, Tensor, Tensor, Tensor, float, Tensor, Tensor, float) -> Tuple[Tensor, Tensor]

    # reward is combo of angle deviated from upright, velocity of cart, and velocity of pole moving
    reward = 1.0 - pole_angle * pole_angle*0.5 - 0.01 * torch.abs(cart_vel) - 0.01 * torch.abs(pole_vel) - torch.abs(command-cart_pos)*0.8
```

需要注意的是compute\_cartpole\_reward中增加新接口输入需要再type处注释位置增加对应的类型

在每次复位时重新设定期望位置：

```python theme={null}
    def reset_idx(self, env_ids):#重置本id的环境直接通过设置仿真器接口
        positions = 1 * (torch.rand((len(env_ids), self.num_dof), device=self.device) - 0.5) #随机设置状态位置
        velocities = 0.5 * (torch.rand((len(env_ids), self.num_dof), device=self.device) - 0.5) #随机设置状态速度

        self.dof_pos[env_ids, :] = positions[:]
        self.dof_vel[env_ids, :] = velocities[:]

        env_ids_int32 = env_ids.to(dtype=torch.int32)
        self.gym.set_dof_state_tensor_indexed(self.sim,
                                              gymtorch.unwrap_tensor(self.dof_state),
                                              gymtorch.unwrap_tensor(env_ids_int32), len(env_ids_int32))
        #随机期望位置
        self.commands[env_ids] = torch_rand_float(-self.command_pos_range , self.command_pos_range, (len(env_ids), 1), device=self.device)#随机控制指令
```

运行脚本，进行训练：

```python theme={null}
python train.py task=Cartpole_Cmd
```
![media](https://pub-7714d99fbd654288a82d7b2f7be01efb.r2.dev/isaac-gym-rl/021-image-image-26.gif)

## 2.2 学习Gym可视化和API接口

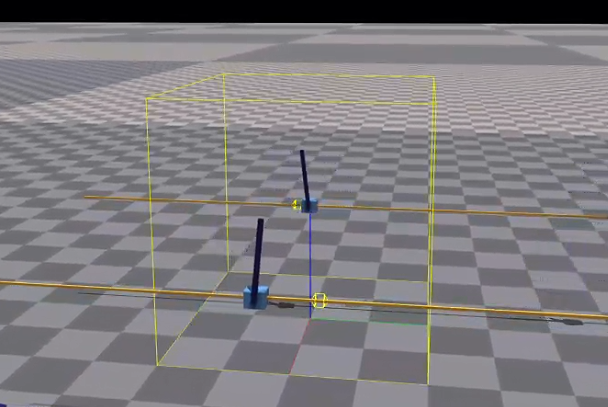
原始的仿真中并没有期望位置因此非常容易从可视化中（**在可视化界面按键v可以停止渲染加速训练过程，按键空格可以暂停**）看到倒立摆竖直，但在增加期望位置后我们无法判断小车是否达到了期望位置，因此需要通过可视化的方式在各训练空间中增加一个标志物。由于在建立环境的时候实在gym统一的一个大世界新建了很多小的虚拟环境，因此大家是有一个统一的世界坐标系，通过交互UI可以看到不同虚拟环境的中心原点：

![media](https://pub-7714d99fbd654288a82d7b2f7be01efb.r2.dev/isaac-gym-rl/022-image-image-27.png)

在creat\_env中可以看到可以设置环境空间尺寸和数量来实现批量世界的建立：

```python theme={null}
        for i in range(self.num_envs):#并形构建虚拟空间
            # create env instance 建立多个虚拟世界
            env_ptr = self.gym.create_env(
                self.sim, lower, upper, num_per_row
            )
            
            cartpole_handle = self.gym.create_actor(env_ptr, cartpole_asset, pose, "cartpole", i, 1, 0)

            dof_props = self.gym.get_actor_dof_properties(env_ptr, cartpole_handle)
            dof_props['driveMode'][0] = gymapi.DOF_MODE_EFFORT #采用扭矩模式
            dof_props['driveMode'][1] = gymapi.DOF_MODE_NONE
            dof_props['stiffness'][:] = 0.0
            dof_props['damping'][:] = 0.0
            self.gym.set_actor_dof_properties(env_ptr, cartpole_handle, dof_props)

            self.envs.append(env_ptr)
            self.cartpole_handles.append(cartpole_handle)
```

由于所有模型都是在同一的世界坐标系下，但是通过定义不同的张量可以确定传感器数据是在root还是dof下：

```python theme={null}
        dof_state_tensor = self.gym.acquire_dof_state_tensor(self.sim) #从仿真器获取传感器信息 相对URDF-----------------------
        self.dof_state = gymtorch.wrap_tensor(dof_state_tensor)#转换为torch张量
```

因此绘制期望位置时候首先需要获取各虚拟空间在世界坐标系下的原点位置，然后再加上相对原点的偏差进行绘制就行：

```python theme={null}
        if 1:#self.viewer and self.debug_viz:
            for i in range(self.num_envs):
                #i=23
                #self.cfg["env"]['envSpacing']
                origin = self.gym.get_env_origin(self.envs[i])#<<-----------------获取空间原点
                location=(origin.x, self.commands[i]+origin.y , 2.0)
                color=(1, 1, 0)
                self.draw_sphere(location,color)
                #gymutil.draw_lines(sphere_geom, self.gym, self.viewer, 0, sphere_pose)
```

get\_env\_origin即获取虚拟空间位置的gym接口，draw\_sphere调用了gym绘制接口：

```python theme={null}
    def draw_sphere(self, location, color):
        #self.gym.clear_lines(self.viewer)
        sphere_geom = gymutil.WireframeSphereGeometry(0.1, 3, 3, None, color)
        pose = gymapi.Transform(gymapi.Vec3(location[0], location[1], location[2]), r=None)
        gymutil.draw_lines(sphere_geom, self.gym, self.viewer, self.envs[0], pose)
```

## 2.3 在该阶段**进一步学习torch的函数调用方法：**

### 2.3.1 **torch中的clamp方法**

clamp用于对tensor按照指定范围进行裁剪，tensor.clamp(min, max)将会将tensor中小于min的取为min，大于max的取为max，而在min和max区间内的保留。

```bash theme={null}
a=tensor([ 0.5302,  0.0820,  0.6439, -0.4095])
a.clamp(0,0.5)    # tensor([0.5000, 0.0820, 0.5000, 0.0000])
```

```bash theme={null}
self.dof_pos[env_ids] = tensor_clamp(self.initial_dof_pos[env_ids] + positions, self.dof_limits_lower, self.dof_limits_upper)#随机关节角度但是限制在限位范围
self.dof_vel[env_ids] = velocities
```

从网络action输出转换Joint控制输入的扭矩：

```bash theme={null}
    def pre_physics_step(self, actions):#1
        self.actions = actions.clone().to(self.device)#PPO产生
        forces = self.actions * self.joint_gears * self.power_scale#转换力矩指令
        force_tensor = gymtorch.unwrap_tensor(forces)
        self.gym.set_dof_actuation_force_tensor(self.sim, force_tensor)#设置执行器
```

采用torch空间绘制多个内容：

```bash theme={null}
 if 1:#self.viewer and self.debug_viz:
            self.gym.clear_lines(self.viewer)
            self.gym.refresh_actor_root_state_tensor(self.sim)

            points = []
            colors = []
            for i in range(self.num_envs):
                origin = self.gym.get_env_origin(self.envs[i])
                pose = self.root_states[:, 0:3][i].cpu().numpy()
                glob_pos = gymapi.Vec3(origin.x + pose[0], origin.y + pose[1], origin.z + pose[2])
                points.append([glob_pos.x, glob_pos.y, glob_pos.z, glob_pos.x + 4 * self.heading_vec[i, 0].cpu().numpy(),
                               glob_pos.y + 4 * self.heading_vec[i, 1].cpu().numpy(),
                               glob_pos.z + 4 * self.heading_vec[i, 2].cpu().numpy()])
                colors.append([0.97, 0.1, 0.06])
                points.append([glob_pos.x, glob_pos.y, glob_pos.z, glob_pos.x + 4 * self.up_vec[i, 0].cpu().numpy(), glob_pos.y + 4 * self.up_vec[i, 1].cpu().numpy(),
                               glob_pos.z + 4 * self.up_vec[i, 2].cpu().numpy()])
                colors.append([0.05, 0.99, 0.04])

            self.gym.add_lines(self.viewer, None, self.num_envs * 2, points, colors)

```

```bash theme={null}
origin = self.gym.get_env_origin(self.envs[i])#<<-----------------获取空间原点https://flowus.cn/jacksonhuangblogs/share/30f9b654-5d05-420b-bb28-c2d3e443a834?code=1T2S2H
【FlowUs 息流】狗王5天带你上手Isacc Gym&RL学习
glob_pos = gymapi.Vec3(origin.x + pose[0], origin.y + pose[1], origin.z + pose[2])
```

### 2.3.2 **torch.ones：**

返回一个填充了标量值1的张量，shape 与 input 相同

torch.ones\_like(input)相当于torch.ones(input)

```bash theme={null}
>>> input = torch.empty(2, 3)
>>> torch.ones_like(input)
tensor([[ 1.,  1.,  1.],
        [ 1.,  1.,  1.]])
```

### 2.3.3 **torch.sum(a, dim=0)求和:**

```bash theme={null}
a = torch.ones((2, 3))
print(a):
tensor([[1, 1, 1],
                 [1, 1, 1]])

a1 =  torch.sum(a)
a2 =  torch.sum(a, dim=0)
a3 =  torch.sum(a, dim=1)

print(a)print(a1)print(a2)
```

```bash theme={null}
    # reset agents
    reset = torch.where(obs_buf[:, 0] < termination_height, torch.ones_like(reset_buf), reset_buf)#结束标志位
    reset = torch.where(progress_buf >= max_episode_length - 1, torch.ones_like(reset_buf), reset)#回合结束标志位
```

***

# 阶段3 学习优秀的开源项目

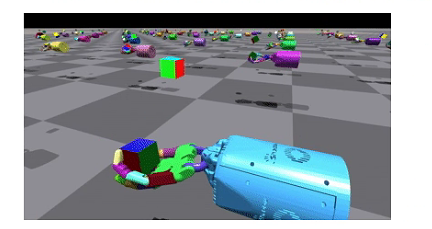
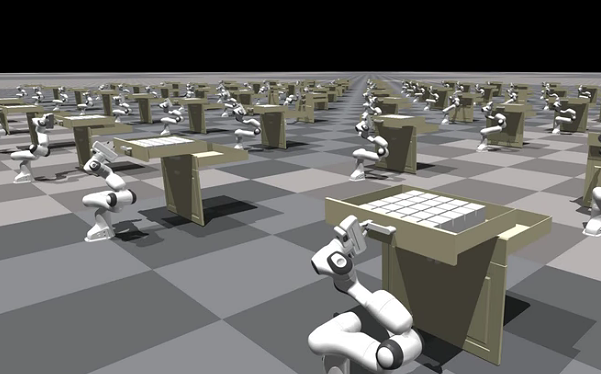
通过学习GymEnv下的例子，可以基本了解到torch和gym的常规接口，在其例子中还有很多五指手、机械臂抓取和作业的例程，都可以详细学习一下如何通过gym接口获取观察并设计奖励函数：

![media](https://pub-7714d99fbd654288a82d7b2f7be01efb.r2.dev/isaac-gym-rl/023-image-image-28.png)

![media](https://pub-7714d99fbd654288a82d7b2f7be01efb.r2.dev/isaac-gym-rl/024-image-image-29.png)

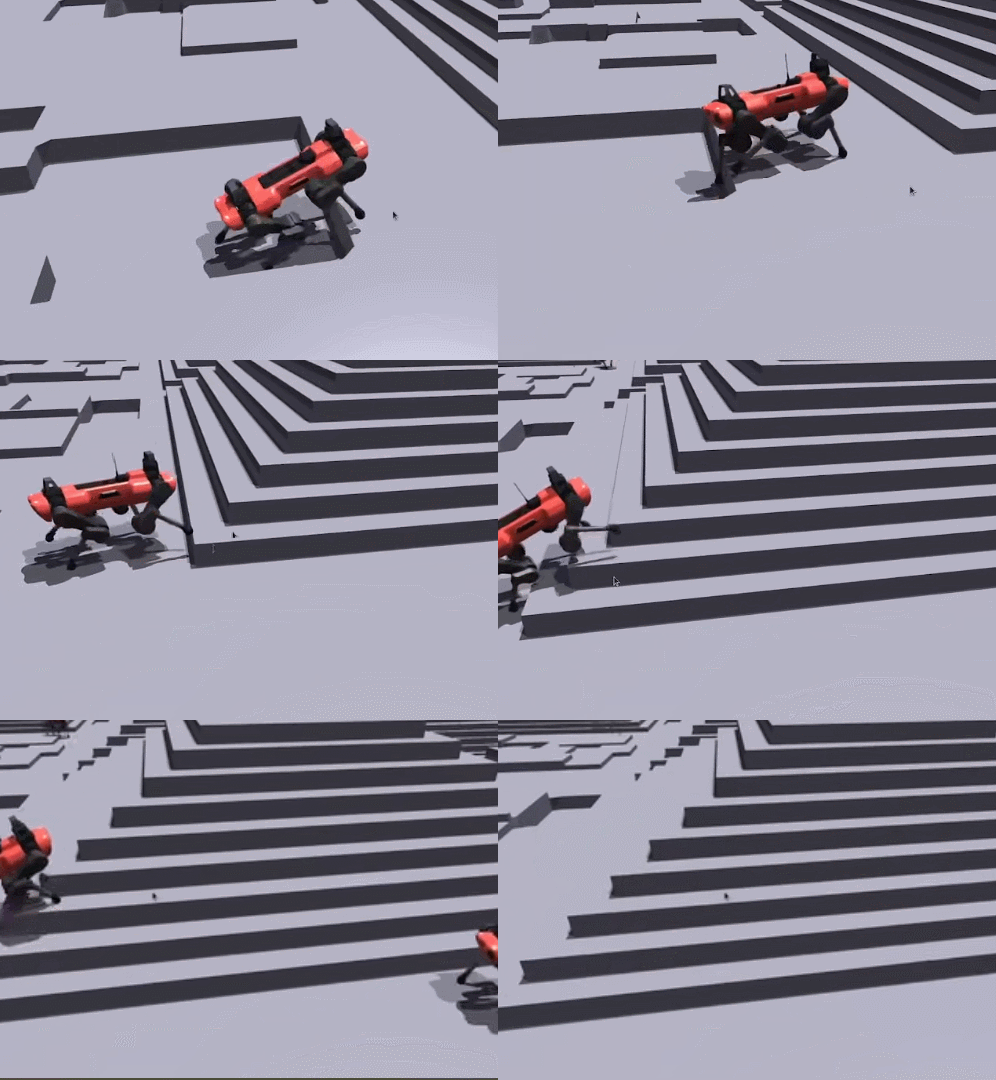
对于腿足式机器人目前主要采用的是RSL实验室开源的LeggedGym强化学习软件包，其针对四足、人形机器人构建了一个统一的训练框架，面向机器人训练需要的地形构建、RD域随机化以及腿足强化奖励、课程设计提供了很多可以参考的例子：

![media](https://pub-7714d99fbd654288a82d7b2f7be01efb.r2.dev/isaac-gym-rl/025-image-image-30.gif)

![media](https://pub-7714d99fbd654288a82d7b2f7be01efb.r2.dev/isaac-gym-rl/026-image-image-31.png)

目前基于该项目已经实现了非常多真实四足机器人的训练与迁移与云深处、宇树、星动等公司都参与该系统进行开发，目前网上也有非常多的开源项目围绕该基础环境进行二次开发，下面推进几个典型的开源项目：

<iframe url="https://www.bilibili.com/video/BV1HUbTesEW1/?vd_source=425167508f9e3d1f23c644a6948470f1" type="0" />

> 注：此处原飞书文档包含一个嵌入表格，已省略，详情请查看原文档。

## 3.1 [LocomotionWithNP3O](https://github.com/zeonsunlightyu/LocomotionWithNP3O)项目学习

通过学习leggedgym例子其基本的内容和一些基本的软件接口如下：

首先是训练环境配置，/configs/tinymal\_constraint\_him.py，由于自建环境一般继承了LeggedRobotCfg 作为基础类，因此很多其中重名的函数和参数将会覆盖，没有的参数将采用LeggedRobotCfg 原始配置：

> 注：此处原飞书文档包含一个嵌入表格，已省略，详情请查看原文档。

（1）定义环境数量和观测

```python theme={null}
class TinymalConstraintHimRoughCfg( LeggedRobotCfg ):
    class env(LeggedRobotCfg.env):
        num_envs = 1024
        n_scan = 187
        n_priv_latent =  4 + 1 + 12 + 12 + 12 + 6 + 1 + 4 + 1 - 3 + 4
        n_proprio = 45 #原始观测
        history_len = 10
        num_observations = n_proprio  + n_priv_latent  + n_scan + history_len*n_proprio
        amao=1
```

（2）依据URDF定义关节角度默认关节角度，一般情况下网络输出会与其进行叠加：

```python theme={null}
        default_joint_angles =
```

（3）控制随机指令范围：

```python theme={null}
    class commands( LeggedRobotCfg.control ):
        curriculum = False
        max_curriculum = 1.
        num_commands = 4  # default: lin_vel_x, lin_vel_y, ang_vel_yaw, heading (in heading mode ang_vel_yaw is recomputed from heading error)
        resampling_time = 5.  # time before command are changed[s]
        heading_command = True  # if true: compute ang vel command from heading error
        global_reference = False
        class ranges:
            lin_vel_x = [-0.5, 0.5]  # min max [m/s]
            lin_vel_y = [-0.5, 0.5]  # min max [m/s]
            ang_vel_yaw = [-0.8, 0.8]  # min max [rad/s]
            heading = [-3.14, 3.14]
            height = [0.12 , 0.2] # m
```

（4）关节PD控制参数，可以独立定义各关节joint名称对应的PD系数：

```python theme={null}
    class control( LeggedRobotCfg.control ):
        # PD Drive parameters:
        control_type = 'P'
        stiffness = {'joint': 3}  # [N*m/rad]
        damping = {'joint': 0.1}     # [N*m*s/rad]
        # action scale: target angle = actionScale * action + defaultAngle
        action_scale = 0.25
        # decimation: Number of control action updates @ sim DT per policy DT
        decimation = 4
        hip_scale_reduction = 1
        use_filter = True
```

（5）域随机化设置，用于迁移：

```python theme={null}
class domain_rand( LeggedRobotCfg.domain_rand):
        randomize_friction = True
        friction_range = [0.2, 2.75]
        randomize_restitution = True
        restitution_range = [0.0,1.0]
        randomize_base_mass = True
        added_mass_range = [-0.15, 0.4]
        randomize_base_com = True
        added_com_range = [-0.03, 0.03]
        push_robots = True
        push_interval_s = 15
        max_push_vel_xy = 0.3

        randomize_motor = True
        motor_strength_range = [0.8, 1.2]#比例系数

        randomize_kpkd = True
        kp_range = [0.8,1.2]#比例系数
        kd_range = [0.8,1.2]

        randomize_lag_timesteps = True
        lag_timesteps = 3
```

（6）训练网络部分，可以设置重新载入网络二次训练resume部分：

```python theme={null}
    class runner( LeggedRobotCfgPPO.runner ):
        run_name = 'test_barlowtwins'
        experiment_name = 'rough_go2_constraint'
        policy_class_name = 'ActorCriticMixedBarlowTwins'
        runner_class_name = 'OnConstraintPolicyRunner'
        algorithm_class_name = 'NP3O'
        max_iterations = 6000
        save_interval = 500
        num_steps_per_env = 24
        resume = False #启动后载入下面的pt网络完成二次训练
        resume_path = '/home/pi/Downloads/LocomotionWithNP3O-master/logs/rough_go2_constraint/Jul12_22-17-22_test_barlowtwins/model_1100.pt'
 
```

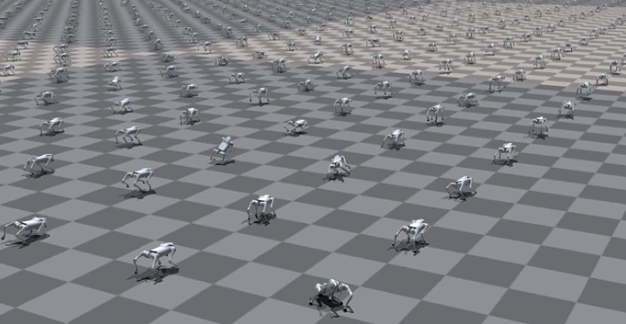
以四足机器人项目为例这边项目，进行训练：

```python theme={null}
python train.py --task=go2N3poHim  
```
![media](https://pub-7714d99fbd654288a82d7b2f7be01efb.r2.dev/isaac-gym-rl/027-image-image-32.png)

## 3.2 学习**必要torch的函数调用方法：**

force sensors are used to indicate contacts with the ground plane on the humanoids' feet.

```bash theme={null}
sensors_per_env = 2
self.vec_sensor_tensor = gymtorch.wrap_tensor(sensor_tensor).view(self.num_envs, sensors_per_env * 6)
```

sensors\_per\_env: 每个环境中的传感器数量。

self.num\_envs: 环境的总数量。

具体代码解释

1. sensors\_per\_env = 2

这行代码定义了每个环境中的传感器数量为2。

2. self.vec\_sensor\_tensor = gymtorch.wrap\_tensor(sensor\_tensor).view(self.num\_envs, sensors\_per\_env \* 6)

这行代码可以分为几个步骤来解释：

gymtorch.wrap\_tensor(sensor\_tensor):

sensor\_tensor是一个原始的传感器数据张量。

gymtorch.wrap\_tensor是一个将原始张量包装为PyTorch张量的函数。这是为了兼容OpenAI Gym和PyTorch，以便可以使用PyTorch的操作来处理这些数据。

.view(self.num\_envs, sensors\_per\_env \* 6):

.view()方法重新调整张量的形状。

self.num\_envs是环境的总数量。

sensors\_per\_env *6表示每个环境中的传感器数据有2* 6 = 12个数据点。

这里的6通常表示每个传感器的数据维度，例如：3个轴上的力和3个轴上的力矩（通常在传感器中会测量这些数据）。

通过这个方法，原始的传感器数据张量被重新调整为一个形状为(self.num\_envs, sensors\_per\_env \* 6)的张量。这意味着每个环境都有一个包含12个数据点的行，共有self.num\_envs行。

建立足端接触传感器：

```bash theme={null}
# create force sensors at the feet
right_foot_idx = self.gym.find_asset_rigid_body_index(humanoid_asset, "right_foot")#建立接触传感器
left_foot_idx = self.gym.find_asset_rigid_body_index(humanoid_asset, "left_foot")
sensor_pose = gymapi.Transform()
self.gym.create_asset_force_sensor(humanoid_asset, right_foot_idx, sensor_pose)
self.gym.create_asset_force_sensor(humanoid_asset, left_foot_idx, sensor_pose)
```

在建立环境时候新建多个对象：

```bash theme={null}
           # add hand - collision filter = -1 to use asset collision filters set in mjcf loader #增加不同的对象在环境中
            allegro_hand_actor = self.gym.create_actor(env_ptr, allegro_hand_asset, shadow_hand_start_pose, "hand", i, -1, 0)
            self.hand_start_states.append([shadow_hand_start_pose.p.x, shadow_hand_start_pose.p.y, shadow_hand_start_pose.p.z,
                                           shadow_hand_start_pose.r.x, shadow_hand_start_pose.r.y, shadow_hand_start_pose.r.z, shadow_hand_start_pose.r.w,
                                           0, 0, 0, 0, 0, 0])
            self.gym.set_actor_dof_properties(env_ptr, allegro_hand_actor, shadow_hand_dof_props)
            hand_idx = self.gym.get_actor_index(env_ptr, allegro_hand_actor, gymapi.DOMAIN_SIM)
            self.hand_indices.append(hand_idx)

            # add object
            object_handle = self.gym.create_actor(env_ptr, object_asset, object_start_pose, "object", i, 0, 0)
            self.object_init_state.append([object_start_pose.p.x, object_start_pose.p.y, object_start_pose.p.z,
                                           object_start_pose.r.x, object_start_pose.r.y, object_start_pose.r.z, object_start_pose.r.w,
                                           0, 0, 0, 0, 0, 0])
            object_idx = self.gym.get_actor_index(env_ptr, object_handle, gymapi.DOMAIN_SIM)
            self.object_indices.append(object_idx)

            # add goal object
            goal_handle = self.gym.create_actor(env_ptr, goal_asset, goal_start_pose, "goal_object", i + self.num_envs, 0, 0)
            goal_object_idx = self.gym.get_actor_index(env_ptr, goal_handle, gymapi.DOMAIN_SIM)
            self.goal_object_indices.append(goal_object_idx)

```

检索ID号：

```bash theme={null}
        #检索ID
        extremity_name = "SHANK" if asset_options.collapse_fixed_joints else "FOOT"
        feet_names = [s for s in body_names if extremity_name in s]
        self.feet_indices = torch.zeros(len(feet_names), dtype=torch.long, device=self.device, requires_grad=False)
        knee_names = [s for s in body_names if "THIGH" in s]
        self.knee_indices = torch.zeros(len(knee_names), dtype=torch.long, device=self.device, requires_grad=False)
        self.base_index = 0
```

***

# 阶段4 尝试移植自己的机器人模型

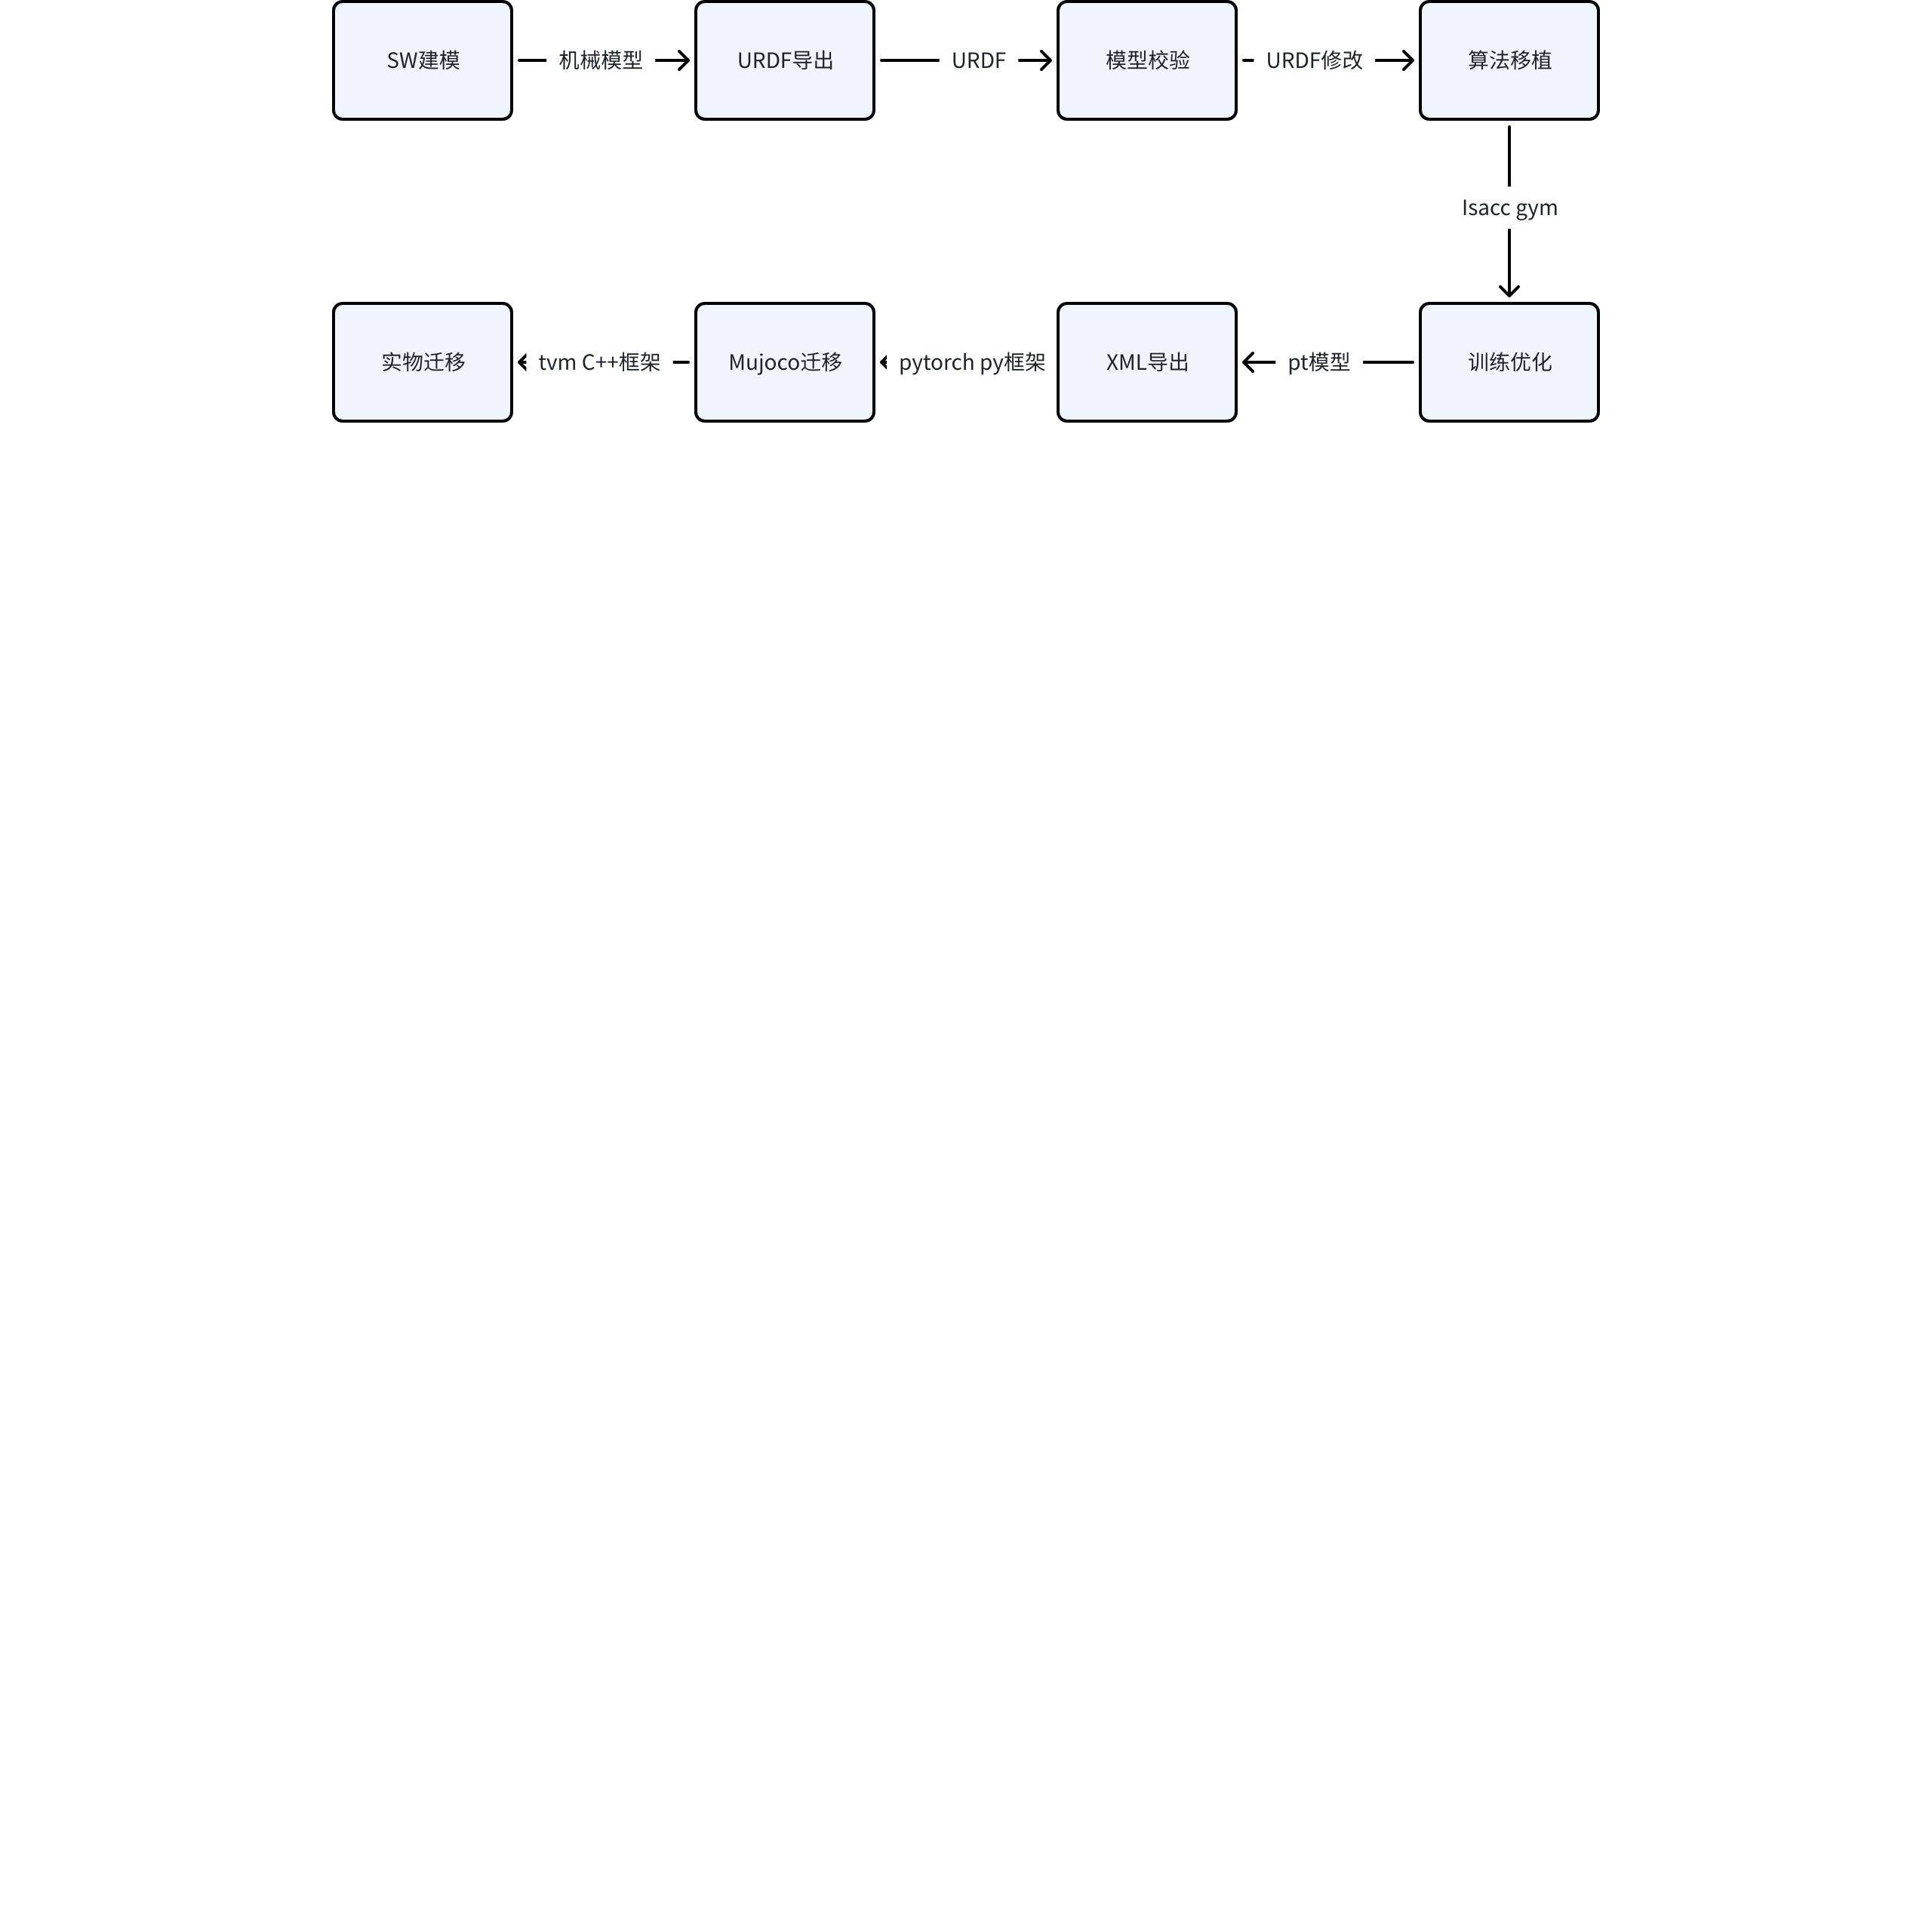
在熟悉了四足机器人和人形开源项目后要完整的上手isacc gym需要走过一个完整的流程，即从模型建模、导出、移植、训练到最终的迁移部署，这样才能保证对RL的整个流程进行全盘的理解，当然在这个阶段遇到的问题也是最多的，基本的流程如下图所示：

![media](https://pub-7714d99fbd654288a82d7b2f7be01efb.r2.dev/isaac-gym-rl/028-whiteboard-whiteboard-33.jpg)

## 4.1 SW建模和导出（关键技术）：

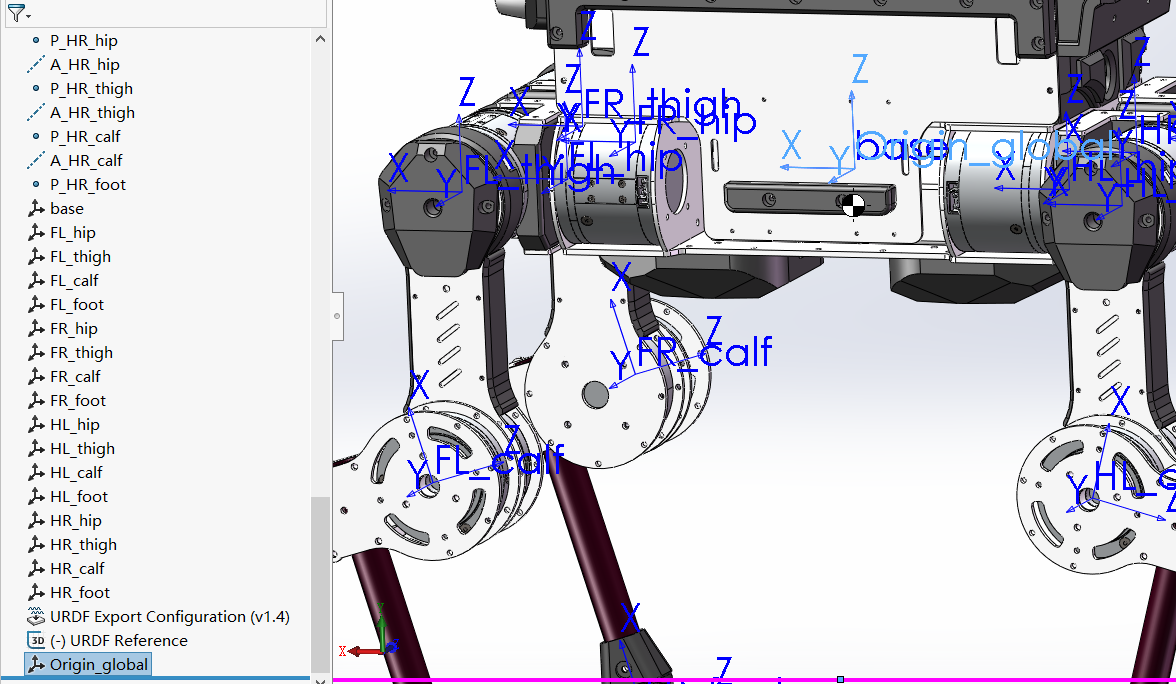
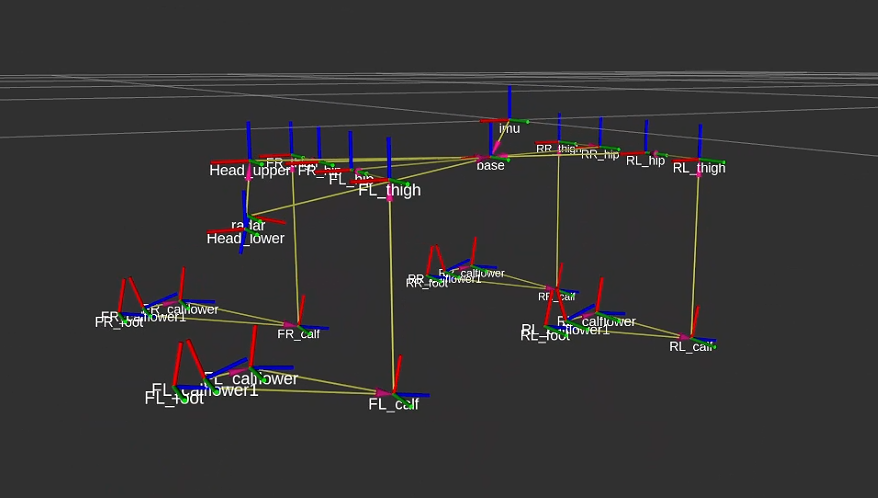
首先采用三维建模工具完成机器人模型的建模，采用SW安装URDF导出插件，完成对模型的坐标系定义，为了降低算法移植的难度，我们采取的是参考开源项目中go2的坐标系命名和定义规则，这样在后续导入isacc中会更加简单，通过ros完成对机器人模型的查看：

```python theme={null}
roslaunch urdf_tutorial display.launch model:=/home/pi/Downloads/LocomotionWit    ·hNP3O-master/resources/go2/urdf/go2.urdf
```
![media](https://pub-7714d99fbd654288a82d7b2f7be01efb.r2.dev/isaac-gym-rl/029-image-image-34.png)

通过在代码中打印相关名称dof name可以了解到其在isacc中的顺序，这关系到后续控制指令顺序、反馈角度q顺序以及xml文件中执行器顺序：

```python theme={null}
body_names: ['base', 'FL_hip', 'FL_thigh', 'FL_calf', 'FL_foot', 'FR_hip', 'FR_thigh', 'FR_calf', 'FR_foot', 'Head_upper', 'Head_lower', 'RL_hip', 'RL_thigh', 'RL_calf', 'RL_foot', 'RR_hip', 'RR_thigh', 'RR_calf', 'RR_foot']
dof_names: ['FL_hip_joint', 'FL_thigh_joint', 'FL_calf_joint', 'FR_hip_joint', 'FR_thigh_joint', 'FR_calf_joint', 'RL_hip_joint', 'RL_thigh_joint', 'RL_calf_joint', 'RR_hip_joint', 'RR_thigh_joint', 'RR_calf_joint']
feet_names: ['FL_foot', 'FR_foot', 'RL_foot', 'RR_foot']

Dof Name list:
    FL_hip_joint
    FL_thigh_joint
    FL_calf_joint
    FR_hip_joint
    FR_thigh_joint
    FR_calf_joint
    RL_hip_joint
    RL_thigh_joint
    RL_calf_joint
    RR_hip_joint
    RR_thigh_joint
    RR_calf_joint
```

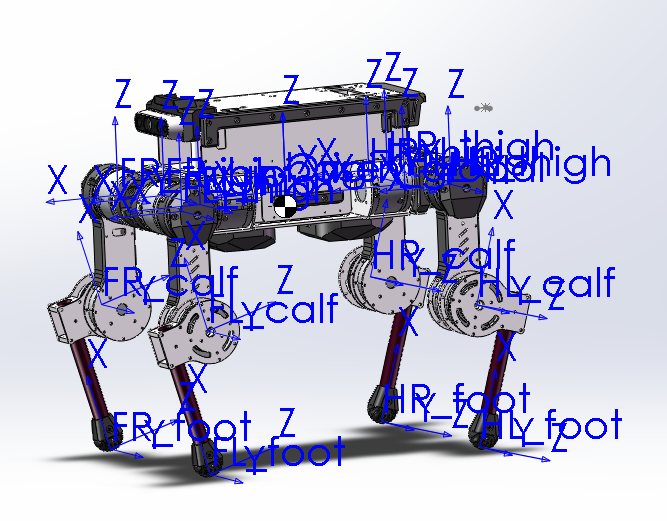
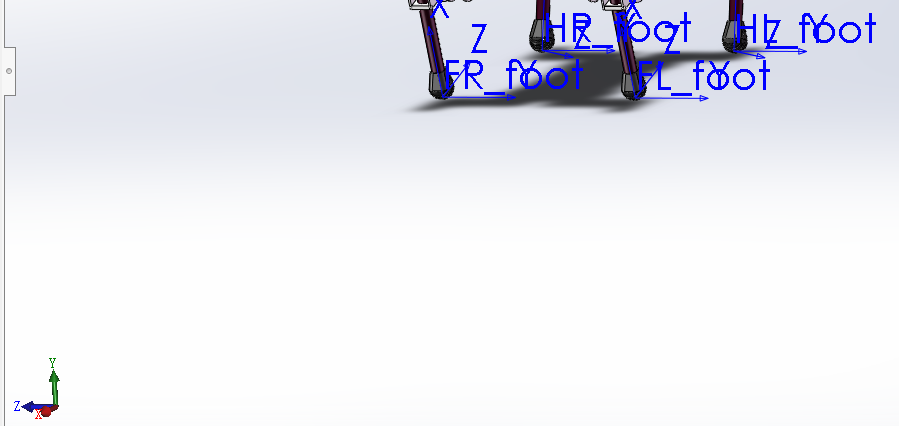
依据上述名称完成在SW增加轴、点、坐标系辅助定义，需要注意的是在建立装配体时，Y轴是向上的，这里可以看下最终模型的阴影来确定机器人组装的是否朝上：

![media](https://pub-7714d99fbd654288a82d7b2f7be01efb.r2.dev/isaac-gym-rl/030-image-image-35.png)

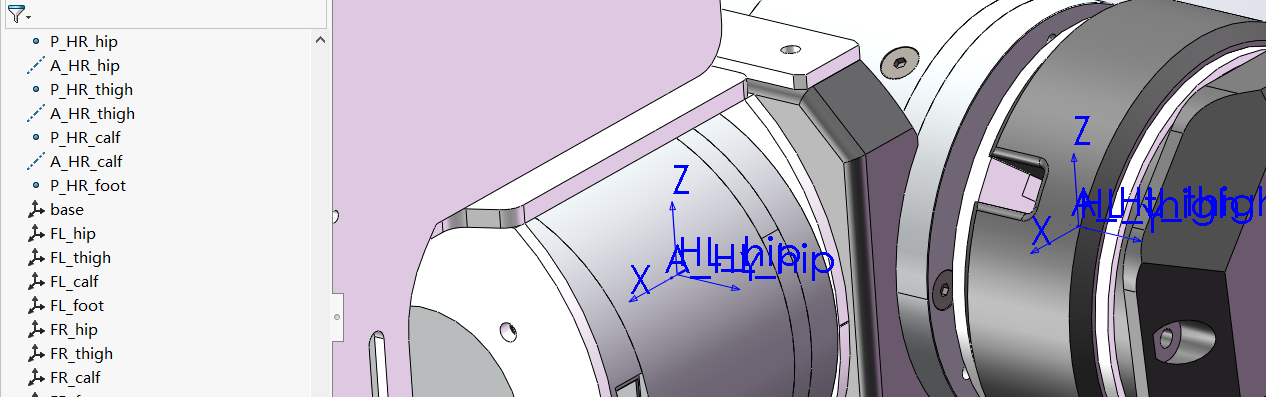
进一步依据关节定义和腿号依次定义 点-基准轴-坐标系，命名方式点P\_，轴A\_，坐标系C\_，**同时注意到装配体状态下关节状态在导出时候即URDF的零位**：

![media](https://pub-7714d99fbd654288a82d7b2f7be01efb.r2.dev/isaac-gym-rl/031-image-image-36.png)

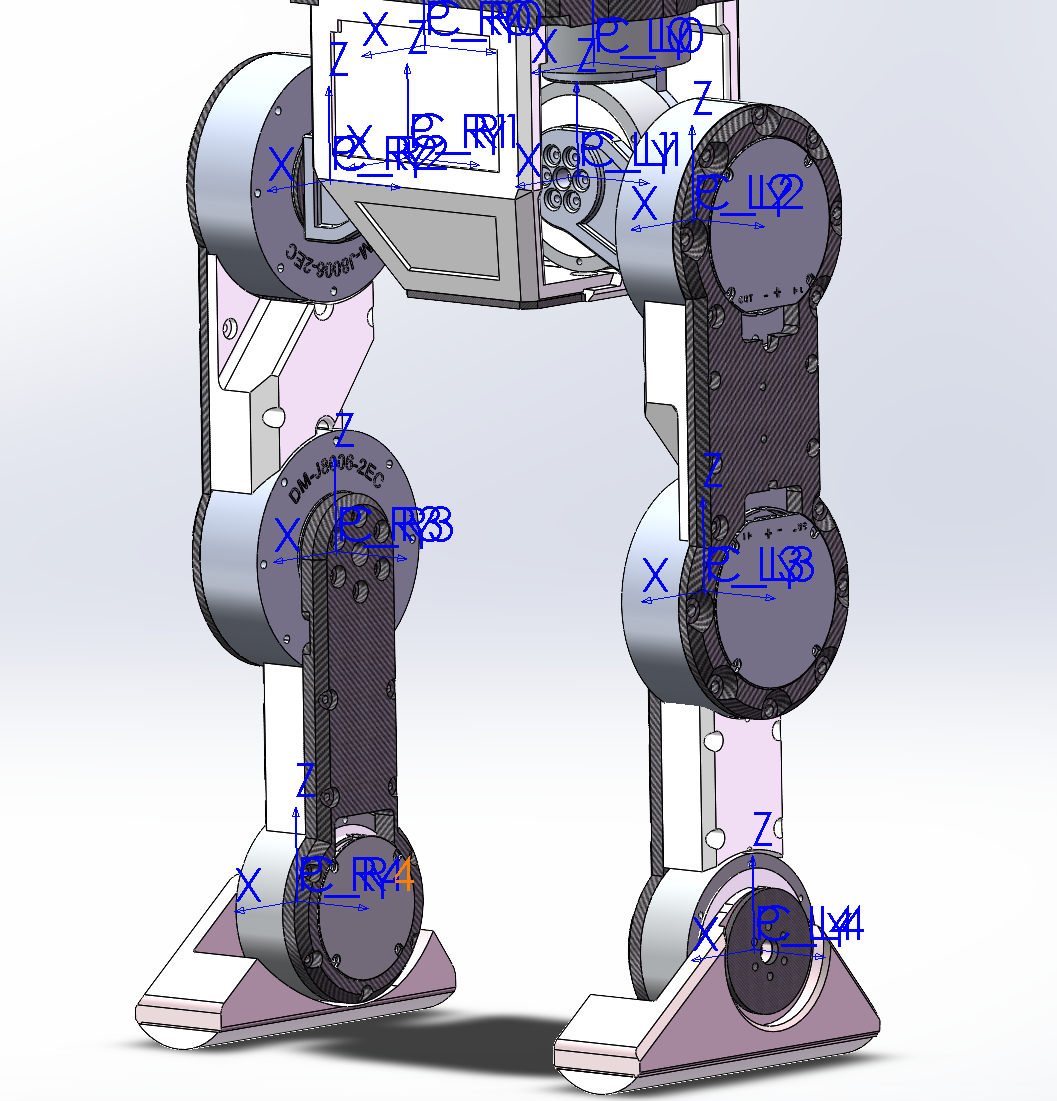
另外，**设置每个坐标系时为了避免导出时候出现模型反转**，建议都按右手坐标系的方向去定义，不依据机械的变化改变，如下面所示的双足模型导出如下：

![media](https://pub-7714d99fbd654288a82d7b2f7be01efb.r2.dev/isaac-gym-rl/032-image-image-37.png)

这依据网络教程完成对URDF的导出，**注意在导出后会出现整个模型的原点original\_global，此时需要手工重新选定其定义在机器人质心，否则会导致最终的模型存在坐标系偏差：**

![media](https://pub-7714d99fbd654288a82d7b2f7be01efb.r2.dev/isaac-gym-rl/033-image-image-38.png)

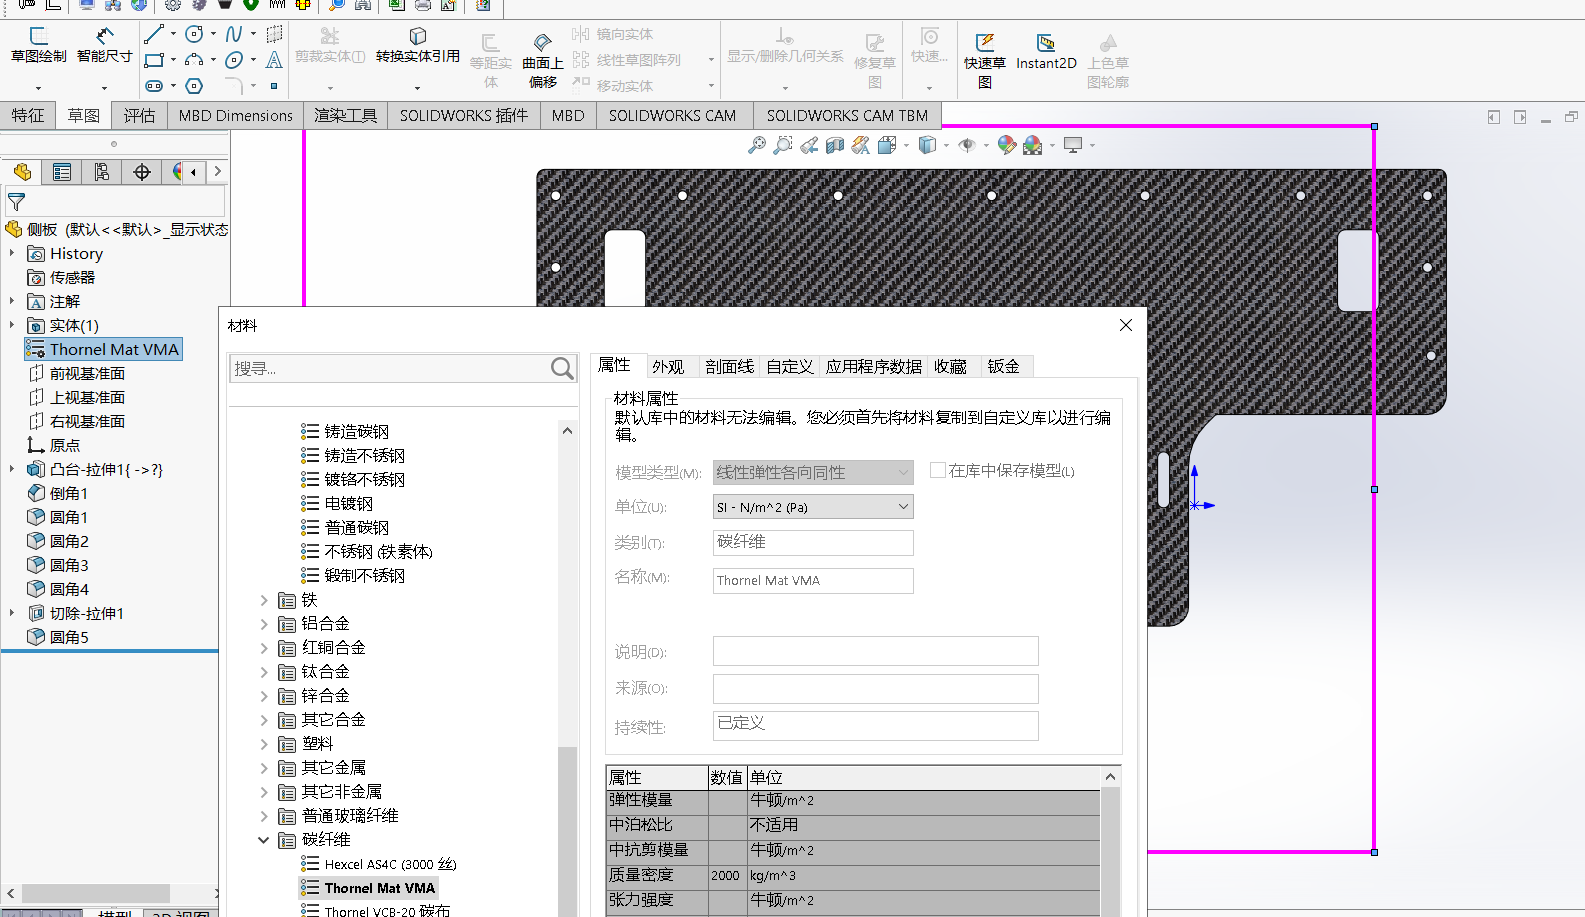
设置模型材质，**如果类似电机简化质量的Step文件可以主动增加一个圆柱体设置相应材质保证质量接近，但是要在后续URDF配置时选择该质量配重**：

![media](https://pub-7714d99fbd654288a82d7b2f7be01efb.r2.dev/isaac-gym-rl/034-image-image-39.png)

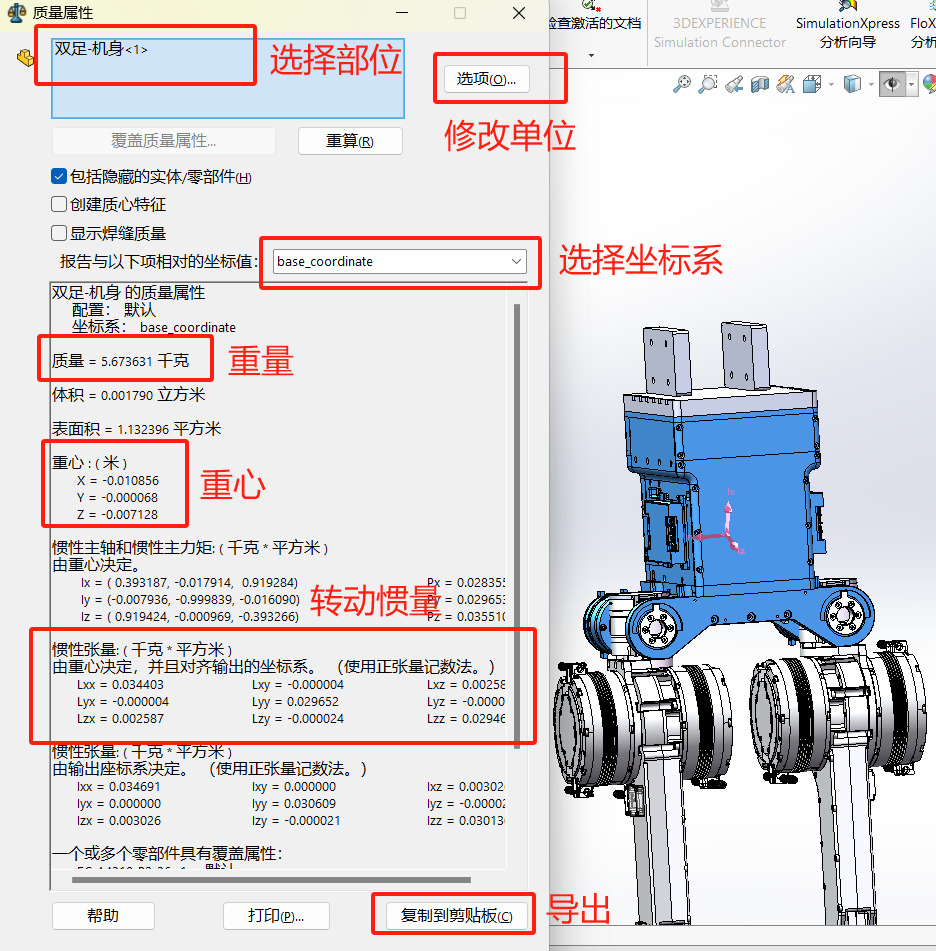
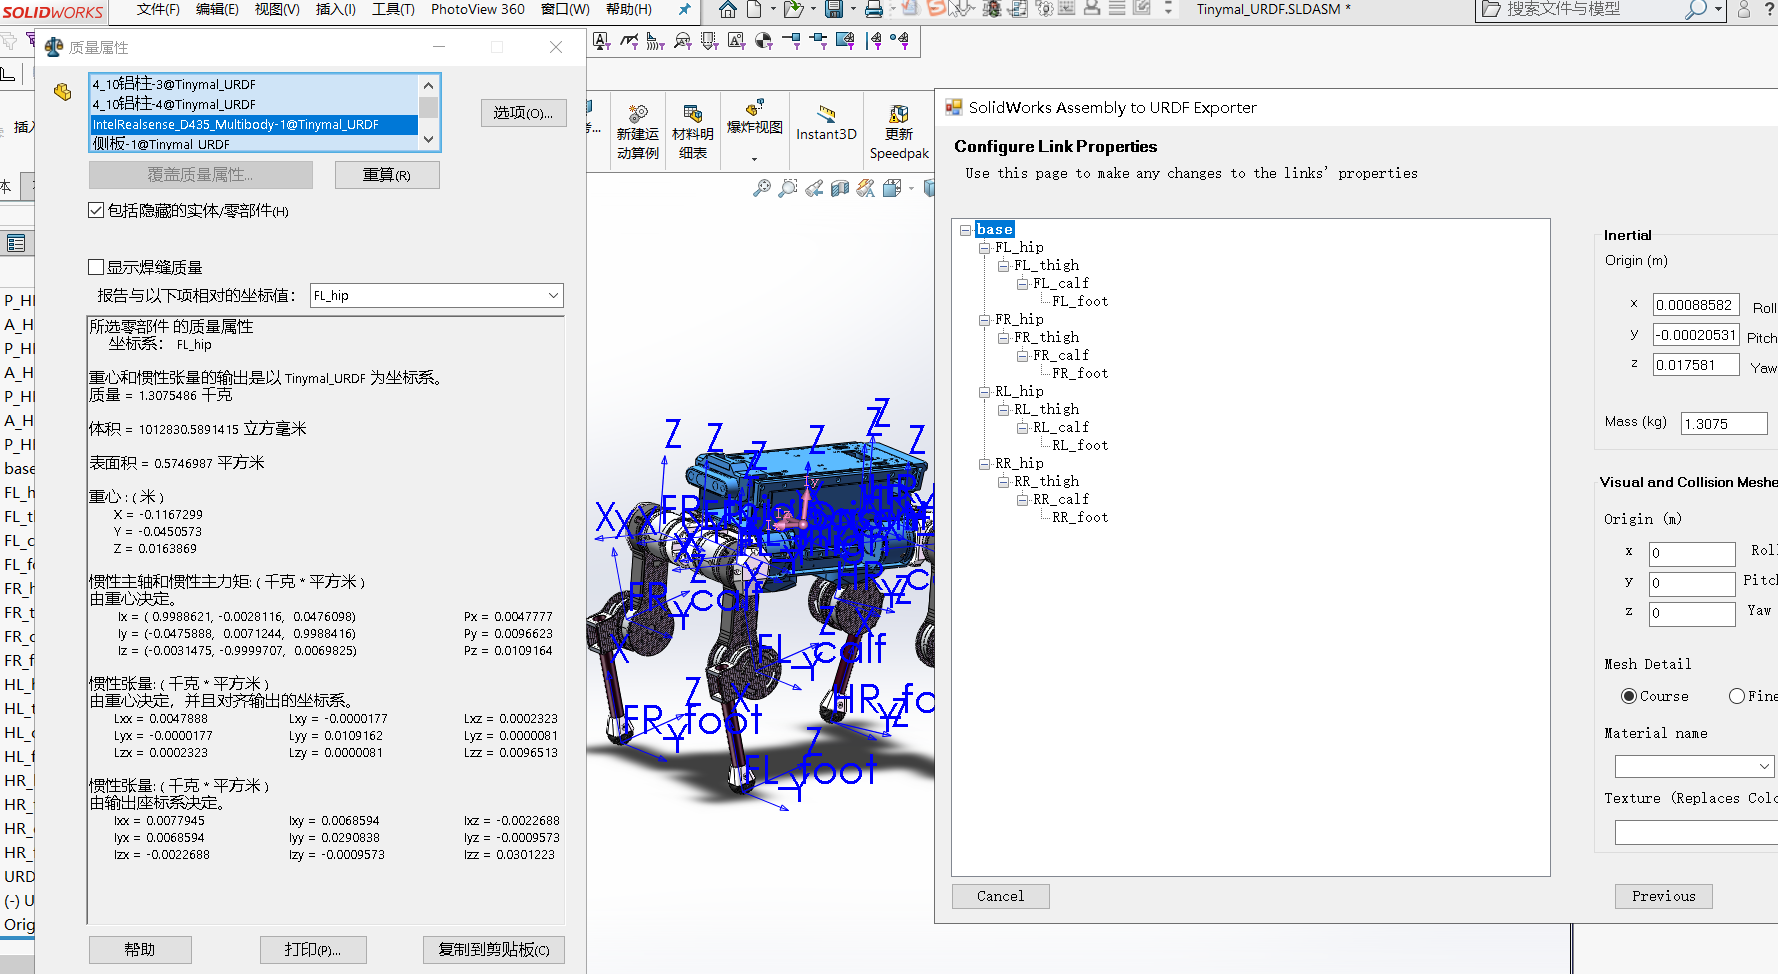
在导出URDF中最后需要注意的就是转动惯量的配置，首先需要对各组件设置好其对应的材质，之后通过选中各组件查看质量属性的方式得到参数。

**注意转动惯量非对角线上的值要取相反数（正的变负，负的变正）**，**同时在替换URDF文件参数时所有Link都需要替换不能只替换好像比较重的否则会造成isacc训练奖励爆炸**：

![media](https://pub-7714d99fbd654288a82d7b2f7be01efb.r2.dev/isaac-gym-rl/035-image-image-40.png)

在URDF export界面时打开工具-评估-质量属性检查可以自动按之前配置的组合选择link，最终坐标值选择该link的起始坐标，上述参数手动填入到导出的URDF中，对模型进行检测\*\*（可选）\*\*：

```sql theme={null}
check_urdf model.urdf
```
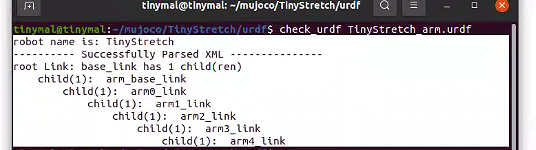
![media](https://pub-7714d99fbd654288a82d7b2f7be01efb.r2.dev/isaac-gym-rl/036-image-image-41.png)

使用Rviz查看urdf是否正确(**无法显示模型不影响后续导出**)：

```bash theme={null}
roslaunch urdf_tutorial display.launch model:=/home/pi/Downloads/LocomotionWithNP3O-master/resources/tinymal/urdf/tinymal.urdf
```
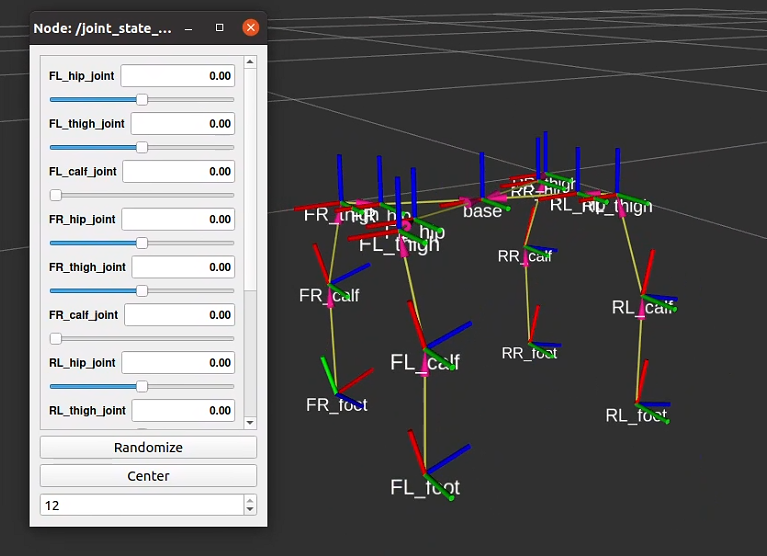
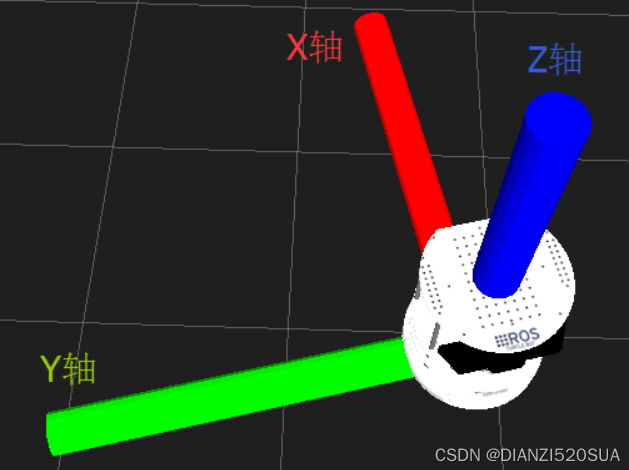
![media](https://pub-7714d99fbd654288a82d7b2f7be01efb.r2.dev/isaac-gym-rl/037-image-image-42.png)

![media](https://pub-7714d99fbd654288a82d7b2f7be01efb.r2.dev/isaac-gym-rl/038-image-image-43.png)

通过拖动条查看关节旋转方向，并在URDF中进行修改，为了满足isacc使用还需要对如下几个内容进行修改：

**（1）修改URDF中STL文件目录为相对目录../meshes：**

```python theme={null}
 filename="../meshes/FL_foot.STL" />
```

**（2）修改foot等fix关节保证能被检测为刚体，否则isacc运行无法检测到foot\_names名称（适用于四足机器人、点接触机器人）：**

```python theme={null}
<joint
    name="FL_foot_joint"
    type="fixed" dont_collapse="true">
    <origin
      xyz="-0.144829367995569 -0.00756307155902691 -0.0430544596022255"
      rpy="0 0 0" />
    <parent
      link="FL_calf" />
    <child
      link="FL_foot" />
    <axis
      xyz="0 0 0" />
  </joint>
```

**（3）修正碰撞体简化mesh文件，采用正方体，圆柱体简化碰撞，特别是点接触足端采用球体碰撞**

总之对于RL来说URDF导出是否正确非常关键，具体导出惯量等问题可以参考：

URDF导出惯量不正确，正确导出方法：

检查你的link是否是装配体，是的话，可以利用SolidWorks自己的质量工具得到惯性量，然后自己填到URDF里面。检查你的link是否是装配体，是的话，可以利用SolidWorks自己的质量工具得到惯性量，然后自己填到urdf里面。

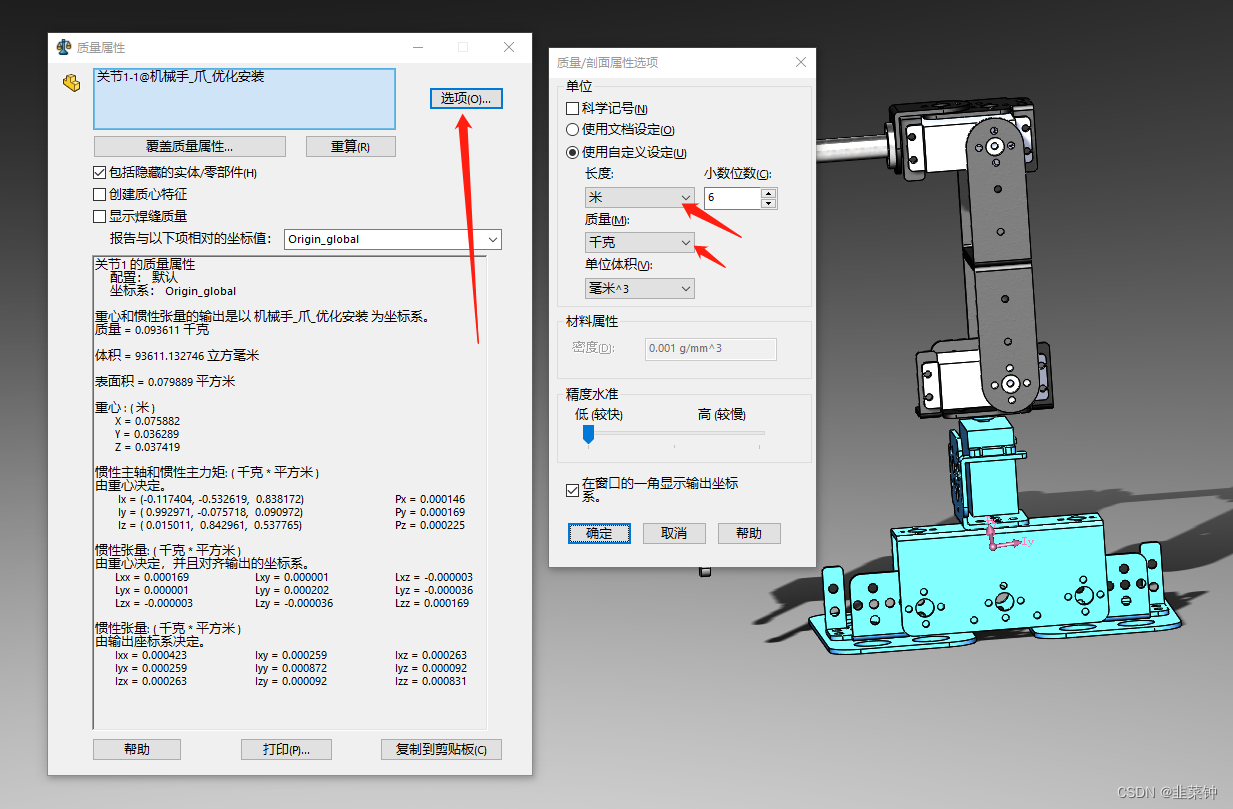
**操作流程**：选中你的link部件后，**选择 工具–》评估–》质量属性**，就可以得到惯性量了。要注意坐标和单位，urdf中用的是千克平方米，而质量**属性中默认显示的是克平方毫米**，而1克每平方毫米=1e-9千克每平方。不过你可以通过设置“质量属性”中的选项来选定单位：

![media](https://pub-7714d99fbd654288a82d7b2f7be01efb.r2.dev/isaac-gym-rl/039-image-image-44.png)

首先，在Solidworks左上角的工具栏中选择\*\*“评估”→“质量属性”，即可打开“质量属性”属性框，之后在URDF导出工具中在Link界面选择对应的结构体名称，在质量属性中进行重算：\*\*

![media](https://pub-7714d99fbd654288a82d7b2f7be01efb.r2.dev/isaac-gym-rl/040-image-image-45.png)

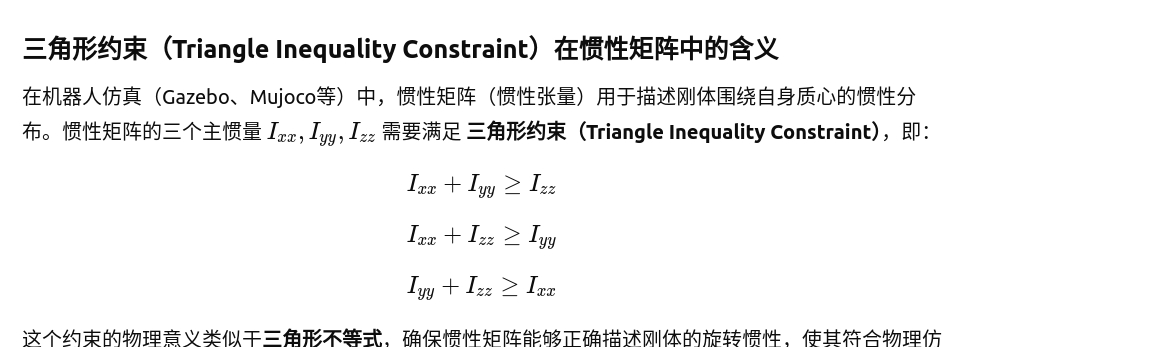
备注在采用真实惯量后训练难度会有变化，需要设置更合适的训练方案：

![media](https://pub-7714d99fbd654288a82d7b2f7be01efb.r2.dev/isaac-gym-rl/041-image-image-46.png)

URDF模型需要满足如下的设计需求：

![media](https://pub-7714d99fbd654288a82d7b2f7be01efb.r2.dev/isaac-gym-rl/042-image-image-47.jpg)

## 4.2 Rviz下对导出模型的惯量进行检查：

首先，复制URDF⽂件⾄ROS的urdf\_tutorial的⽂件夹中：

（1）\*.urdf⽂件⾄/opt/ros/XX/share/urdf\_tutorial/urdf/中

（2）与urdf关联的mesh⽂件放到/opt/ros/XX/share/urdf\_tutorial/meshes/中

```python theme={null}
sudo cp * /opt/ros/noetic/share/urdf_tutorial/meshes/
```
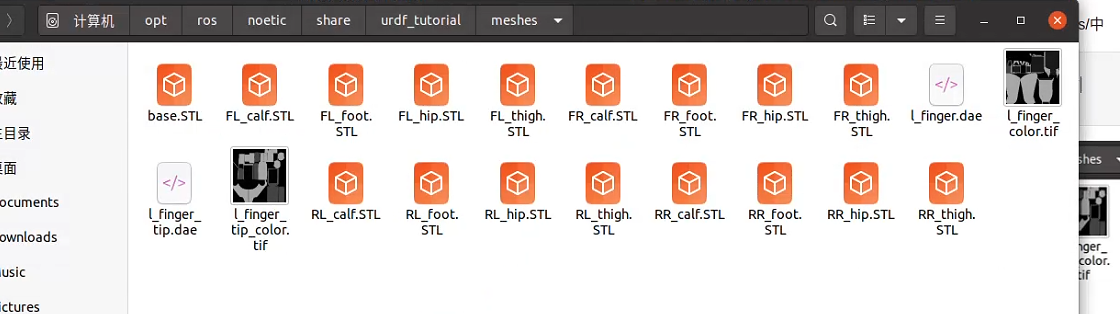
![media](https://pub-7714d99fbd654288a82d7b2f7be01efb.r2.dev/isaac-gym-rl/043-image-image-48.png)

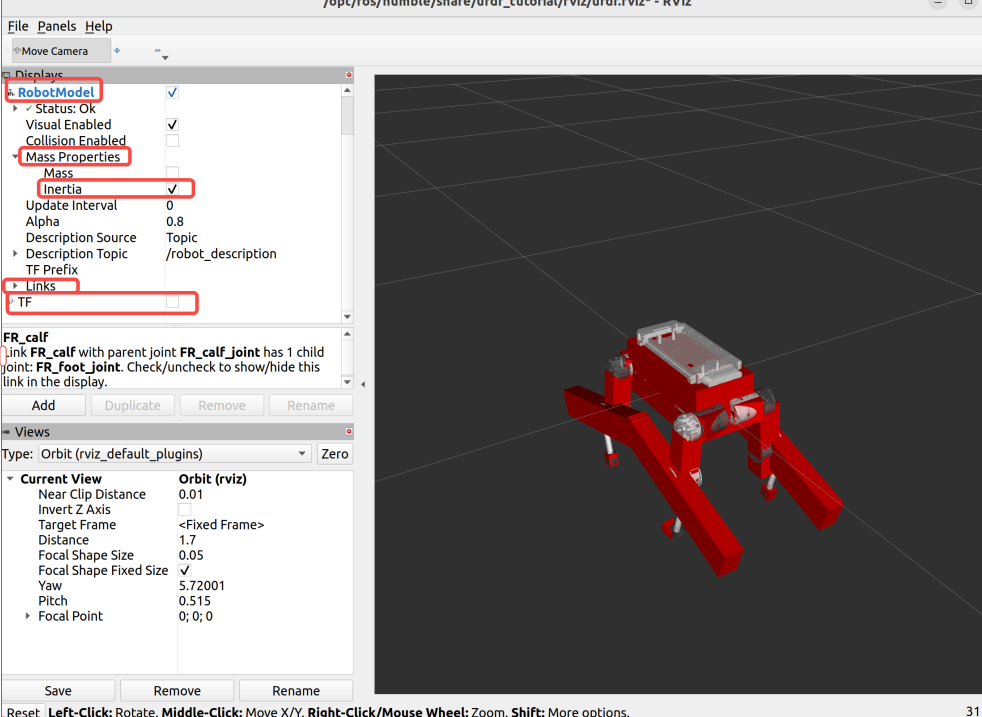
开启惯量显⽰（对ROS 版本有要求)：在rviz左侧的菜单树中点选**RobotModel-Mass Properties-Inertia**，机器⼈模 型中出现红⾊⽅块，即为等效惯量显⽰。 可以点选菜单树中的TF选定去掉，不显⽰坐标轴。 可以在RobotModel-Links中点选不同的link，以显⽰特定的link ：

```python theme={null}
roslaunch urdf_tutorial display.launch model:=/home/pi/Downloads/LocomotionWithNP3O-master/resources/tinymal/urdf/tinymal.urdf
```
![media](https://pub-7714d99fbd654288a82d7b2f7be01efb.r2.dev/isaac-gym-rl/044-image-image-49.png)

## 4.3 将机器人模型部署在leggedgym框架进行训练：

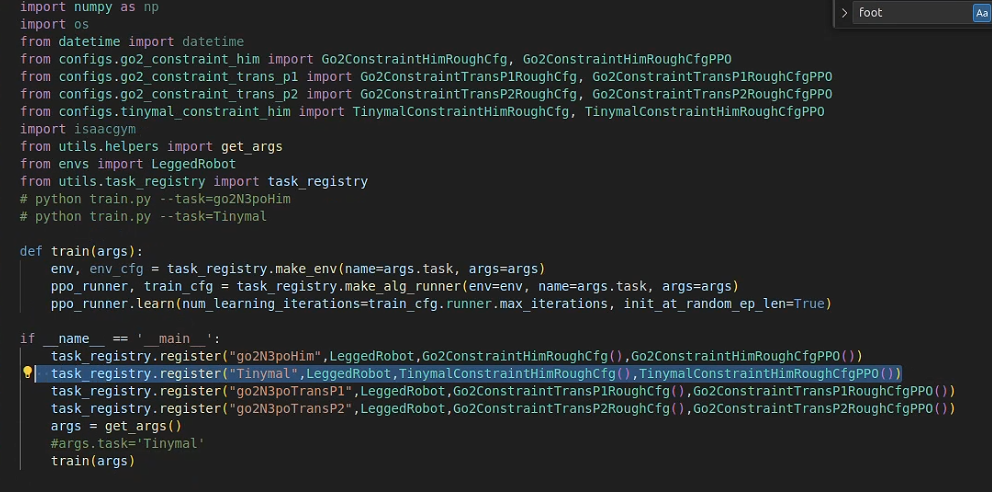
在导出URDF后就可以开始替换isacc中代码了，首先还是依据legged gym框架完成对新环境与任务的注册，在train脚本中引用对应新的环境和训练类：

![media](https://pub-7714d99fbd654288a82d7b2f7be01efb.r2.dev/isaac-gym-rl/045-image-image-50.png)

修改配置文件asset中相关内容:

```python theme={null}
    class asset( LeggedRobotCfg.asset ):
        file = '{ROOT_DIR}/resources/tinymal/urdf/tinymal.urdf'
        foot_name = "foot"
        name = "tinymal"
        penalize_contacts_on = ["thigh", "calf"] 
        terminate_after_contacts_on = ["base"]
        self_collisions = 0 # 1 to disable, 0 to enable...bitwise filter
        flip_visual_attachments = False #tinymal
```

3D文件模型显示出现错误需要设置：

```bash theme={null}
flip_visual_attachments = False #tinymal
```

另外依据机器人模型修改PD参数，默认角度，随机化参数，控制指令范围等，之后进行测试和debug：

conda activate OmniRobCtrl

启动：

```bash theme={null}
python train.py --task=Tinymal
```

在仿真界面按键V可以暂停和启动仿真

headless=:设置为headless=True可禁用模拟绘制(--headless)

重复训练config文件：

resume = True

resume\_path = ''目录"

输出的刚体信息，仿真画面出现则模型导入成功：

```bash theme={null}
['base', 'FL_hip', 'FL_thigh', 'FL_calf', 'FL_foot', 'FR_hip', 'FR_thigh', 'FR_calf', 'FR_foot', 'Head_upper', 'Head_lower', 'RL_hip', 'RL_thigh', 'RL_calf', 'RL_foot', 'RR_hip', 'RR_thigh', 'RR_calf', 'RR_foot']
['FL_hip_joint', 'FL_thigh_joint', 'FL_calf_joint', 'FR_hip_joint', 'FR_thigh_joint', 'FR_calf_joint', 'RL_hip_joint', 'RL_thigh_joint', 'RL_calf_joint', 'RR_hip_joint', 'RR_thigh_joint', 'RR_calf_joint']
['FL_foot', 'FR_foot', 'RL_foot', 'RR_foot']
```
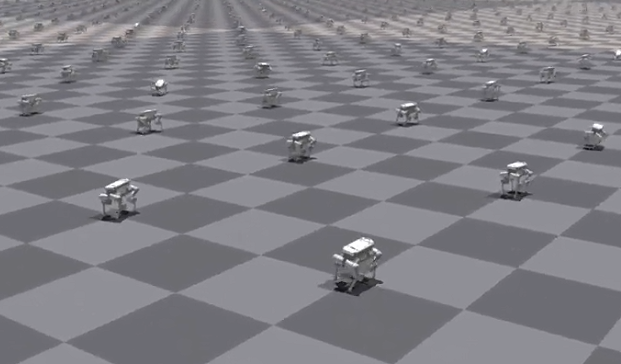
![media](https://pub-7714d99fbd654288a82d7b2f7be01efb.r2.dev/isaac-gym-rl/046-image-image-51.png)

则依据机器人尺寸对奖励函数进行调整尝试训练，进一步可以针对性进行奖励函数和约束函数的优化。

## 4.4 训练奖励优化与学习：

（1）常用回合结束判断，可以通过机器人机体速度、姿态判断是否摔倒，并进行环境复位：

```python theme={null}
    def check_termination(self):
        """ Check if environments need to be reset
        """
        # Termination for contact
        term_contact = torch.norm(
                self.contact_forces[:, self.termination_contact_indices, :],
                dim=-1)
        self.reset_buf = torch.any((term_contact > 1.), dim=1)

        # Termination for velocities, orientation, and low height
        self.reset_buf |= torch.any(
          torch.norm(self.base_lin_vel, dim=-1, keepdim=True) > 10., dim=1)

        self.reset_buf |= torch.any(
          torch.norm(self.base_ang_vel, dim=-1, keepdim=True) > 5., dim=1)

        self.reset_buf |= torch.any(
          torch.abs(self.projected_gravity[:, 0:1]) > 0.7, dim=1)

        self.reset_buf |= torch.any(
          torch.abs(self.projected_gravity[:, 1:2]) > 0.7, dim=1)
        self.reset_buf |= torch.any(self.base_pos[:, 2:3] < 0.3, dim=1)
        # # no terminal reward for time-outs
        self.time_out_buf = self.episode_length_buf > self.max_episode_length
        self.reset_buf |= self.time_out_buf
```

（2）常用随机控制指令，在环境复位中随机设置控制指令，可以增加摆动高度、机体姿态、机体高度、步态模式等新的控制指令，当然需要再观测中同步更新：

```python theme={null}
    def _resample_commands(self, env_ids):
        """ Randommly select commands of some environments
        Args:
            env_ids (List[int]): Environments ids for which new commands are needed
        """
        self.resampling_time[env_ids] = torch_rand_float(self.min_sample_time, self.max_sample_time, (len(env_ids), 1), device=self.device).squeeze(1)
        self.commands[env_ids, 0] = torch_rand_float(self.command_ranges["lin_vel_x"][0], self.command_ranges["lin_vel_x"][1], (len(env_ids), 1), device=self.device).squeeze(1)
        self.commands[env_ids, 1] = torch_rand_float(self.command_ranges["lin_vel_y"][0], self.command_ranges["lin_vel_y"][1], (len(env_ids), 1), device=self.device).squeeze(1)
        if self.cfg.commands.robot_height_command:
            self.commands[env_ids, 3] = torch_rand_float(self.command_ranges["robot_height"][0], self.command_ranges["robot_height"][1], (len(env_ids), 1), device=self.device).squeeze(1)
        elif self.cfg.commands.ang_vel_command:
            self.commands[env_ids, 2] = torch_rand_float(self.command_ranges["ang_vel_yaw"][0], self.command_ranges["ang_vel_yaw"][1], (len(env_ids), 1), device=self.device).squeeze(1)
        self.time_to_stand_still[env_ids] = 0.
        command_mode = torch.rand((len(env_ids), 1), device=self.device).squeeze(1)
        # 0-0.1 stand still (all = 0)
        # 0.1-0.2 turn (ang vel != 0)
        # 0.2-0.4 walk along y axis (y vel != 0)
        # 0.4-0.6 walk along x axis (x vel != 0)
        # 0.6-1 hybrid (all != 0)
        self.commands[env_ids, 0] *= command_mode >= 0.4 # x vel
        self.commands[env_ids, 1] *= ((command_mode >= 0.2) & (command_mode < 0.4)) | (command_mode >= 0.6) # y vel
        self.commands[env_ids, 2] *= ((command_mode >0.1) & (command_mode < 0.2)) | (command_mode >= 0.6) # ang vel

        contacts = self.contact_forces[:, self.feet_indices, 2] > 5.
        double_contact = torch.sum(1.*contacts, dim=-1) == 2
        self.time_to_stand_still[env_ids] += self.static_delay * double_contact[env_ids] * \
            (torch.norm(self.commands[env_ids, :3], dim=-1) == 0) * \
            (torch.norm(self.base_lin_vel[env_ids, :2], dim=-1) < 0.3)
```

（3）RD域随机化处理，对机器人进行扰动和随机误差建模干扰，提高网络的鲁棒性：

```python theme={null}

    def _process_rigid_body_props(self, props, env_id):
        if env_id==0:
            m = 0
            for i, p in enumerate(props):
                m += p.mass
            #     print(f"Mass of body {i}: {p.mass} (before randomization)")
            # print(f"Total mass {m} (before randomization)")
            self.mass_total = m

        # randomize mass of all link
        if self.cfg.domain_rand.randomize_all_mass:
            for s in range(len(props)):
                rng = self.cfg.domain_rand.rd_mass_range
                rd_num = np.random.uniform(rng[0], rng[1])
                self.mass_mask[env_id, s] = rd_num
                props[s].mass *= rd_num
        
        # randomize base mass
        if self.cfg.domain_rand.randomize_base_mass:
            rng = self.cfg.domain_rand.added_mass_range
            props[-1].mass += np.random.uniform(rng[0], rng[1])
        
        # randomize com of all link other than base link
        if self.cfg.domain_rand.randomize_com:
            for s in range(len(props)-1):
                
                rng = self.cfg.domain_rand.rd_com_range
                rd_num = np.random.uniform(rng[0], rng[1])
                self.com_diff_x[env_id, s] = rd_num
                props[s].com.x += rd_num
                rd_num = np.random.uniform(rng[0], rng[1])
                self.com_diff_y[env_id, s] = rd_num
                props[s].com.y += rd_num
                rd_num = np.random.uniform(rng[0], rng[1])
                self.com_diff_z[env_id, s] = rd_num
                props[s].com.z += rd_num

        # randomize com of base link
        if self.cfg.domain_rand.randomize_base_com:
            rng = self.cfg.domain_rand.rd_base_com_range
            rd_num = np.random.uniform(rng[0], rng[1])
            self.com_diff_x[env_id, -1] = rd_num
            props[-1].com.x += rd_num
            rd_num = np.random.uniform(rng[0], rng[1])
            self.com_diff_y[env_id, -1] = rd_num
            props[-1].com.y += rd_num
            rd_num = np.random.uniform(rng[0], rng[1])
            self.com_diff_z[env_id, -1] = rd_num
            props[-1].com.z += rd_num

        # randomize inertia of all body
        if self.cfg.domain_rand.random_inertia:
            rng = self.cfg.domain_rand.inertia_range
            for s in range(len(props)):
                rd_num = np.random.uniform(rng[0], rng[1])
                self.inertia_mask_xx[env_id, s] = rd_num
                props[s].inertia.x.x *= rd_num
                
                rd_num = np.random.uniform(rng[0], rng[1])
                self.inertia_mask_xy[env_id, s] = rd_num
                props[s].inertia.x.y *= rd_num
                props[s].inertia.y.x *= rd_num

                rd_num = np.random.uniform(rng[0], rng[1])
                self.inertia_mask_xz[env_id, s] = rd_num
                props[s].inertia.x.z *= rd_num
                props[s].inertia.z.x *= rd_num

                rd_num = np.random.uniform(rng[0], rng[1])
                self.inertia_mask_yy[env_id, s] = rd_num
                props[s].inertia.y.y *= rd_num

                rd_num = np.random.uniform(rng[0], rng[1])
                self.inertia_mask_yz[env_id, s] = rd_num
                props[s].inertia.y.z *= rd_num
                props[s].inertia.z.y *= rd_num

                rd_num = np.random.uniform(rng[0], rng[1])
                self.inertia_mask_zz[env_id, s] = rd_num
                props[s].inertia.z.z *= rd_num
        
        
        return props
```

（4）主动推动机器人，通过向机体设置速度进行模拟外力推动：

```python theme={null}

    def _push_robots(self):
        # Randomly pushes the robots.
        # Emulates an impulse by setting a randomized base velocity.

        # max_vel = self.cfg.domain_rand.max_push_vel_xy
        # self.root_states[:, 7:8] = torch_rand_float(
        #     -max_vel, max_vel, (self.num_envs, 1), device=self.device)
        # self.gym.set_actor_root_state_tensor(
        #     self.sim, gymtorch.unwrap_tensor(self.root_states))
        """ Random pushes the robots. Emulates an impulse by setting a randomized base velocity. 
        """
        max_vel = self.cfg.domain_rand.max_push_vel_xy
        max_push_angular = self.cfg.domain_rand.max_push_ang_vel
        self.rand_push_force[:, :2] = torch_rand_float(
            -max_vel, max_vel, (self.num_envs, 2), device=self.device)  # lin vel x/y
        self.root_states[:, 7:9] = self.rand_push_force[:, :2]

        self.rand_push_torque = torch_rand_float(
            -max_push_angular, max_push_angular, (self.num_envs, 3), device=self.device)

        self.root_states[:, 10:13] = self.rand_push_torque

        self.gym.set_actor_root_state_tensor(
            self.sim, gymtorch.unwrap_tensor(self.root_states))
        
        print("pushed")
```

（5）机器人默认控制中主要设置为角度控制，在训练脚本command有专用模式会增加航向控制，即构建了一个P控制器结合航向角误差计算输入网络的转向速度指令：

```python theme={null}
        if self.cfg.commands.heading_command:
            forward = quat_apply(self.base_quat, self.forward_vec)
            heading = torch.atan2(forward[:, 1], forward[:, 0])
            self.commands[:, 2] = torch.clip(0.5*wrap_to_pi(self.commands[:, 3] - heading), -1., 1.) #航向模式下产生速度控制量
```

（6）关节控制模式：

在配置文件中可以设置关节控制模式和参数：

```bash theme={null}
    class control( LeggedRobotCfg.control ):
        # PD Drive parameters:
        control_type = 'P'
        stiffness = {'joint': 3}  # [N*m/rad]
        damping = {'joint': 0.1}     # [N*m*s/rad]
        # action scale: target angle = actionScale * action + defaultAngle
        action_scale = 0.25
        # decimation: Number of control action updates @ sim DT per policy DT
        decimation = 4
        hip_scale_reduction = 1

        use_filter = True
```

当然也可以通过独立命名的方式设置对应关节的PD参数：

```python theme={null}
     stiffness =
     damping = {'leg_roll': 10, 'leg_pitch': 10, 'leg_yaw':
                 10, 'knee': 10, 'ankle': 10}  关节名字可以区分，mujoco下与其一致
```

## 4.5 训练模型保存：

在完成强化学习训练后，需要对模型进行测试，在simple\_play文件中可以设置对应网络加载：

```python theme={null}
  model_dict = torch.load(os.path.join(ROOT_DIR, \
    'logs/rough_go2_constraint/Jul16_21-49-36_test_barlowtwins/model_6000.pt'))#《---------------------调用的网络模型doghome
```

设置默认的启动任务：

```python theme={null}
if __name__ == '__main__':
    task_registry.register("go2N3poHim",LeggedRobot,Go2ConstraintHimRoughCfg(),Go2ConstraintHimRoughCfgPPO())
    task_registry.register("Tinymal",LeggedRobot,TinymalConstraintHimRoughCfg(),TinymalConstraintHimRoughCfgPPO())
    task_registry.register("go2N3poTransP1",LeggedRobot,Go2ConstraintTransP1RoughCfg(),Go2ConstraintTransP1RoughCfgPPO())
    task_registry.register("go2N3poTransP2",LeggedRobot,Go2ConstraintTransP2RoughCfg(),Go2ConstraintTransP2RoughCfgPPO())

    RECORD_FRAMES = False
    args = get_args()
    args.task='Tinymal'
    play(args)
```

为了后续使用需要将之前训练中保存的参数载入网络中，并进一步将整个网络模型进行保存：

```python theme={null}
      policy.load_state_dict(model_dict['model_state_dict'])
      policy.half()
      policy = policy.to(env.device)
      torch.save(policy,'logs/rough_go2_constraint/amao_policy.pt',)
      print('*****************')
      print(policy)
```

当然也可以裁剪后采用torch.jit保存和加载模型：

```python theme={null}
      policy.load_state_dict(model_dict['model_state_dict'])
      policy.half()
      policy = policy.to(env.device)
      policy.save_torch_jit_policy('model_jit.pt',env.device)
```

**保存jit模型时会对网络保存的内容进行处理，如下只保存了actor部分的网络：**

```python theme={null}
    def save_torch_jit_policy(self,path,device):
        obs_demo_input = torch.randn(1,self.num_prop).to(device)
        hist_demo_input = torch.randn(1,self.num_hist,self.num_prop).to(device)
        model_jit = torch.jit.trace(self.actor_student_backbone,(obs_demo_input,hist_demo_input))
        model_jit.save(path)
```

在测试网络时可以增加遥控器或者随机指令的方式来进行移动测试：

```python theme={null}
        if i %300==0 or i==0:
          commands=[0]*4
          rand_commands(env_cfg.commands.ranges,commands)
          print("resample comand:",commands)
          env.commands[:,0] = commands[0]#0.35#控制指令
          env.commands[:,1] = commands[1]#
          env.commands[:,2] = commands[2]#
          env.commands[:,3] = commands[3]# #header
          
 def rand_commands(command_ranges,commands):
    commands[0] = random.uniform(command_ranges.lin_vel_x[0], command_ranges.lin_vel_x[1])
    commands[1] = random.uniform(command_ranges.lin_vel_y[0], command_ranges.lin_vel_y[1])
    commands[2] = 0 #角速度由P控制计算
    commands[3] = random.uniform(command_ranges.heading[0], command_ranges.heading[1])
```

另外也可以独立设置关节角度并打印相关观测进行接口校验：

```python theme={null}
        if 0:#debug
            actions[0,0]=0#FL
            actions[0,1]=3
            actions[0,2]=3

            actions[0,3]=0#FR
            actions[0,4]=3
            actions[0,5]=3

            actions[0,6]=0#RL
            actions[0,7]=3
            actions[0,8]=3

            actions[0,9]=0#RR
            actions[0,10]=3
            actions[0,11]=3
            print(obs[0,3:6]*57.3)#att
```

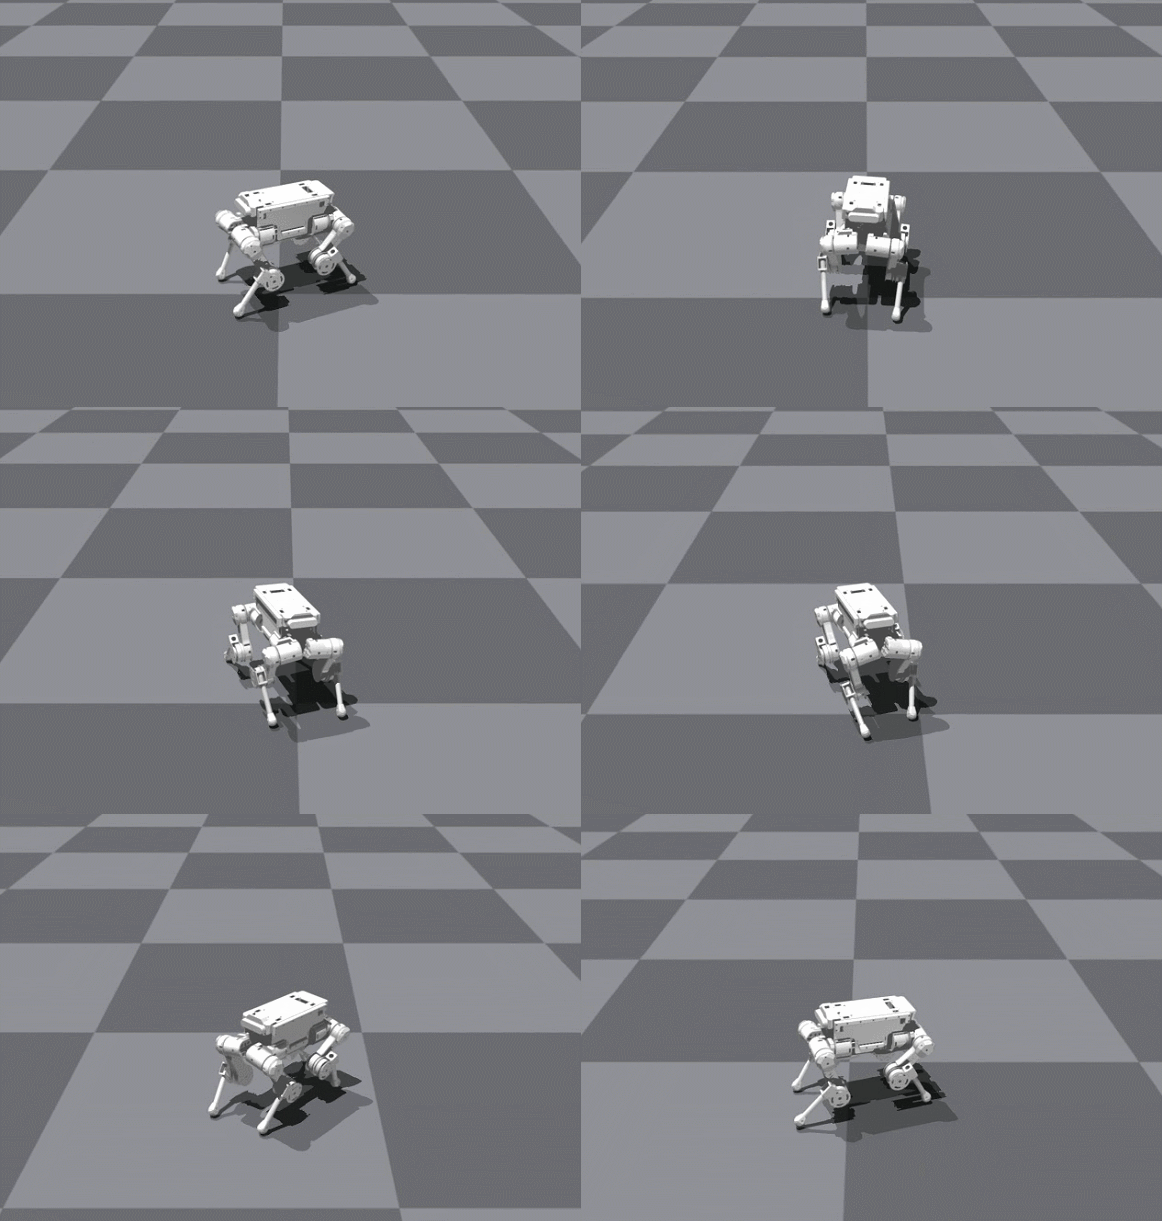
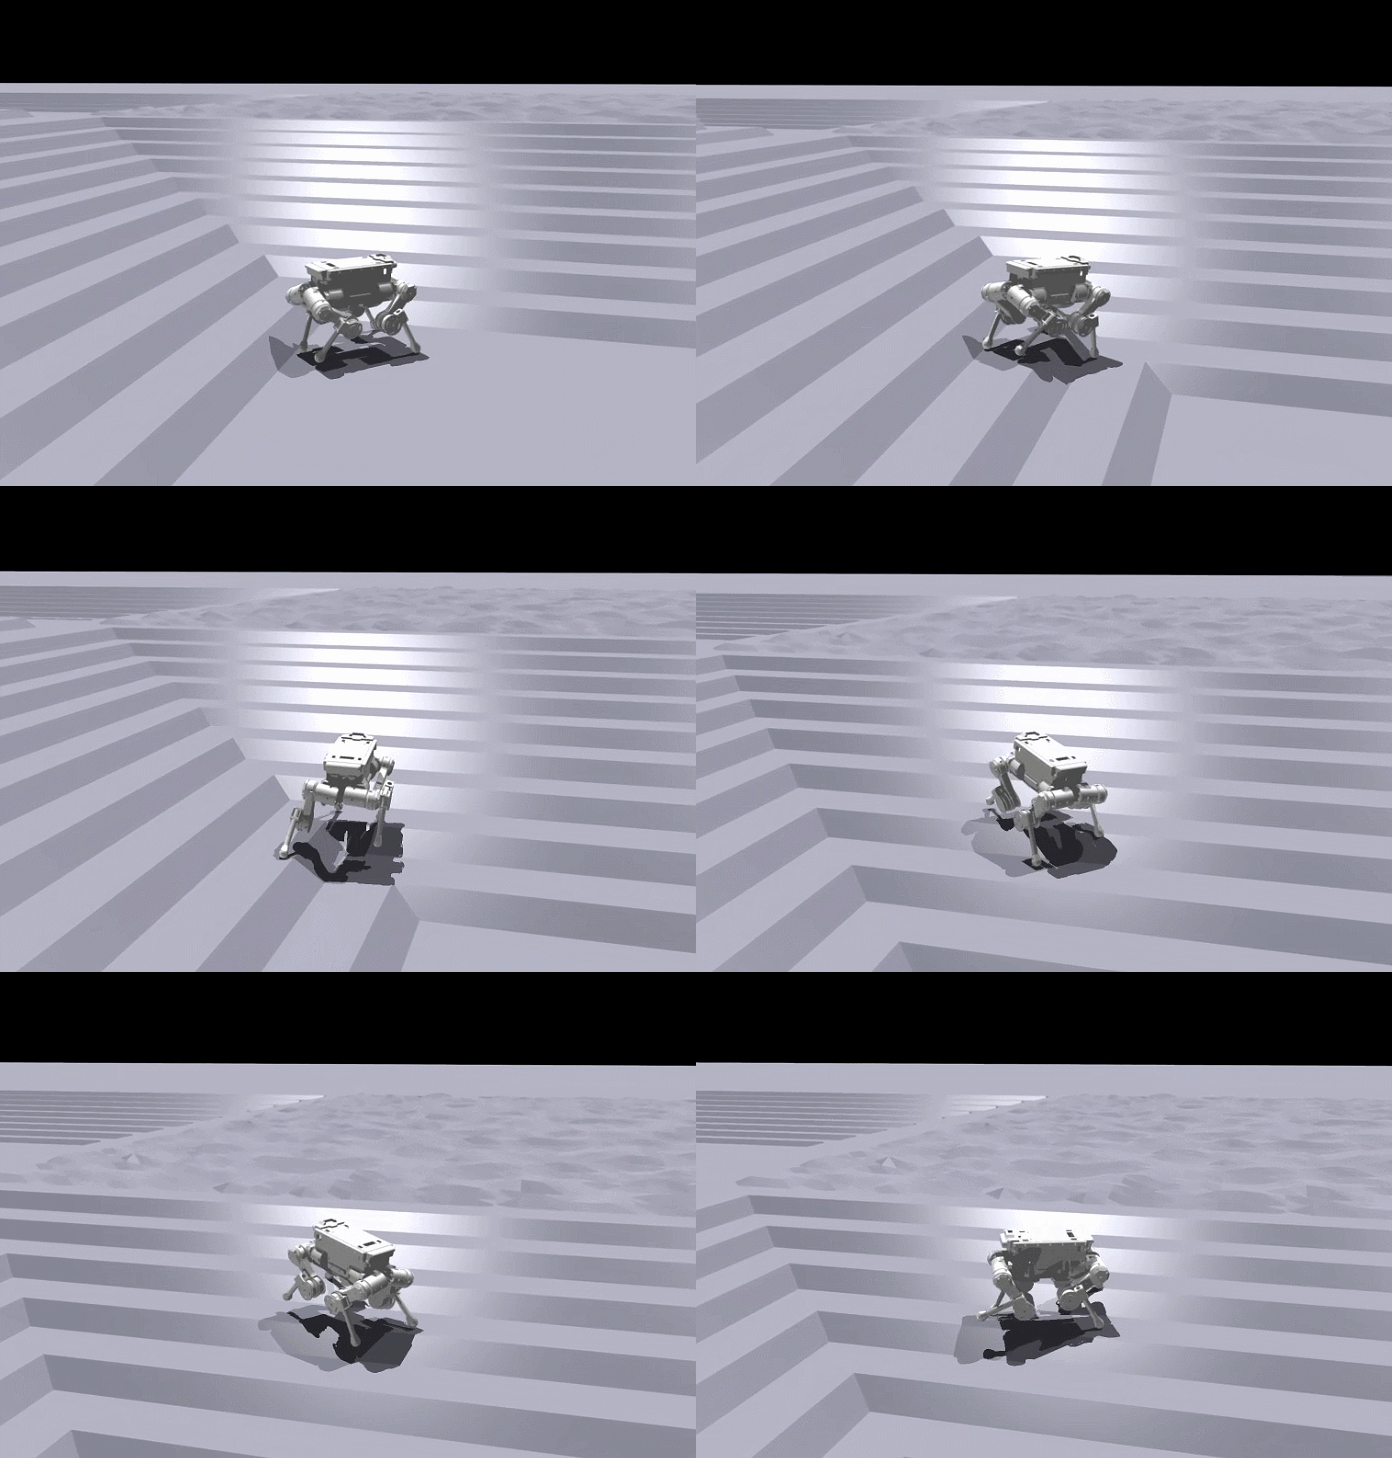
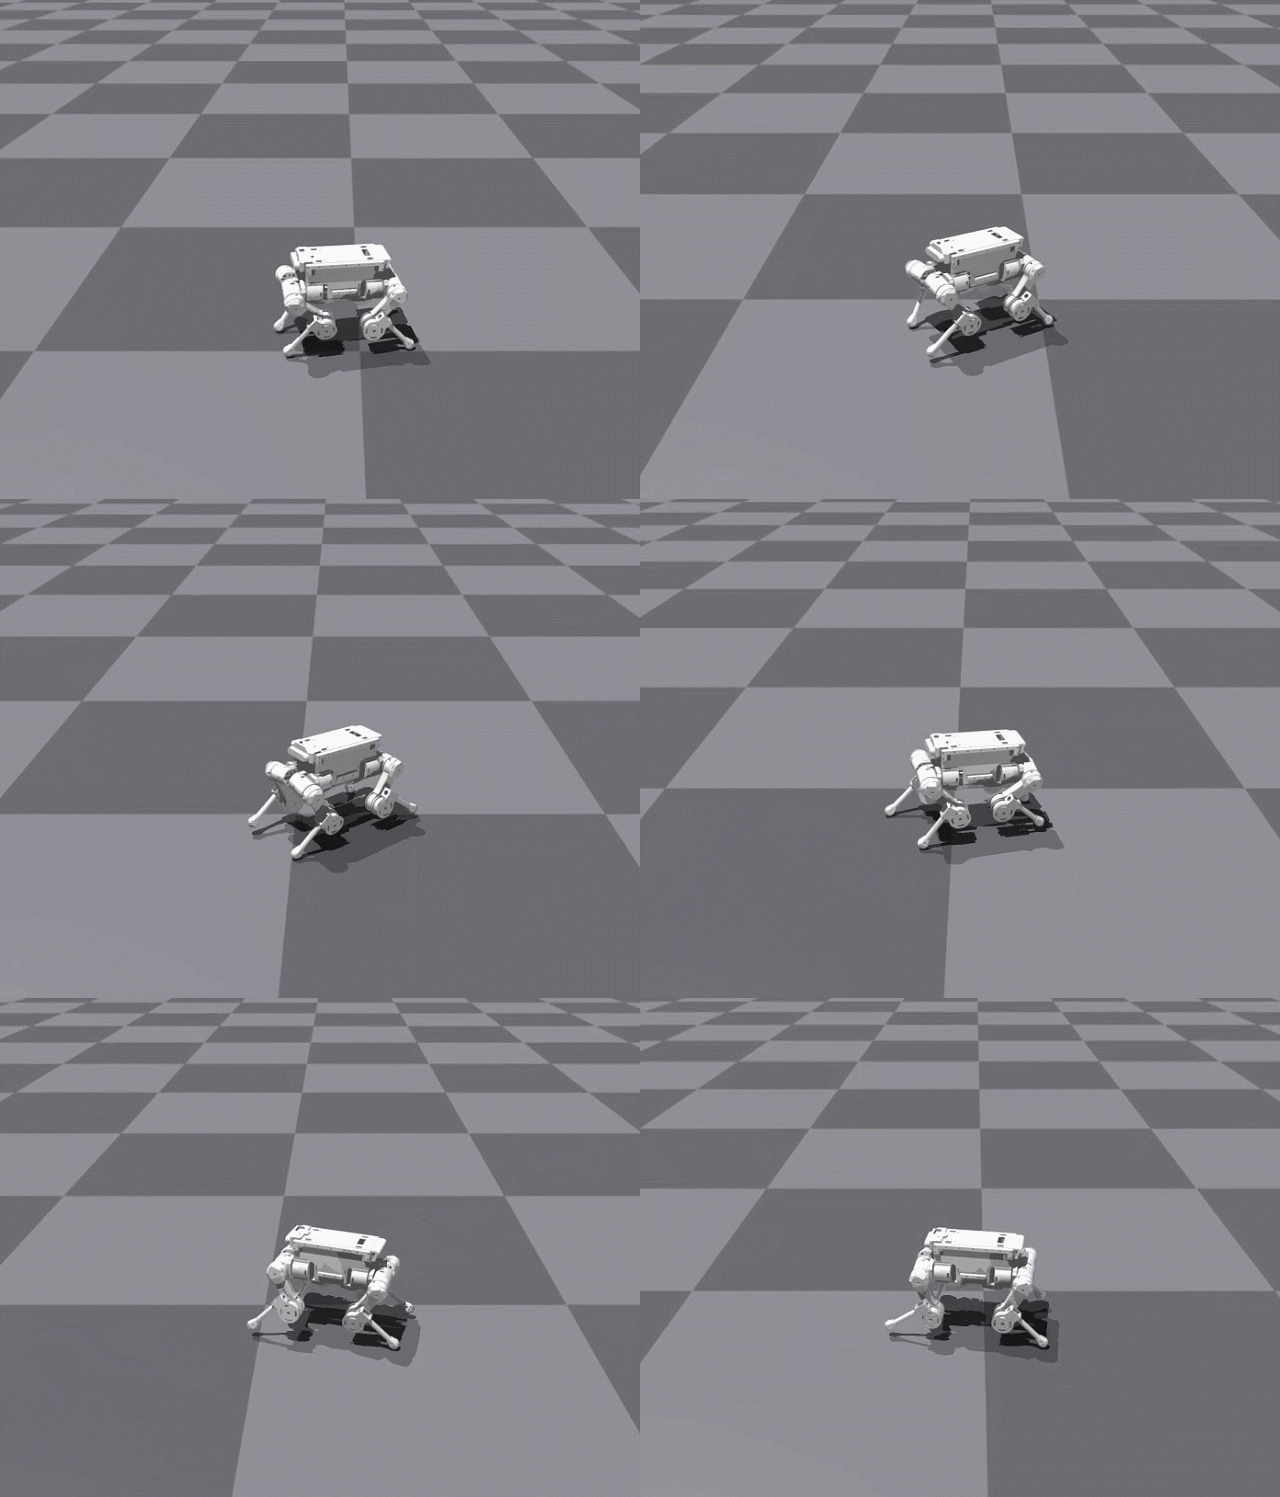
训练网络验证结果如下6000回合在4060 GPU上训练40分钟
![media](https://pub-7714d99fbd654288a82d7b2f7be01efb.r2.dev/isaac-gym-rl/047-image-image-52.gif)

## 4.6 增加地形训练课程：

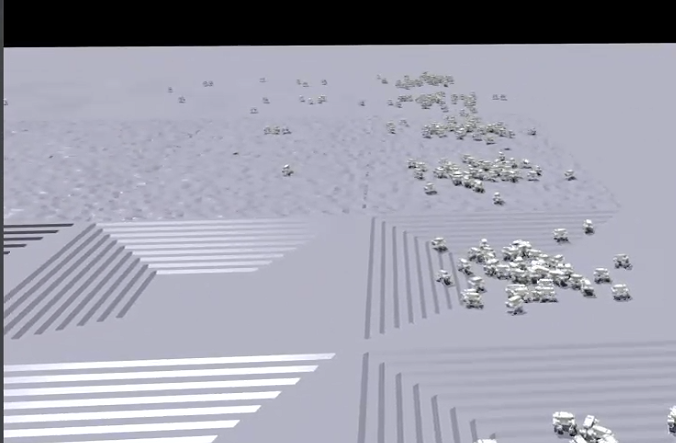
通过修改参数实现增加地形进行训练：

```python theme={null}
    class terrain(LeggedRobotCfg.terrain):
        mesh_type = 'trimesh'  # "heightfield" # none, plane, heightfield or trimesh
        measure_heights = True
        include_act_obs_pair_buf = False
```
![media](https://pub-7714d99fbd654288a82d7b2f7be01efb.r2.dev/isaac-gym-rl/048-image-image-53.png)

![media](https://pub-7714d99fbd654288a82d7b2f7be01efb.r2.dev/isaac-gym-rl/049-image-image-54.gif)

在play中需要修改不同难度地形terrain.py文件中修改，**play时设置，训练时注释这句话**：

```python theme={null}
    def make_terrain(self, choice, difficulty):
        terrain = terrain_utils.SubTerrain("terrain",
                                            width=self.width_per_env_pixels,
                                            length=self.width_per_env_pixels,
                                            vertical_scale=self.cfg.vertical_scale,
                                            horizontal_scale=self.cfg.horizontal_scale)
        difficulty=0.1#设置地形难度---------
```

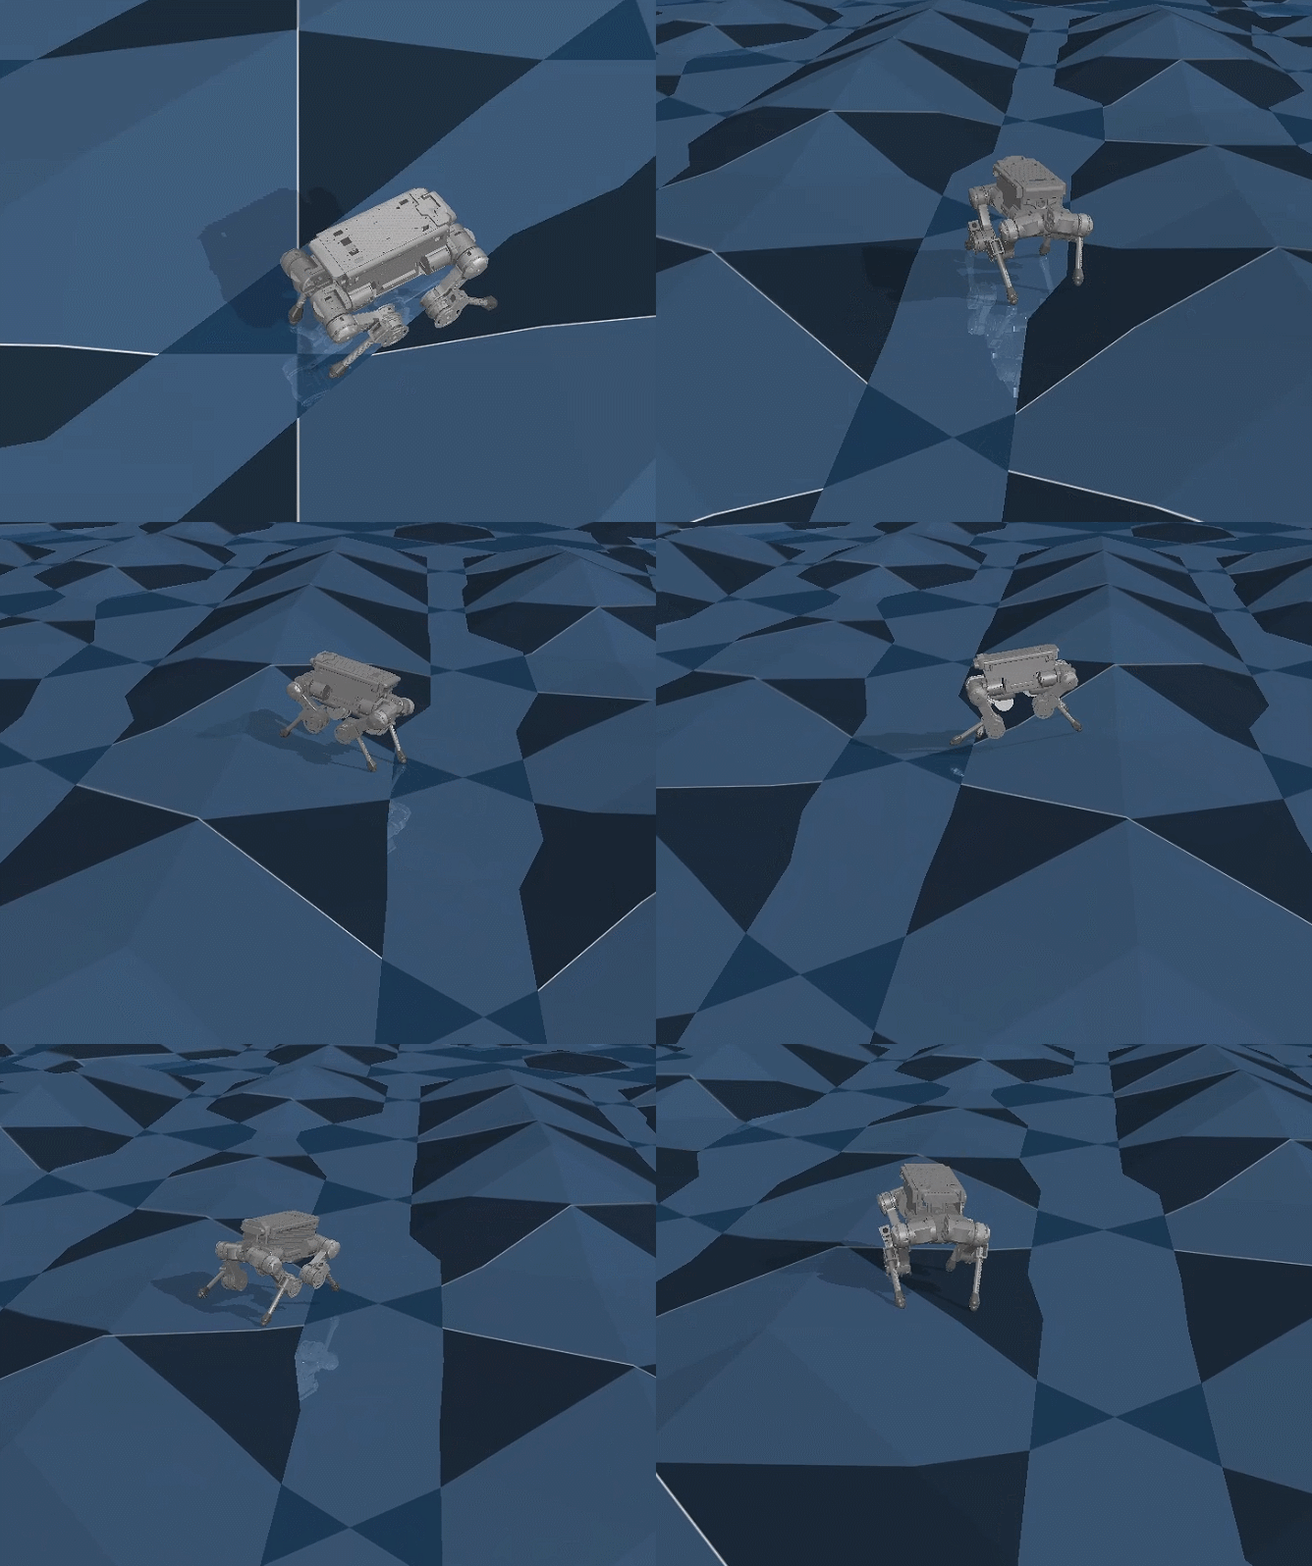
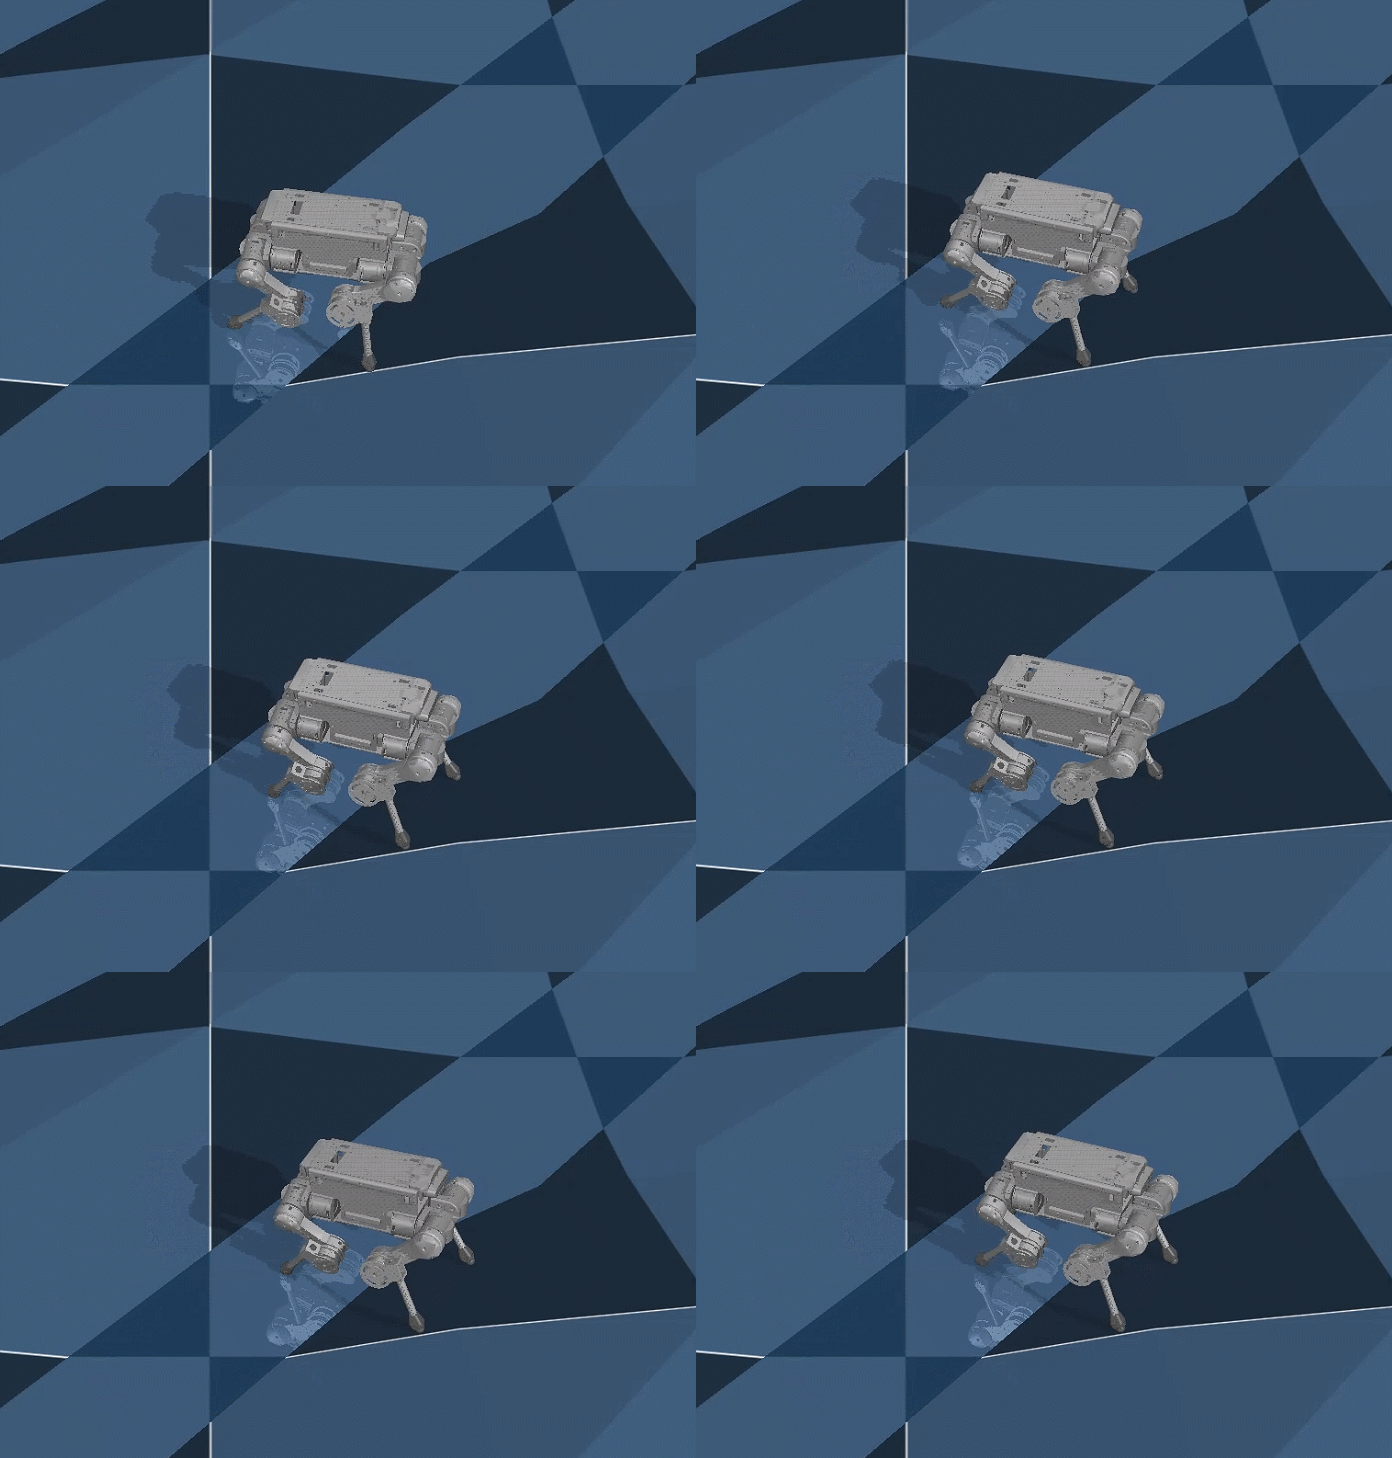
最后在sim2sim时增加terrain参数：

```python theme={null}
python ./sim2sim.py --terrain
```
![media](https://pub-7714d99fbd654288a82d7b2f7be01efb.r2.dev/isaac-gym-rl/050-image-image-55.gif)

![media](https://pub-7714d99fbd654288a82d7b2f7be01efb.r2.dev/isaac-gym-rl/051-image-image-56.gif)

## 4.7 **学习必要torch的函数调用方法：**

### 4.7.1 **Python获取数据的顺序：**

我们假设有一个数组名叫 array

那么可以用array\[0:3]访问前三个元素

可以用左开右闭来理解

```python theme={null}
array = [1, 2, 3, 4, 5, "你又怎么了"]print(array[0 : 3])
1,2,3
```

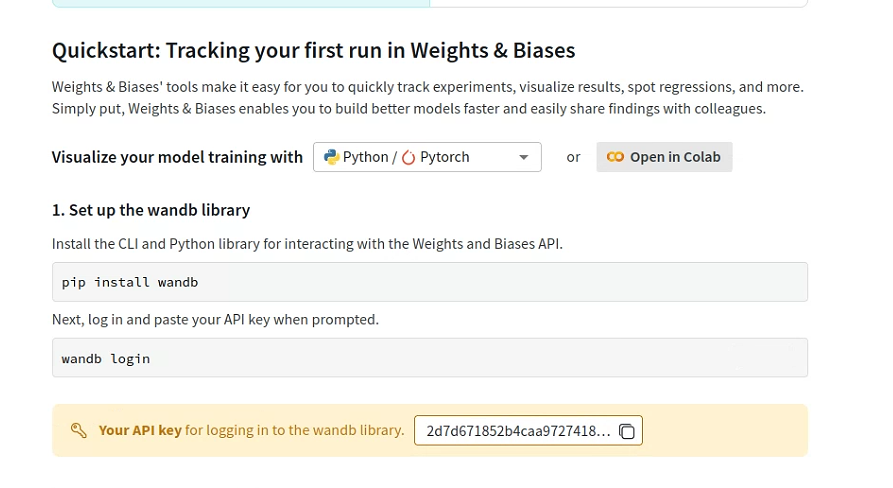
### 4.7.2 使用wandb进行数据记录，新建project工程后可以查看到对应的API：

![media](https://pub-7714d99fbd654288a82d7b2f7be01efb.r2.dev/isaac-gym-rl/052-image-image-57.png)

```python theme={null}
wandb.init()
wandb_dict = {}#doghome
#写入数据
wandb_dict['Loss/value_function'] = locs['mean_value_loss']
wandb_dict['Loss/surrogate'] = locs['mean_surrogate_loss']
#持续保存
wandb.log(wandb_dict, step=locs['it'])
```

则在每次启动时选择已有账户并复制API（不会显示），回车后启动训练则会将过程中的log数据上传。

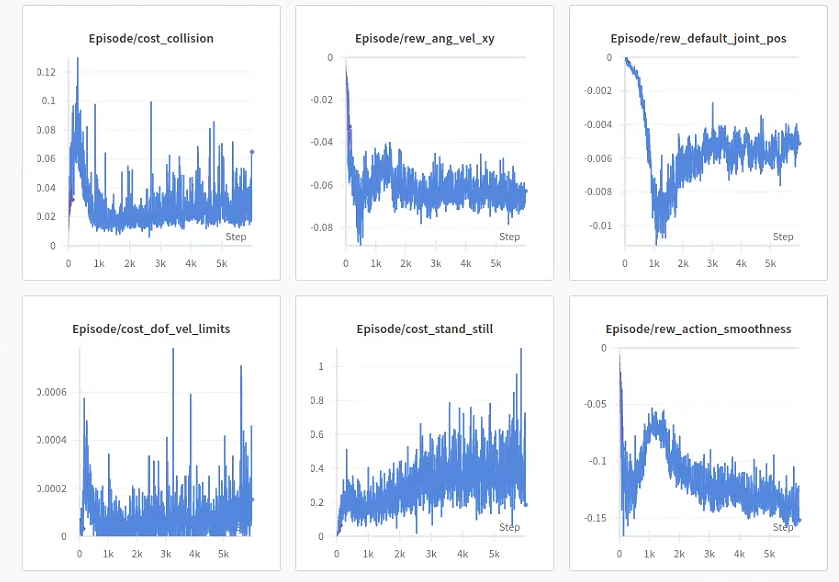
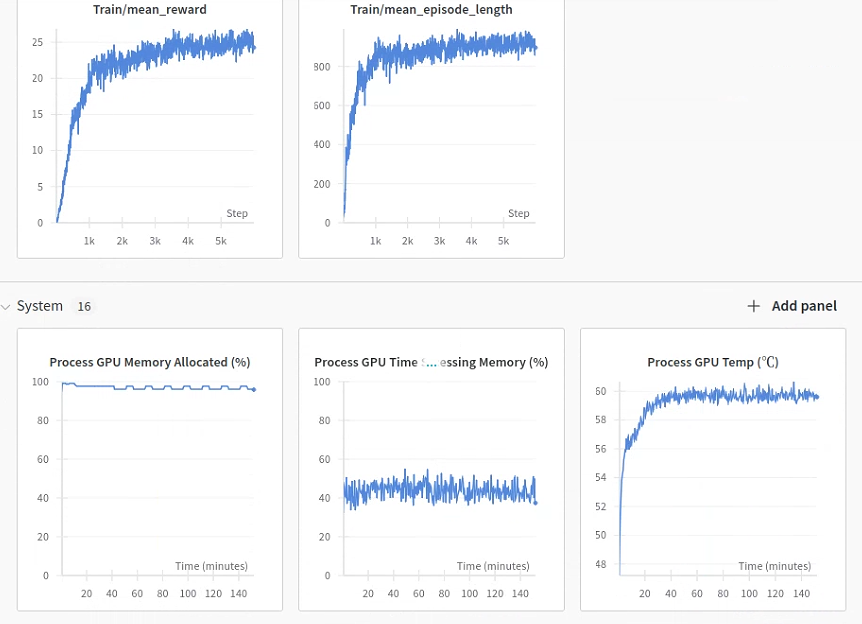
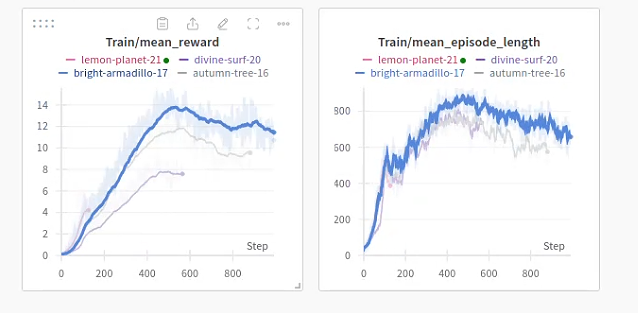
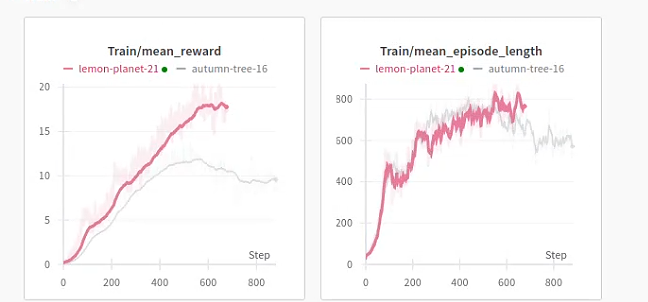
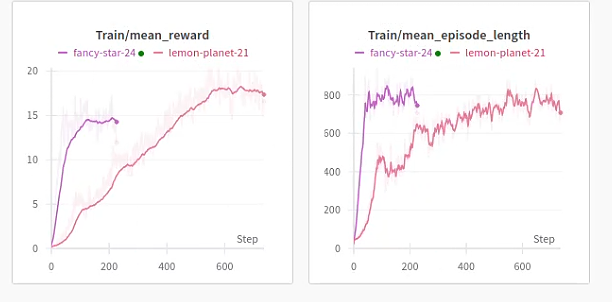
登录网站：[wandb.ai](https://wandb.ai) 注册用户，训练时候需要保证能联网，则数据可以上传，通过刷新网络了解最新的训练结果：

![media](https://pub-7714d99fbd654288a82d7b2f7be01efb.r2.dev/isaac-gym-rl/053-image-image-58.png)

![media](https://pub-7714d99fbd654288a82d7b2f7be01efb.r2.dev/isaac-gym-rl/054-image-image-59.png)

```python theme={null}
andb: Currently logged in as: golaced (golaced-). Use wandb login --relogin to force relogin
```

## 4.8 启发式训练方法+训练方案探讨

### 4.8.1 训练问题

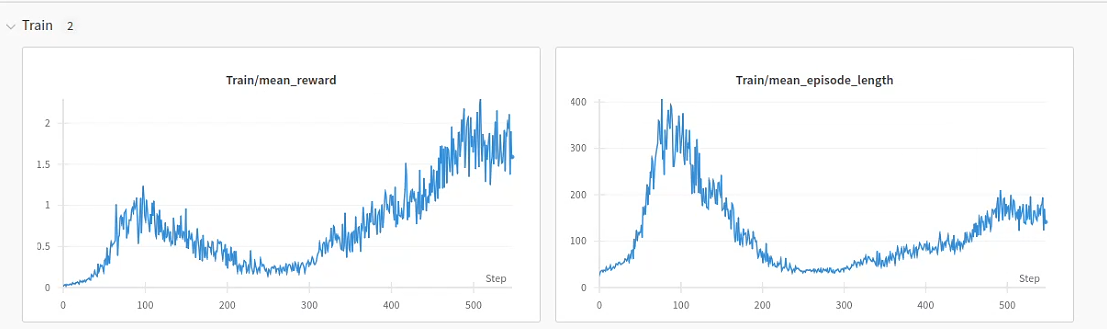
在重新导出URDF模型后出现原始训练方法无法实现机器人获取持续奖励，最大问题是机器人不抬腿迈步，在之前SW直接导出的模型中由于其惯量和质量小，因此机器人可以很快发现移动迈腿会获取到更多奖励，但重新导出训练中却出现平台、甚至reward出现回落：

![media](https://pub-7714d99fbd654288a82d7b2f7be01efb.r2.dev/isaac-gym-rl/055-image-image-60.png)

同样修正奖励发现几个问题：

（1）tracking\_sigma值过小（0.15）会导致机器人获取一段奖励后出现reward快速跌落机器人在空中不断复位；

（2）tracking\_sigma值过大（0.25）则会导致机器人不会迈腿，只会站在原地并获取奖励，最终造成如上图所示的平台

### 4.8.2 解决思路

（1）首先想到的是采用简单粗暴的方式，直接增大线速度与角速度奖励，但并不能保证很好启发踏步（**失败**）：

![media](https://pub-7714d99fbd654288a82d7b2f7be01efb.r2.dev/isaac-gym-rl/056-image-image-61.png)

（2）优化训练方法，采用课程的方式，在平台处机器人已经学会站立，则是否可以在训练回合保存的网络处作为预训练模型，重新设计课程和奖励在该网络参数基础上将tracking\_sigma调小让其可以探索出踏步并继续训练（**失败**）

![media](https://pub-7714d99fbd654288a82d7b2f7be01efb.r2.dev/isaac-gym-rl/057-image-image-62.png)

（3）增加更多启发式的课程和奖励设置，目前驱动摆动的主要是速度奖励和对腾空高度的惩罚，前者如果机器人不移动则无法获取到，因此并不能主动引导机器人产生踏步行为，后者只设置了腿与期望高度重合时的奖励或惩罚，因此如果腿就不摆动，则此时产生的奖励不变，因此也很难产生启发式的奖励，因此需要增加类似相序或参考摆动轨迹、关节运动的奖励：

***

# 阶段5 迁移部署对网络进行测试

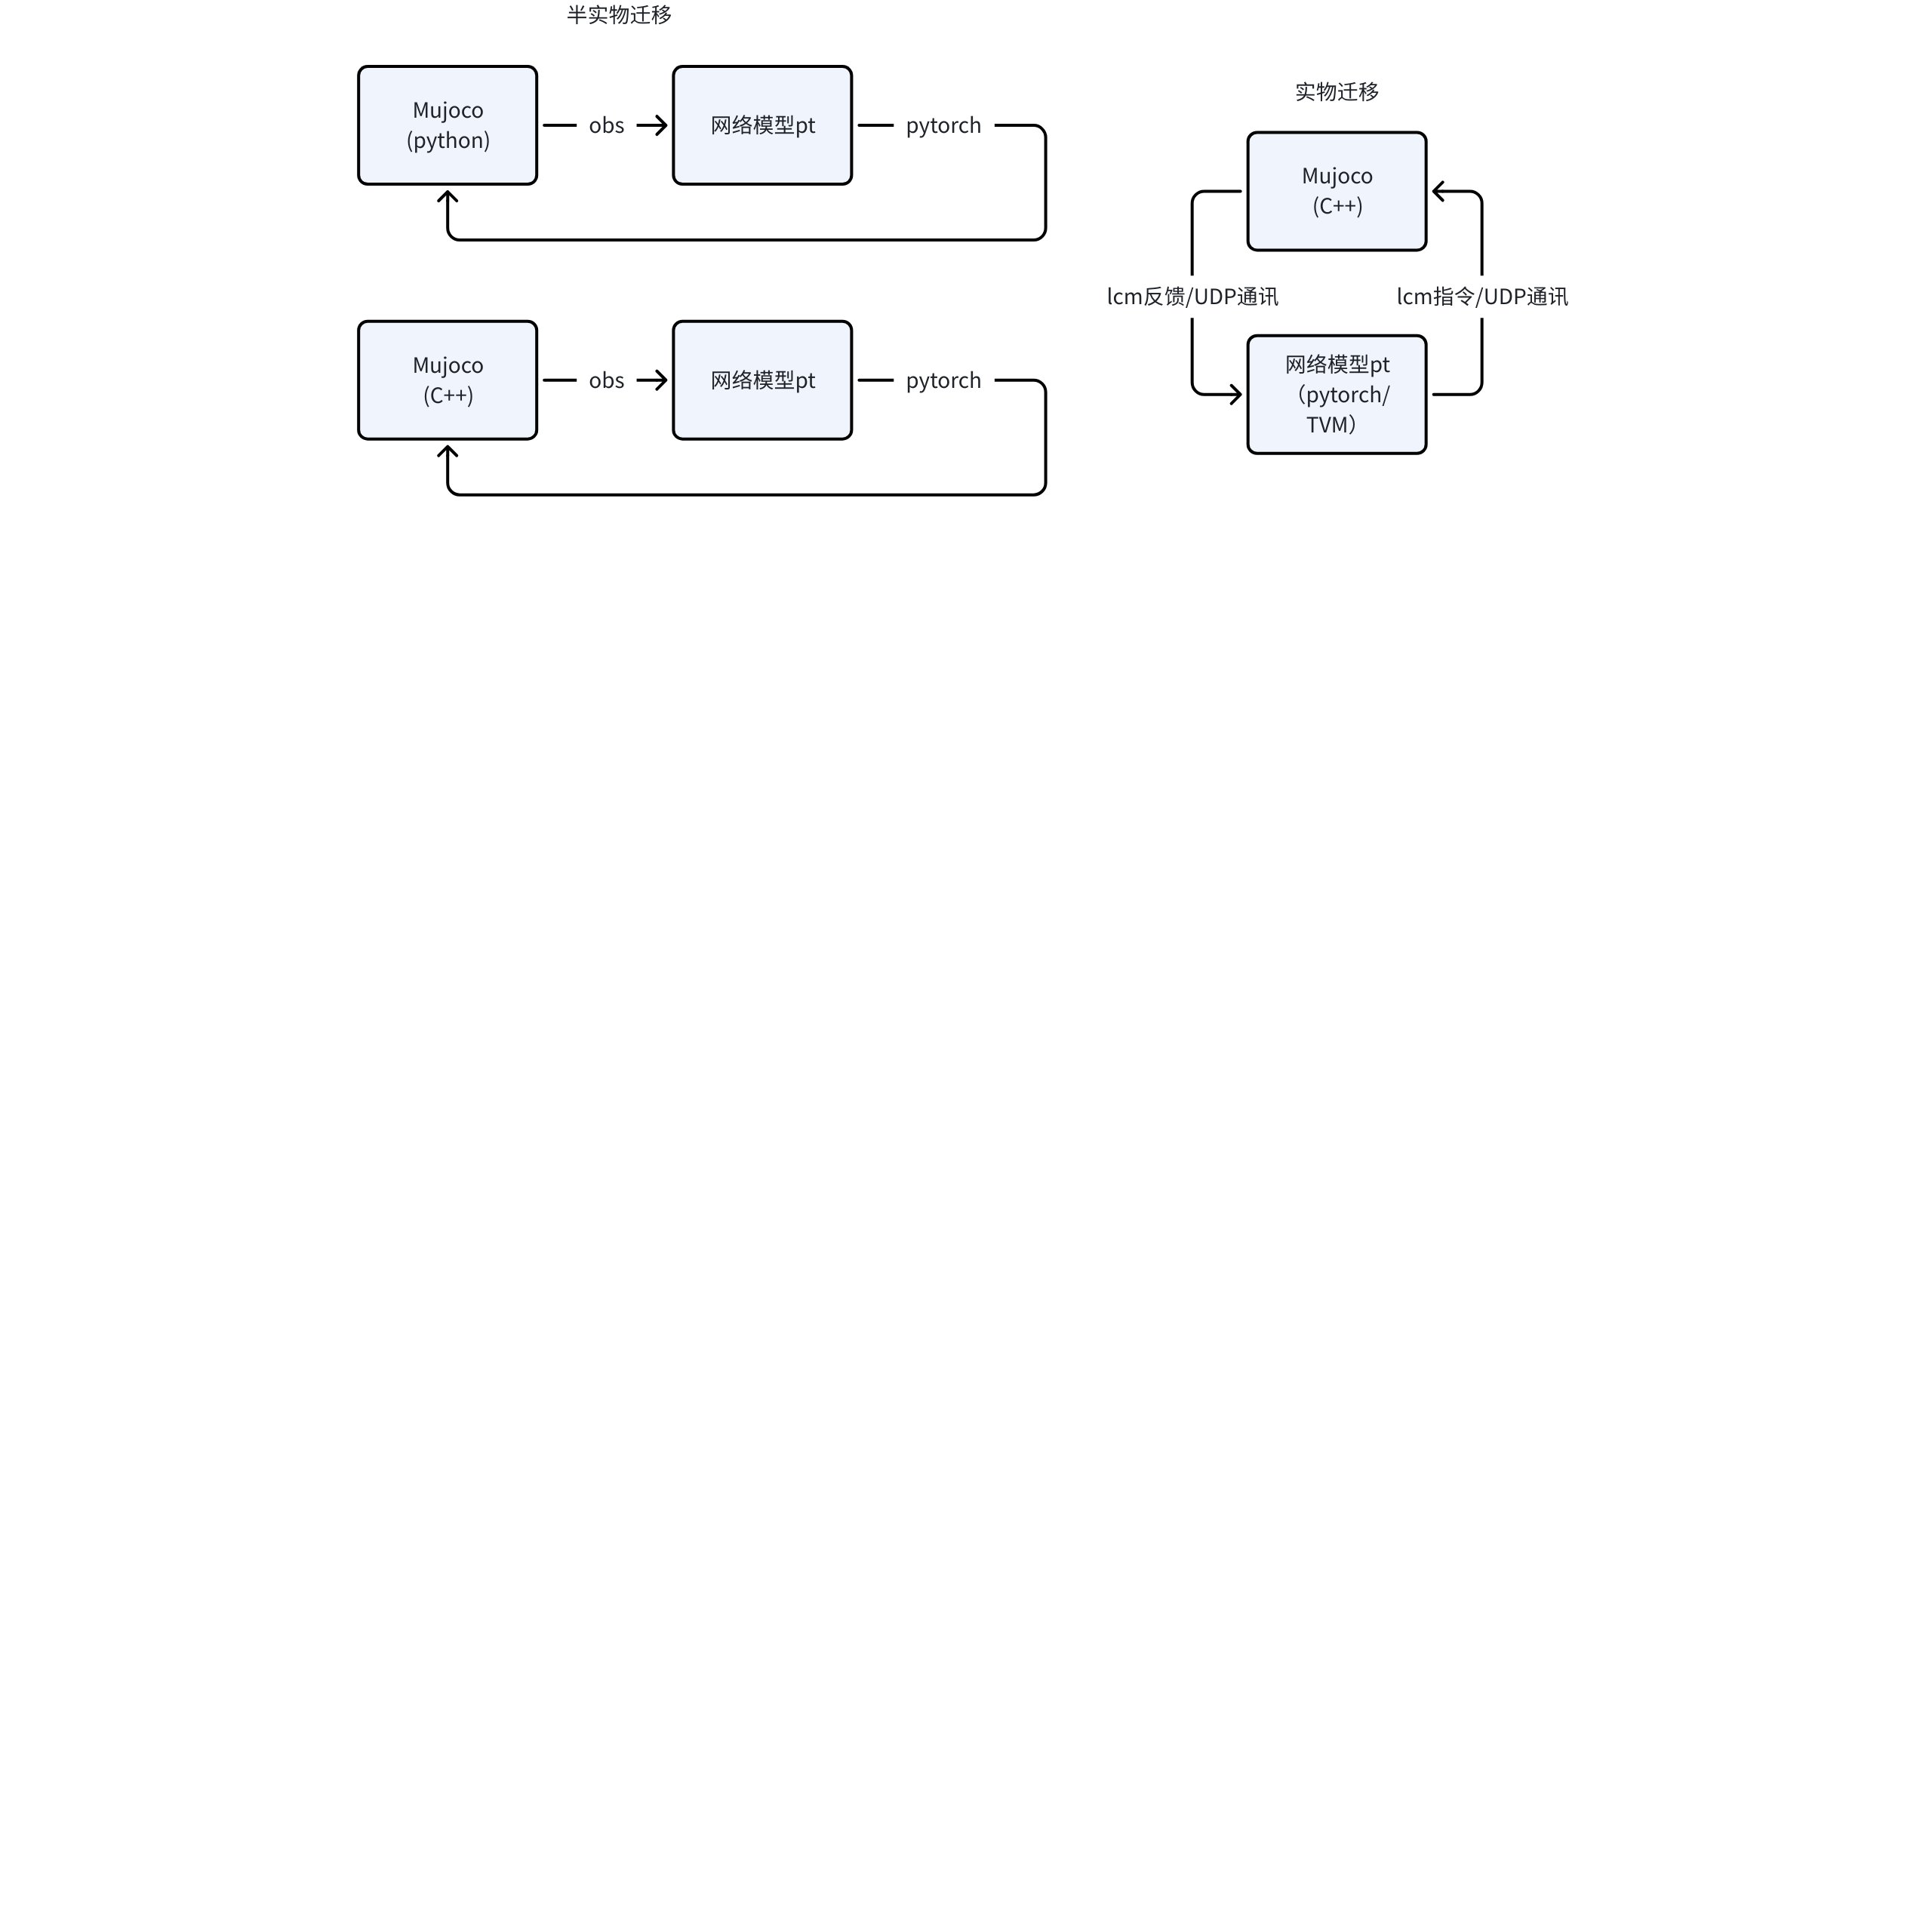
在完成在isacc下训练后需要进行迁移，模型迁移最核心的是在控制器端搭建运行神经网络的框架并将其所需要的反馈数据送入到网络中，这里参考Human-Gym中通过mujoco仿真器实现sim2sim的迁移，当然面向实物迁移还需搭建C++下的迁移软件，因此这里可以形成如下几种典型的迁移框架：

![media](https://pub-7714d99fbd654288a82d7b2f7be01efb.r2.dev/isaac-gym-rl/058-whiteboard-whiteboard-63.jpg)

**（1）采用mujoco python/C++仿真框架：**

网络输入输出嵌入到mujoco仿真接口中，直接读取和驱动仿真，偏向于半实物迁移；

**（2）采用mujoco C++仿真，通过LCM或ROS接口实现迁移**

异步运行mujoco仿真，通过LCM和C++ pytorch接口独立运行网络，实现多线程并行，偏向与实物迁移；

## 5.1 URDF转mujoco XMl文件

下面介绍面向半实物迁移的方法，首先完成URDF向xml文件的转换，参考Mujoco教程1：安装与urdf转xml

在urdf中添加以下段，同时mesh需要指定到机器人目录，字段嵌入到robot下：

```sql theme={null}
<robot
  name="tinymal">
  <mujoco>
  <compiler 
    meshdir="/home/pi/Downloads/LocomotionWithNP3O-master/resources/tinymal/meshes" 
    balanceinertia="true" 
    discardvisual="false" />
</mujoco>
```

转换模型，cd进入mujoco bin可执行文件夹下：

第一项是urdf路径，第二项是期望xml所在路径./compile /path/to/model.urdf /path/to/model.xml

![media](https://pub-7714d99fbd654288a82d7b2f7be01efb.r2.dev/isaac-gym-rl/059-image-image-64.png)

```sql theme={null}
./compile /home/pi/Downloads/LocomotionWithNP3O-master/resources/tinymal/urdf/tinymal.urdf /home/pi/Downloads/LocomotionWithNP3O-master/resources/tinymal/xml/tinymal_out.xml

./compile /home/pi/Downloads/back_good/LocomotionWithNP3O-masteroldxgoo1/LocomotionWithNP3O-masteroldx/resources/tinker/urdf/tinker_urdf_inv.urdf /home/pi/Downloads/back_good/LocomotionWithNP3O-masteroldxgoo1/LocomotionWithNP3O-masteroldx/resources/tinker/xml/tinker_cout.xml
```

可在asset标签和worldbody标签中添加一些背景材料和光源，需要改造下原始xml文件，增加浮动基座，并改成xml嵌套。

## 5.2修改xml文件：

采用Aloha下的xml环境构建形式，通过sence、world和机器人实现快速的替换和二次开发，对导出的机器人模型进行修改：

```sql theme={null}
去掉以下内容
<mujoco model="TinyStretch">
    <compiler angle="radian" meshdir="/home/tinymal/mujoco/TinyStretch/meshes/" />
    <size njmax="500" nconmax="100" />
    <asset>
        <mesh name="base_link" file="base_link.STL" />
        <mesh name="w0_link" file="w0_link.STL" />
        <mesh name="w1_link" file="w1_link.STL" />
        <mesh name="w2_link" file="w2_link.STL" />
        <mesh name="w3_link" file="w3_link.STL" />
        <mesh name="arm_up_link" file="arm_up_link.STL" />
        <mesh name="arm_base_link" file="arm_base_link.STL" />
        <mesh name="head0_link" file="head0_link.STL" />
        <mesh name="head1_link" file="head1_link.STL" />
        <mesh name="arm0_link" file="arm0_link.STL" />
        <mesh name="arm1_link" file="arm1_link.STL" />
        <mesh name="arm2_link" file="arm2_link.STL" />
        <mesh name="arm3_link" file="arm3_link.STL" />
        <mesh name="arm4_link" file="arm4_link.STL" />
        <mesh name="lidar_link" file="lidar_link.STL" />
    </asset>
    <worldbody>      
        <geom size="0.0005 0.0005 0.0005" type="box" contype="0" conaffinity="0" group="1" />
        <geom type="mesh" contype="0" conaffinity="0" group="1" rgba="0.22353 0.22353 0.22353 1" mesh="base_link" />
        <geom type="mesh" rgba="0.22353 0.22353 0.22353 1" mesh="base_link" />
        </body>
    </worldbody>
</mujoco>       
         
修改为,增加浮动基座和惯性：
<mujocoinclude>
    <body name="robot" pos="0 0 -0.5" quat="1 0 0 0">
        <joint name="float_base" type="free"/>  
        <inertial pos="0 0 0" quat="1 0 0 0" mass="0.8" diaginertia="0.001 0.001 0.001"/>  
        <geom size="0.0005 0.0005 0.0005" type="box" contype="0" conaffinity="0" group="1" />
         ...
        </body>
    </body>
</mujocoinclude>
```

（1）world.xml:

```sql theme={null}
<mujoco>
    <include file="scene.xml"/>
    <include file="dependencies.xml"/>
    <worldbody>
        <include file="TinyStretch.xml" />
    </worldbody>
</mujoco>
```

（2）scene.xml :

```sql theme={null}
<mujocoinclude>
<!--    <option timestep='0.0025' iterations="50" tolerance="1e-10" solver="Newton" jacobian="dense" cone="elliptic"/>-->
    <asset>
        <texture type="skybox" builtin="gradient" rgb1=".3 .5 .7" rgb2="0 0 0" width="512" height="512"/>
        <texture name="grid" type="2d" builtin="checker" width="512" height="512" rgb1=".1 .2 .3" rgb2=".2 .3 .4"/>
        <material name="grid" texture="grid" texrepeat="1 1" texuniform="true" reflectance=".2"/>
    </asset>

    <visual>
        <map fogstart="1.5" fogend="5" force="0.1" znear="0.1"/>
        <quality shadowsize="4096" offsamples="4"/>
        <headlight ambient="0.4 0.4 0.4"/>
    </visual>

    <worldbody>
        <geom name="floor" pos="0 0 -0.505" size="0 0 0.05" type="plane" material="grid" condim="3"/>
         
        <light castshadow="false" directional='true' diffuse='.3 .3 .3' specular='0.3 0.3 0.3' pos='-1 -1 1'
               dir='1 1 -1'/>
        <light directional='true' diffuse='.3 .3 .3' specular='0.3 0.3 0.3' pos='1 -1 1' dir='-1 1 -1'/>
        <light castshadow="false" directional='true' diffuse='.3 .3 .3' specular='0.3 0.3 0.3' pos='0 1 1'
               dir='0 -1 -1'/>

    </worldbody>
</mujocoinclude>
```

（3）dependencies.xml:

```sql theme={null}
<mujocoinclude>
    <compiler angle="radian" inertiafromgeom="auto" inertiagrouprange="4 5"/>
    <asset>
        <mesh name="base_link" file="/home/tinymal/mujoco/TinyStretch/meshes/base_link.STL" />
        <mesh name="w0_link" file="/home/tinymal/mujoco/TinyStretch/meshes/w0_link.STL" />
        <mesh name="w1_link" file="/home/tinymal/mujoco/TinyStretch/meshes/w1_link.STL" />
        <mesh name="w2_link" file="/home/tinymal/mujoco/TinyStretch/meshes/w2_link.STL" />
        <mesh name="w3_link" file="/home/tinymal/mujoco/TinyStretch/meshes/w3_link.STL" />
        <mesh name="arm_up_link" file="/home/tinymal/mujoco/TinyStretch/meshes/arm_up_link.STL" />
        <mesh name="arm_base_link" file="/home/tinymal/mujoco/TinyStretch/meshes/arm_base_link.STL" />
        <mesh name="head0_link" file="/home/tinymal/mujoco/TinyStretch/meshes/head0_link.STL" />
        <mesh name="head1_link" file="/home/tinymal/mujoco/TinyStretch/meshes/head1_link.STL" />
        <mesh name="arm0_link" file="/home/tinymal/mujoco/TinyStretch/meshes/arm0_link.STL" />
        <mesh name="arm1_link" file="/home/tinymal/mujoco/TinyStretch/meshes/arm1_link.STL" />
        <mesh name="arm2_link" file="/home/tinymal/mujoco/TinyStretch/meshes/arm2_link.STL" />
        <mesh name="arm3_link" file="/home/tinymal/mujoco/TinyStretch/meshes/arm3_link.STL" />
        <mesh name="arm4_link" file="/home/tinymal/mujoco/TinyStretch/meshes/arm4_link.STL" />
        <mesh name="lidar_link" file="/home/tinymal/mujoco/TinyStretch/meshes/lidar_link.STL" />
    </asset>

</mujocoinclude>
```

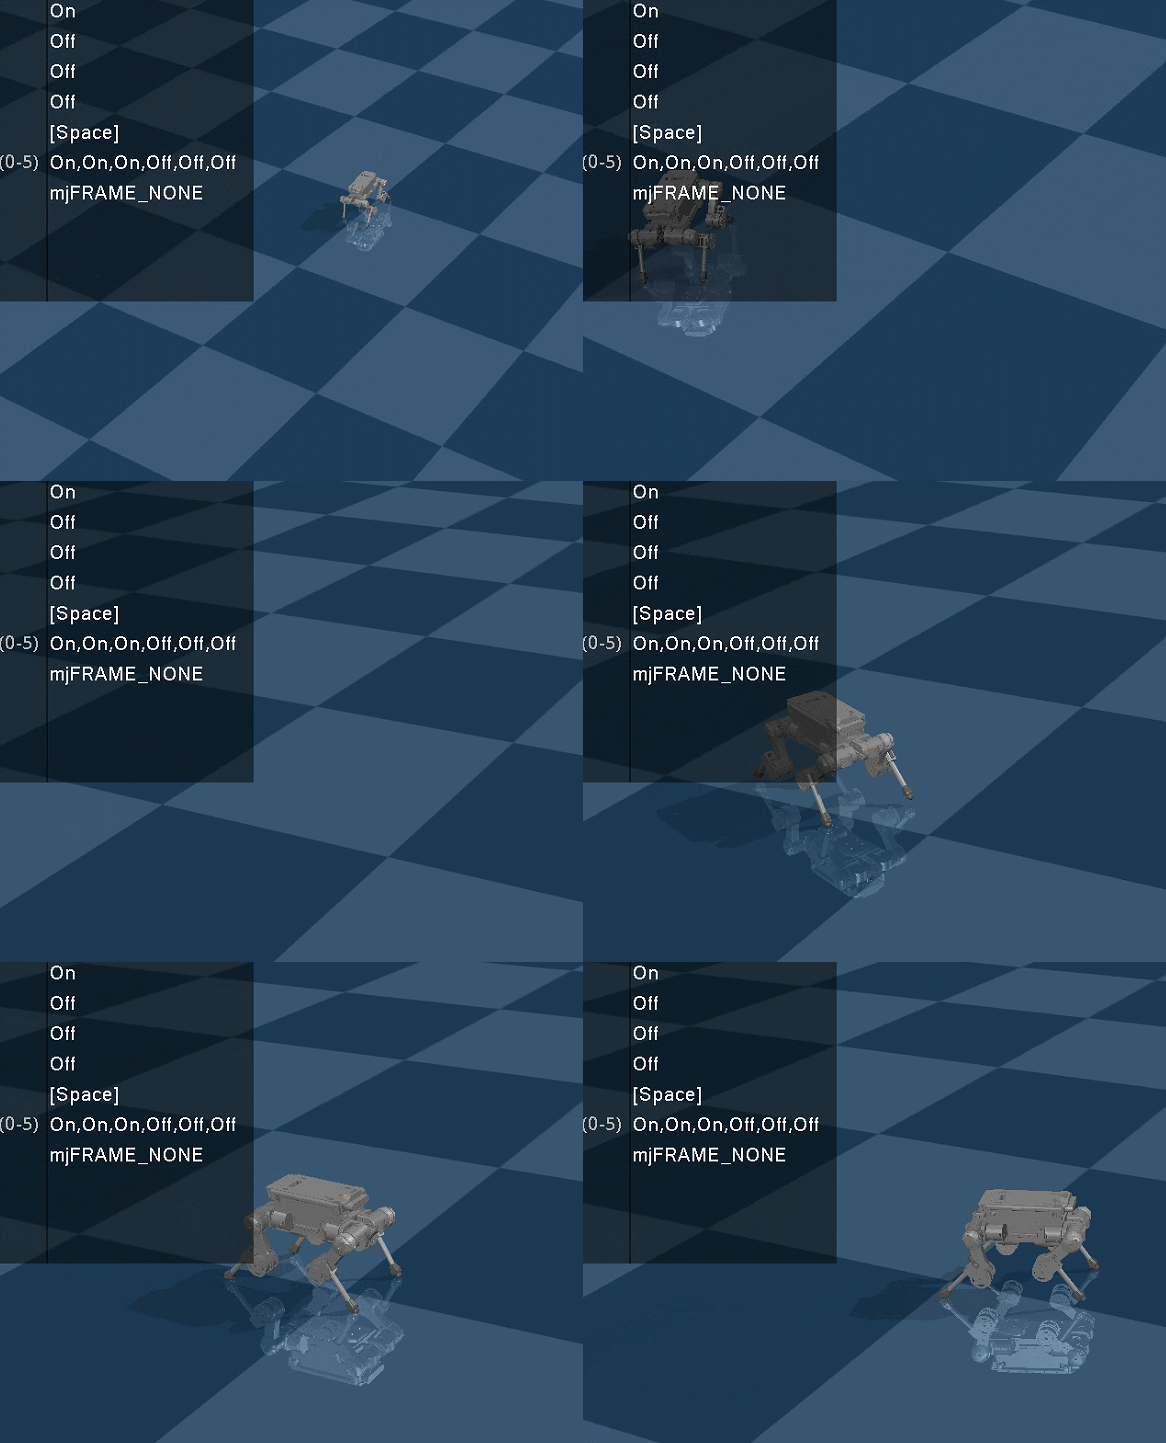
输入一下指令打开仿真界面，要求输入xml路径，对模型进行测试，可以通过render下的UI查看机器人惯量是否正确：

```sql theme={null}
./simulate /home/pi/Downloads/LocomotionWithNP3O-master/resources/tinymal/xml/world.xml
```

![media](https://pub-7714d99fbd654288a82d7b2f7be01efb.r2.dev/isaac-gym-rl/060-image-image-65.png)

![media](https://pub-7714d99fbd654288a82d7b2f7be01efb.r2.dev/isaac-gym-rl/061-image-image-66.png)

通过删除机器人模型中浮动基座可以实现机器人模型悬空测试关节控制：

```python theme={null}
<mujocoinclude>
    <body name="tinymal" pos="0 0 -0.25" quat="1 0 0 0">
        <joint name="float_base" type="free" />  
```

## 5.3增加电机执行器：

最后在world文件中依据关节增加控制器，可以采用motor，也可以独立设置速度和位置控制器，需要注意的是机器人模型和执行器模型命名顺序需要一致，并且保证与isacc中打印名字的顺序一致joint：

```sql theme={null}
     <actuator>      
                <motor name="FL_hip_joint" joint="FL_hip_joint" gear="1" ctrllimited="true" ctrlrange="-12 12"/>
                <motor name="FL_thigh_joint" joint="FL_thigh_joint" gear="1" ctrllimited="true" ctrlrange="-12 12"/>
                <motor name="FL_calf_joint" joint="FL_calf_joint" gear="1" ctrllimited="true" ctrlrange="-12 12"/>

                <motor name="FR_hip_joint" joint="FR_hip_joint" gear="1" ctrllimited="true" ctrlrange="-12 12"/>
                <motor name="FR_thigh_joint" joint="FR_thigh_joint" gear="1" ctrllimited="true" ctrlrange="-12 12"/>
                <motor name="FR_calf_joint" joint="FR_calf_joint" gear="1" ctrllimited="true" ctrlrange="-12 12"/>

                <motor name="RL_hip_joint" joint="RL_hip_joint" gear="1" ctrllimited="true" ctrlrange="-12 12"/>
                <motor name="RL_thigh_joint" joint="RL_thigh_joint" gear="1" ctrllimited="true" ctrlrange="-12 12"/>
                <motor name="RL_calf_joint" joint="RL_calf_joint" gear="1" ctrllimited="true" ctrlrange="-12 12"/>

                <motor name="RR_hip_joint" joint="RR_hip_joint" gear="1" ctrllimited="true" ctrlrange="-12 12"/>
                <motor name="RR_thigh_joint" joint="RR_thigh_joint" gear="1" ctrllimited="true" ctrlrange="-12 12"/>
                <motor name="RR_calf_joint" joint="RR_calf_joint" gear="1" ctrllimited="true" ctrlrange="-12 12"/>
    </actuator>
        <!--actuator>      
                <position name="FR_hip_joint_M" joint="FR_hip_joint" gear="1" ctrllimited="true" kp="5" ctrlrange="-1.57 1.57" />
                <position name="FR_thigh_joint_M" joint="FR_thigh_joint" gear="1" ctrllimited="true" kp="5" ctrlrange="-1.57 1.57" />
                <position name="FR_calf_joint_M" joint="FR_calf_joint" gear="1" ctrllimited="true" kp="5" ctrlrange="-1.57 1.57" />
                <position name="RR_hip_joint_M" joint="RR_hip_joint" gear="1" ctrllimited="true" kp="5" ctrlrange="-1.57 1.57" />
                <position name="RR_thigh_joint_M" joint="RR_thigh_joint" gear="1" ctrllimited="true" kp="5" ctrlrange="-1.57 1.57" />
                <position name="RR_calf_joint_M" joint="RR_calf_joint" gear="1" ctrllimited="true" kp="5" ctrlrange="-1.57 1.57" />
                <position name="FL_hip_joint_M" joint="FL_hip_joint" gear="1" ctrllimited="true" kp="5" ctrlrange="-1.57 1.57" />
                <position name="FL_thigh_joint_M" joint="FL_thigh_joint" gear="1" ctrllimited="true" kp="5" ctrlrange="-1.57 1.57" />
                <position name="FL_calf_joint_M" joint="FL_calf_joint" gear="1" ctrllimited="true" kp="5" ctrlrange="-1.57 1.57" />
                <position name="RL_hip_joint_M" joint="RL_hip_joint" gear="1" ctrllimited="true" kp="5" ctrlrange="-1.57 1.57" />
                <position name="RL_thigh_joint_M" joint="RL_thigh_joint" gear="1" ctrllimited="true" kp="5" ctrlrange="-1.57 1.57" />
                <position name="RL_calf_joint_M" joint="RL_calf_joint" gear="1" ctrllimited="true" kp="5" ctrlrange="-1.57 1.57" />         
    </actuator-->
 
```

通过运行xml文件，确认关节角度顺序：

![media](https://pub-7714d99fbd654288a82d7b2f7be01efb.r2.dev/isaac-gym-rl/062-image-image-67.png)

![media](https://pub-7714d99fbd654288a82d7b2f7be01efb.r2.dev/isaac-gym-rl/063-image-image-68.png)

最后，在机器人模型中绑定site名称，在world中增加对应的关节位置、速度和扭矩传感器、IMU传感器：

```python theme={null}
  <sensor>
                <actuatorpos name='FR_hip_joint_p'  actuator='FR_hip_joint' user='13'/>
                <actuatorpos name='FR_thigh_joint_p'  actuator='FR_thigh_joint' user='13'/>
                <actuatorpos name='FR_calf_joint_p'  actuator='FR_calf_joint' user='13'/>
                <actuatorpos name='RR_hip_joint_p'  actuator='RR_hip_joint' user='13'/>
                <actuatorpos name='RR_thigh_joint_p'  actuator='RR_thigh_joint' user='13'/>
                <actuatorpos name='RR_calf_joint_p'  actuator='RR_calf_joint' user='13'/>
                <actuatorpos name='FL_hip_joint_p'  actuator='FL_hip_joint' user='13'/>
                <actuatorpos name='FL_thigh_joint_p'  actuator='FL_thigh_joint' user='13'/>
                <actuatorpos name='FL_calf_joint_p'  actuator='FL_calf_joint' user='13'/>
                <actuatorpos name='RL_hip_joint_p'  actuator='RL_hip_joint' user='13'/>
                <actuatorpos name='RL_thigh_joint_p'  actuator='RL_thigh_joint' user='13'/>
                <actuatorpos name='RL_calf_joint_p'  actuator='RL_calf_joint' user='13'/>

        <actuatorvel name='FR_hip_joint_v'  actuator='FR_hip_joint' user='13'/>
        <actuatorvel name='FR_thigh_joint_v'  actuator='FR_thigh_joint' user='13'/>
        <actuatorvel name='FR_calf_joint_v'  actuator='FR_calf_joint' user='13'/>
        <actuatorvel name='RR_hip_joint_v'  actuator='RR_hip_joint' user='13'/>
        <actuatorvel name='RR_thigh_joint_v'  actuator='RR_thigh_joint' user='13'/>
        <actuatorvel name='RR_calf_joint_v'  actuator='RR_calf_joint' user='13'/>
        <actuatorvel name='FL_hip_joint_v'  actuator='FL_hip_joint' user='13'/>
        <actuatorvel name='FL_thigh_joint_v'  actuator='FL_thigh_joint' user='13'/>
        <actuatorvel name='FL_calf_joint_v'  actuator='FL_calf_joint' user='13'/>
        <actuatorvel name='RL_hip_joint_v'  actuator='RL_hip_joint' user='13'/>
        <actuatorvel name='RL_thigh_joint_v'  actuator='RL_thigh_joint' user='13'/>
        <actuatorvel name='RL_calf_joint_v'  actuator='RL_calf_joint' user='13'/>

                <actuatorfrc name='FR_hip_joint_f'  actuator='FR_hip_joint'  user='13' noise='1e-3'/>
                <actuatorfrc name='FR_thigh_joint_f'  actuator='FR_thigh_joint'  user='13' noise='1e-3'/>
                <actuatorfrc name='FR_calf_joint_f'  actuator='FR_calf_joint'  user='13' noise='1e-3'/>
                <actuatorfrc name='RR_hip_joint_f'  actuator='RR_hip_joint'  user='13' noise='1e-3'/>
                <actuatorfrc name='RR_thigh_joint_f'  actuator='RR_thigh_joint'  user='13' noise='1e-3'/>
                <actuatorfrc name='RR_calf_joint_f'  actuator='RR_calf_joint'  user='13' noise='1e-3'/>
                <actuatorfrc name='FL_hip_joint_f'  actuator='FL_hip_joint'  user='13' noise='1e-3'/>
                <actuatorfrc name='FL_thigh_joint_f'  actuator='FL_thigh_joint'  user='13' noise='1e-3'/>
                <actuatorfrc name='FL_calf_joint_f'  actuator='FL_calf_joint'  user='13' noise='1e-3'/>
                <actuatorfrc name='RL_hip_joint_f'  actuator='RL_hip_joint'  user='13' noise='1e-3'/>
                <actuatorfrc name='RL_thigh_joint_f'  actuator='RL_thigh_joint'  user='13' noise='1e-3'/>
                <actuatorfrc name='RL_calf_joint_f'  actuator='RL_calf_joint'  user='13' noise='1e-3'/>

        <framequat     name='orientation' objtype='site' noise='0.001' objname='imu'/>
        <framepos      name='position' objtype='site' noise='0.001' objname='imu'/>
        <gyro          name='angular-velocity'    site='imu' noise='0.005' cutoff='34.9'/>
        <velocimeter   name='linear-velocity'     site='imu' noise='0.001' cutoff='30'/>
        <accelerometer name='linear-acceleration' site='imu' noise='0.005' cutoff='157'/>
        <magnetometer  name='magnetometer'        site='imu'/>
    </sensor>
```

最后，sim2sim

```python theme={null}
    count_lowlevel = 0
        # <motor name="FL_hip_joint" joint="FL_hip_joint" gear="1" ctrllimited="true" ctrlrange="-12 12"/>
                # <motor name="FL_thigh_joint" joint="FL_thigh_joint" gear="1" ctrllimited="true" ctrlrange="-12 12"/>
                # <motor name="FL_calf_joint" joint="FL_calf_joint" gear="1" ctrllimited="true" ctrlrange="-12 12"/>

                # <motor name="FR_hip_joint" joint="FR_hip_joint" gear="1" ctrllimited="true" ctrlrange="-12 12"/>
                # <motor name="FR_thigh_joint" joint="FR_thigh_joint" gear="1" ctrllimited="true" ctrlrange="-12 12"/>
                # <motor name="FR_calf_joint" joint="FR_calf_joint" gear="1" ctrllimited="true" ctrlrange="-12 12"/>

                # <motor name="RL_hip_joint" joint="RL_hip_joint" gear="1" ctrllimited="true" ctrlrange="-12 12"/>
                # <motor name="RL_thigh_joint" joint="RL_thigh_joint" gear="1" ctrllimited="true" ctrlrange="-12 12"/>
                # <motor name="RL_calf_joint" joint="RL_calf_joint" gear="1" ctrllimited="true" ctrlrange="-12 12"/>

                # <motor name="RR_hip_joint" joint="RR_hip_joint" gear="1" ctrllimited="true" ctrlrange="-12 12"/>
                # <motor name="RR_thigh_joint" joint="RR_thigh_joint" gear="1" ctrllimited="true" ctrlrange="-12 12"/>
                # <motor name="RR_calf_joint" joint="RR_calf_joint" gear="1" ctrllimited="true" ctrlrange="-12 12"/>
        # }
    default_dof_pos=[-0.16,0.68,1.1 ,0.16,0.68,1.1, -0.16,0.68,1.1, 0.16,0.68,1.1]#默认角度需要与isacc一致
```

从仿真器中读取观察数据并依据网络定义输入，需要注意的是关节角度输入采用的是实际反馈-默认角度：

```python theme={null}
                eu_ang = quaternion_to_euler_array(quat)
                eu_ang[eu_ang > math.pi] -= 2 * math.pi

                cmd.vx=0.25
                cmd.vy=0.0
                cmd.dyaw= 0.3
                #单次观测
                obs[0, 0] = omega[0] *cfg.normalization.obs_scales.ang_vel
                obs[0, 1] = omega[1] *cfg.normalization.obs_scales.ang_vel
                obs[0, 2] = omega[2] *cfg.normalization.obs_scales.ang_vel
                obs[0, 3] = eu_ang[0] *cfg.normalization.obs_scales.quat
                obs[0, 4] = eu_ang[1] *cfg.normalization.obs_scales.quat
                obs[0, 5] = eu_ang[2] *cfg.normalization.obs_scales.quat
                obs[0, 6] = cmd.vx * cfg.normalization.obs_scales.lin_vel
                obs[0, 7] = cmd.vy * cfg.normalization.obs_scales.lin_vel
                obs[0, 8] = cmd.dyaw * cfg.normalization.obs_scales.ang_vel
                obs[0, 9:21] = (q-default_dof_pos) * cfg.normalization.obs_scales.dof_pos #g关节角度顺序依据修改为样机
                obs[0, 21:33] = dq * cfg.normalization.obs_scales.dof_vel
                obs[0, 33:45] = last_actions#上次控制指令
                obs = np.clip(obs, -cfg.normalization.clip_observations, cfg.normalization.clip_observations)

```

最后依据网络结构输入为obs\[45]，和obs\_lis\[10\*45]，需要将其压入一个1维度的数组，但是由于我们存储的网络包括了Teacher部分，因此中间还有其他不可观测的状态，需要人为赋值：

```python theme={null}
                policy_input = np.zeros([1, num_observations], dtype=np.float16) # 同isaac 完整
                hist_obs_input = np.zeros([1, history_len*n_proprio], dtype=np.float16) # 同isaac 观测buf
                #依据完成模型的顺序实际只采用了前后的观测数据
                policy_input[0,0:n_proprio]=obs
                for i in range(n_priv_latent  + n_scan):#缓存历史观测
                    policy_input[0,n_proprio+i]=0
                for i in range(history_len):#缓存历史观测
                    policy_input[0, n_proprio  + n_priv_latent  + n_scan +i * n_proprio : n_proprio  + n_priv_latent  + n_scan +(i + 1) * n_proprio] = hist_obs[i][0, :]
                #采集模型仅仅使用观测和buf
                for i in range(history_len):#缓存历史观测
                    hist_obs_input[0, i * n_proprio : (i + 1) * n_proprio] = hist_obs[i][0, :]
```

![media](https://pub-7714d99fbd654288a82d7b2f7be01efb.r2.dev/isaac-gym-rl/064-whiteboard-whiteboard-69.jpg)

最终，网络进行输出：

```python theme={null}
 policy = policy.to('cpu') #policy是half()
                action[:] = policy.act_teacher(torch.tensor(policy_input).half())[0].detach().numpy()#完整模型
```

通过，在线工具，查看导出模型的结构[https://netron.app/：](https://netron.app/：)

![media](https://pub-7714d99fbd654288a82d7b2f7be01efb.r2.dev/isaac-gym-rl/065-image-image-70.png)

**对于Human-gym其导出的是JIT模型，目前还有问题，导出模型需要运行play文件：**

* ****Please note: Before initiating the sim-to-sim process, ensure that you run **`**play.py**`** to export a JIT policy.****
* **Mujoco-based Sim2Sim Deployment**: Utilize Mujoco for executing simulation-to-simulation (sim2sim) deployments with the command below:

需要再play中导出为JIT模型：

```bash theme={null}
    # export policy as a jit module (used to run it from C++)
    if EXPORT_POLICY:
        path = os.path.join(LEGGED_GYM_ROOT_DIR, 'logs', train_cfg.runner.experiment_name, 'exported', 'policies')
        export_policy_as_jit(ppo_runner.alg.actor_critic, path)
        print('Exported policy as jit script to: ', path)
```

网络部署与迁移结果：

![media](https://pub-7714d99fbd654288a82d7b2f7be01efb.r2.dev/isaac-gym-rl/066-image-image-71.gif)

![media](https://pub-7714d99fbd654288a82d7b2f7be01efb.r2.dev/isaac-gym-rl/067-image-image-72.gif)

## 5.4仿真迁移：

要实现实物迁移首先需要构建C++下的网络部署框架，采用pytorch或openvino或TVM等神经网络部署框架搭建程序：

### 5.4.1 LCM消息中间件

通过LCM库完成在跨平台间的数据接口封装和发送，在完成LCM安装后定义lcm消息：

```python theme={null}
package my_lcm;

struct Request
```

通过，指令生成头文件并包含在项目中：

![media](https://pub-7714d99fbd654288a82d7b2f7be01efb.r2.dev/isaac-gym-rl/068-image-image-73.png)

```python theme={null}
#生成C++
/sim2sim_lcm/lcm_types$ lcm-gen -x response.lcm  
/sim2sim_lcm/lcm_types$ lcm-gen -x request.lcm  
 #生成py
/sim2sim_lcm/lcm_types$ lcm-gen -p response.lcm  
/sim2sim_lcm/lcm_types$ lcm-gen -p request.lcm  
```

面向实物迁移需要搭建C++版本的底层，通过LCM或共享内存的方式操作机器人底层SDK接口，具体可以参考原始开源项目：

```python theme={null}
/home/pi/Downloads/LocomotionWithNP3O-master/depoly/src/unitree_guide/unitree_guide/src/FSM/State_Rl.cpp
```

### 5.4.2 迁移测试软件基本框架

在sim2sim.py中构建了一个基于Python接口的仿真迁移案例，为了面向实物样机部署需要构建C++版本的网络部署代码，因此需要采用Mujoco获取仿真数据，单独运行一个网络推理程序，二者采用LCM进行数据交互，由于机器人端程序启动后往往不会重启，因此其设置为LCM服务器，这里我们采用sim2sim的函数进行改造，增加LCM程序：

![media](https://pub-7714d99fbd654288a82d7b2f7be01efb.r2.dev/isaac-gym-rl/069-whiteboard-whiteboard-74.jpg)

```python theme={null}
                obs = np.zeros([1, cfg.env.n_proprio], dtype=np.float32) #1,45

                eu_ang = quaternion_to_euler_array(quat)
                eu_ang[eu_ang > math.pi] -= 2 * math.pi

                cmd.vx=0.25
                cmd.vy=0.0
                cmd.dyaw= 0.05
                #---send obs
                msg = Request()
                msg.eu_ang=eu_ang
                msg.omega=omega
                msg.command[0]=cmd.vx
                msg.command[1]=cmd.vy
                msg.command[2]=cmd.dyaw
                msg.q=q
                msg.dq=dq
                
                lcm.publish("LCM_OBS", msg.encode())
                lcm.handle()
                #--LCM传输RL滤波后的输出
                target_q = action_rl* cfg.control.action_scale + default_dof_pos
```

上面的代码为修改后的仿真接口，其为RL网络部署提供了一个基于LCM接口的通用框架，发送LCM\_OBS：

```python theme={null}
struct Request
```

接收LCM\_ACTION:

```python theme={null}
struct Response
```

迁移测试结果如下：

![media](https://pub-7714d99fbd654288a82d7b2f7be01efb.r2.dev/isaac-gym-rl/070-image-image-75.gif)

![media](https://pub-7714d99fbd654288a82d7b2f7be01efb.r2.dev/isaac-gym-rl/071-image-image-76.gif)

### 5.4.3 Libpytroch迁移

最直接的迁移方式是直接采用pt模型和libpytorch（版本与训练脚本一致），构建C++下的部署代码通过LCM获取观测发送输出，在sim2sim\_lcm中提供了一个libpytorch的部署代码，首先需要完成LCM库的编译，并提供cuda等其他依赖：

**（1）Cuda GPU版本**

采用JIT方式导出模型后，载入：

```python theme={null}
int RL_Tinymal::init_policy()
    // vel q joint
    for (int i = 0; i < 12; ++i)
    // last action
    for (int i = 0; i < 12; ++i)
    std::cout<<("----------------obs---------------")<<std::endl;
    cout<<obs<<endl;
    std::cout<<("--------------------------------")<<std::endl;

    auto options = torch::TensorOptions().dtype(torch::kFloat32);
    torch::Tensor obs_tensor = torch::from_blob(obs.data(),{1,45},options).to(device);
    //----------------------------------------------------------------
    auto obs_buf_batch = obs_buf.unsqueeze(0);

    std::vector<torch::jit::IValue> inputs;
    inputs.push_back(obs_tensor.to(torch::kHalf));
    inputs.push_back(obs_buf_batch.to(torch::kHalf));
    
    //---------------------------网络推理----------------------------- Execute the model and turn its output into a tensor
    //cout<<"obs_tensor1:"<<endl<<obs_tensor<<endl;
    //std::cout<<("*****************")<<std::endl;
    //cout<<"obs_buf_batch:"<<endl<<obs_buf_batch<<endl;
    torch::Tensor action_tensor = model.forward(inputs).toTensor();
    action_buf = torch::cat({action_buf.index({ Slice(1,None),Slice()}),action_tensor},0);
    cout<<"[action out]:"<<endl<<action_tensor<<endl;
    bool has_nan = false;
    for (float val : obs)
    }
    if (has_nan)
    //-----------------------------网络输出滤波--------------------------------
    torch::Tensor action_blend_tensor = 0.8*action_tensor + 0.2*last_action;
    last_action = action_tensor.clone();
 
    this->obs_buf = torch::cat({this->obs_buf.index({Slice(1, None), Slice()}), obs_tensor}, 0); // 历史观测移位
    // //obs_buf = torch::cat({obs_buf.index({Slice(1,None),Slice()}),obs_tensor},0);//历史观测移位
    // //----------------------------------------------------------------
    torch::Tensor action_raw = action_blend_tensor.squeeze(0);
    // move to cpu
    action_raw = action_raw.to(torch::kFloat32);
    action_raw = action_raw.to(torch::kCPU);
    // // assess the result
    auto action_getter = action_raw.accessor <float,1>();//bug
    for (int j = 0; j < 12; j++)
```

**（2）CPU版本**

在载入模型时会判断是否有cuda：

```python theme={null}
    device= torch::kCPU;
    if (torch::cuda::is_available())
```

**(3) LCM通讯版本**

通过LCM可以构建标准的通讯接口，因此采用Python下Mujoco仿真接口通过LCM代替传输obs和action，单独开发C++的程序满足后续在样机部署的需求，测试首先启动仿真：

```python theme={null}
Python sim2sim_cm.py
```

然后再sim2sim\_lcm中build文件夹中运行,订阅观测并计算网络输出

```python theme={null}
./lcm_publish
```

**（4）UDP通讯版本**

LCM底层也是采用UDP通讯，但是由于在嵌入式编译中需要进行交叉编译如面向JetsonNano等ARM核心的处理器，因此也可以直接采用UDP的方式实现通讯，测试首先启动仿真：

```python theme={null}
Python sim2sim_udp.py
```

然后再sim2sim\_lcm中build文件夹中运行,订阅观测并计算网络输出

```python theme={null}
./udp_publish
```

#### 5.4.3.1 LLVM安装（用于编译TVM）

```bash theme={null}
git clone https://gitee.com/mirrors/LLVM.git
mkdir build
cd build
cmake -DCMAKE_BUILD_TYPE=Release ../llvm
make -j32
```

#### 5.4.3.2 TVM安装

```bash theme={null}
git clone https://gitee.com/mirrors/tvm.git
cd tvm/
git submodule init
git submodule update
mkdir build
cp cmake/config.cmake build
cd build/
gedit config.cmake
// 修改set连接LLVM
////////////////////////////////////////
#set(USE_LLVM OFF)
set(USE_LLVM ON)
set(USE_LLVM /home/wdd/isaacgym_/LLVM/build/bin/llvm-config) #按照自己安装的路径
////////////////////////////////////////
cmake ..
make -j32
cd ..
```

安装TVM Python API

```bash theme={null}
cd python/
python setup.py install --user
```

#### 5.4.3.3 ONNX安装

```bash theme={null}
//依赖安装
sudo apt-get install protobuf-compiler libprotoc-dev 
sudo pip install pytest 
git clone https://github.com/pybind/pybind11.git
cd pybind11/
mkdir build
cd build
cmake ..
make -j32
sudo make install

// onnx安装，将上面的库放到onnx.third_party/pybind11中
git clone https://github.com/onnx/onnx.git
cd onnx/
python setup.py build
python setup.py install
```

#### 5.4.3.4 PyTorch转ONNX

向ONNX导出器`torch.onx.dynamo_export() `提供模型的实例及其输入，导出器将返回`torch.onnx`的实例，再使用`torch.onnx.ONNXProgram.save()`保存`xx.onnx`模型。

安装依赖

```bash theme={null}
pip install --upgrade onnx onnxscript
```

示例：

```python theme={null}
import torch
import torch.nn as nn

class MLPModel(nn.Module):
  def __init__(self):
      super().__init__()
      self.fc0 = nn.Linear(8, 8, bias=True)
      self.fc1 = nn.Linear(8, 4, bias=True)
      self.fc2 = nn.Linear(4, 2, bias=True)
      self.fc3 = nn.Linear(2, 2, bias=True)

  def forward(self, tensor_x: torch.Tensor):
      tensor_x = self.fc0(tensor_x)
      tensor_x = torch.sigmoid(tensor_x)
      tensor_x = self.fc1(tensor_x)
      tensor_x = torch.sigmoid(tensor_x)
      tensor_x = self.fc2(tensor_x)
      tensor_x = torch.sigmoid(tensor_x)
      output = self.fc3(tensor_x)
      return output

model = MLPModel()
tensor_x = torch.rand((97, 8), dtype=torch.float32)
onnx_program = torch.onnx.dynamo_export(model, tensor_x) # 
onnx_program.save("mlp.onnx")
```

`dynamo_export` 函数将生成一个 `onnx`实例`onnx_program`，`onnx_program.save`将实例保存为onnx格式。

#### 5.4.3.5 ONNX可视化

打开 [https://netron.app/](https://netron.app/) 打开生成的onnx文件，如下图所示，看到MLP每层结构：

![media](https://pub-7714d99fbd654288a82d7b2f7be01efb.r2.dev/isaac-gym-rl/072-image-image-77.png)

#### 5.4.3.6 ONNX转TVM

安装依赖

```bash theme={null}
pip install onnx onnxoptimizer
```

ONNX转TVM示例如下：

加载转换后的onnx模型-->加载图像-->Relay 编译模型-->在 TVM 上执行

```cpp theme={null}
import onnx
import numpy as np
import tvm
from tvm import te
import tvm.relay as relay
from tvm.contrib.download import download_testdata

######################################################################
# Load pretrained ONNX model
# ---------------------------------------------
# The example super resolution model used here is exactly the same model in onnx tutorial
# http://pytorch.org/tutorials/advanced/super_resolution_with_caffe2.html
# we skip the pytorch model construction part, and download the saved onnx model
model_url = "".join(
    [
        "https://gist.github.com/zhreshold/",
        "bcda4716699ac97ea44f791c24310193/raw/",
        "93672b029103648953c4e5ad3ac3aadf346a4cdc/",
        "super_resolution_0.2.onnx",
    ]
)
model_path = download_testdata(model_url, "super_resolution.onnx", module="onnx")
# now you have super_resolution.onnx on disk
onnx_model = onnx.load(model_path)

######################################################################
# Load a test image
# ---------------------------------------------
# A single cat dominates the examples! This model takes a single input image of size
# 224x224 and outputs a scaled image that is 3x greater than the input along each
# axis, a 672x672 image. Re-scale the cat image to fit this input shape then
# convert to `YCbCr`. The super resolution model will then be applied to the
# luminance (`Y`) channel.
from PIL import Image

img_url = "https://github.com/dmlc/mxnet.js/blob/main/data/cat.png?raw=true"
img_path = download_testdata(img_url, "cat.png", module="data")
img = Image.open(img_path).resize((224, 224))
img_ycbcr = img.convert("YCbCr")  # convert to YCbCr
img_y, img_cb, img_cr = img_ycbcr.split()
x = np.array(img_y)[np.newaxis, np.newaxis, :, :]

######################################################################
# Compile the model with relay
# ---------------------------------------------
# Typically ONNX models mix model input values with parameter values, with
# the input having the name `1`. This model dependent, and you should check
# with the documentation for your model to determine the full input and
# parameter name space.
#
# Passing in the shape dictionary to the `relay.frontend.from_onnx` method
# tells relay which ONNX parameters are inputs, and which are parameters, and
# provides a static definition of the input size.
target = "llvm"

input_name = "1"
shape_dict =
mod, params = relay.frontend.from_onnx(onnx_model, shape_dict)

with tvm.transform.PassContext(opt_level=1):
    executor = relay.build_module.create_executor(
        "graph", mod, tvm.cpu(0), target, params
    ).evaluate()

######################################################################
# Execute on TVM
# ---------------------------------------------
dtype = "float32"
tvm_output = executor(tvm.nd.array(x.astype(dtype))).numpy()

######################################################################
# Display results
# ---------------------------------------------
# We put input and output image neck to neck. The luminance channel, `Y` is the output
# from the model. The chroma channels `Cb` and `Cr` are resized to match with a simple
# bicubic algorithm. The image is then recombined and converted back to `RGB`.
from matplotlib import pyplot as plt

out_y = Image.fromarray(np.uint8((tvm_output[0, 0]).clip(0, 255)), mode="L")
out_cb = img_cb.resize(out_y.size, Image.BICUBIC)
out_cr = img_cr.resize(out_y.size, Image.BICUBIC)
result = Image.merge("YCbCr", [out_y, out_cb, out_cr]).convert("RGB")
canvas = np.full((672, 672 * 2, 3), 255)
canvas[0:224, 0:224, :] = np.asarray(img)
canvas[:, 672:, :] = np.asarray(result)
plt.imshow(canvas.astype(np.uint8))
plt.show()

######################################################################
# Notes
# ---------------------------------------------
# By default, ONNX defines models in terms of dynamic shapes. The ONNX importer
# retains that dynamism upon import, and the compiler attempts to convert the model
# into a static shapes at compile time. If this fails, there may still be dynamic
# operations in the model. Not all TVM kernels currently support dynamic shapes,
# please file an issue on discuss.tvm.apache.org if you hit an error with dynamic kernels.
#
# This particular model was build using an older version of ONNX. During the import
# phase ONNX importer will run the ONNX verifier, which may throw a `Mismatched attribute type`
# warning. Because TVM supports a number of different ONNX versions, the Relay model
# will still be valid.
```

## 5.5 实物样机迁移

在完成仿真迁移验证和接口开发后，可以直接套用LCM库或UDP包进行测试与快速迁移。样机迁移最重要的首先是按照网络定义确定好输入数据的单位和坐标极性，关节的零点位置与坐标系定义，依据URDF目前的Obs观察定义如下。对于关节角度首先其角速度与角度转向一致，可以通过Rviz查看URDF，另外需要明确鸡头方向和腿号顺序：

```python theme={null}
roslaunch urdf_tutorial display.launch model:=/home/pi/Downloads/LocomotionWithNP3O-master/resources/tinymal/urdf/tinymal.urdf
```

项目
定义
示意图
关节零位
四足机器人关节以全竖直和水平状态为0位置，但由于Tinymal本身小腿是异构因此0位以足端位置竖直为参考
![media](https://pub-7714d99fbd654288a82d7b2f7be01efb.r2.dev/isaac-gym-rl/073-image-image-78.png)
腿号顺序
依据URDF定义模型腿号顺序为FL FR RL RR其对应数组0~~4与输入obs中的q顺序一致
侧展定义
从机器人后端看，侧展满足右手定义为+时顺时针偏差
![media](https://pub-7714d99fbd654288a82d7b2f7be01efb.r2.dev/isaac-gym-rl/074-image-image-79.png)
大腿定义
前后腿对称，从左侧看大腿为+，向内收腿
![media](https://pub-7714d99fbd654288a82d7b2f7be01efb.r2.dev/isaac-gym-rl/075-image-image-80.png)
小腿定义
前后腿对称，从左侧看小腿为+，抬腿
![media](https://pub-7714d99fbd654288a82d7b2f7be01efb.r2.dev/isaac-gym-rl/076-image-image-81.png)
IMU定义
采用RPY对应0~~1，为Rad，满足右手定义
俯仰+低头，横滚-右倾，航向+逆时针，角速度与其一致
CMD定义
0为VX 1为VY 2为Ryaw
标准单位

### 5.5.1 UDP部署测试:

为了实现快速的RL控制这里推荐在完成学习后优先采用UDP进行部署测试，验证模型具有基本功能后，再实现在边端模型的转换和部署，通过UDP直接将指令发送到机器人端，因此系统连线如下图所示（**目前采用的是4060的训练显卡，1024个环境下每次迭代时间在1.1s左右，后续也将推出专用RL套件帮助配置好硬件，实现到手即练习，到手即部署**）：

![media](https://pub-7714d99fbd654288a82d7b2f7be01efb.r2.dev/isaac-gym-rl/077-whiteboard-whiteboard-82.jpg)

在机器人端我们安装了路由器使用时将RL训练服务器连接到路由器并保证与Odroid控制器网络联调。

在机器人控制程序启动后，在RL服务器端启动udp\_publish读取机器人端的状态反馈发送网络推理结果驱动机器人进行步态机动，由于需要保证网络按训练时的设置进行推理，在RL训练脚本中默认的仿真时间为5ms：

```python theme={null}
    class sim:
        dt = 0.005
        substeps = 1
        gravity = [0., 0., -9.81]  # [m/s^2]
        up_axis = 1  # 0 is y, 1 is z

        class physx:
            num_threads = 10
            solver_type = 1  # 0: pgs, 1: tgs
            num_position_iterations = 4
            num_velocity_iterations = 0
            contact_offset = 0.01  # [m]
            rest_offset = 0.0  # [m]
            bounce_threshold_velocity = 0.5  # 0.5 [m/s]
            max_depenetration_velocity = 1.0
            max_gpu_contact_pairs = 2 ** 23  # 2**24 -> needed for 8000 envs and more
            default_buffer_size_multiplier = 5
            contact_collection = 2  # 0: never, 1: last sub-step, 2: all sub-steps (default=2)

```

在训练时网络推理的次数由下面的参数确认decimation ：

```python theme={null}
    #             10, 'knee': 10, 'ankle': 10}  关节名字可以区分，mujoco下与其一致
    class control( LeggedRobotCfg.control ):
        # PD Drive parameters:
        control_type = 'P'
        stiffness = {'joint': 10.0}  # [N*m/rad]
        damping = {'joint': 0.4}     # [N*m*s/rad]
        # action scale: target angle = actionScale * action + defaultAngle
        action_scale = 0.3
        # decimation: Number of control action updates @ sim DT per policy DT
        decimation = 4
        hip_scale_reduction = 1

        use_filter = True
```

因此网络迭代推理的时间为decimation \*dt =20ms也就是50Hz，因此在软件中机器人端建立了服务器，并设置结构体如下：

```python theme={null}
//RL
struct _msg_request
{
    float trigger;
    float command[4];
    float eu_ang[3];
    float omega[3];
    float acc[3];
    float q[12];
    float dq[12];
    float tau[12];
} _msg_request;

struct _msg_response
{
    float q_exp[12];
    float dq_exp[12];
    float tau_exp[12];
} _msg_response;
```

其中线程以50Hz将trigger设置为1并发送状态反馈，推理测代码为客户端在接收到数据后进行推理计算并反馈action指令从而实现50Hz的推理，当然里面是存在通讯延时等问题，也可以验证网络的泛化能力。**另外，為了加快部署可以單獨採購一個JetsonNano運行上述軟件，並通過UDP的方式實現數據傳輸，JetsonNano的環境配置如下：**

> 本教程参考了[https://blog.csdn.net/qq\_41451125/article/details/116262611这个帖子。](https://blog.csdn.net/qq_41451125/article/details/116262611这个帖子。)
>
> 1. 安装miniconda, 在linux版本里面选择[Miniconda3 Linux-aarch64 64-bit](https://repo.anaconda.com/miniconda/Miniconda3-latest-Linux-aarch64.sh)版本，创建虚拟环境(python=3.6)。直接创建可能提示当前渠道找不到python3.6\*，这时可以修改channel
>
> ```bash theme={null}
> ```

conda config --add channels conda-forge

````
> 
> 创建好之后，可以修改pip配置
> ```bash
[global]
timeout = 6000
index-url = https://pypi.tuna.tsinghua.edu.cn/simple
trusted-host = pypi.tuna.tsinghua.edu.cn
````

> 1. 下载jetson nano对应的torch版本 [https://forums.developer.nvidia.com/t/pytorch-for-jetson/72048](https://forums.developer.nvidia.com/t/pytorch-for-jetson/72048) (应该是1.10版本)，在新创建的环境下，用pip安装。
> 2. 进入python，import torch看看是否会出错。可能会报`“非法指令（核心已转储）”`的错误，将  export OPENBLAS\_CORETYPE=ARMV8  添加到\~/.bashrc中的环境变量即可。
> 3. 在新环境下安装cmake。
>
> ```bash theme={null}
> ```

conda install -c anaconda cmake

````
> 
> 1. 安装tinymal源文件中的lcm包。在lcm文件夹下面删除build文件夹的内容，再在终端中进入build文件夹，运行下面三个命令：
> ```bash
cmake ..
make
sudo make install
````

> 1. 修改cmakelist.txt文件，修改CUDA和torch库地址，添加cuBLAS库地址。
>
> ![media](https://pub-7714d99fbd654288a82d7b2f7be01efb.r2.dev/isaac-gym-rl/078-image-image-83.png)
>
> 1. 编译sim2sim\_lcm文件夹下面的内容，注意编译前需要修改文件中的model\_jitt.pt位置，并且运行./udp\_publisher。
> 2. 设置SSH及VNC远程连接。具体可参考这篇帖子：[https://blog.csdn.net/yangyu0515/article/details/133922022#:\~:text=%E7%82%B9%E5%87%BBadd%EF%BC%8C%E5%9C%A8%E6%96%B0,add%E7%A1%AE%E8%AE%A4%E6%B7%BB%E5%8A%A0%E3%80%82](https://blog.csdn.net/yangyu0515/article/details/133922022#:~:text=%E7%82%B9%E5%87%BBadd%EF%BC%8C%E5%9C%A8%E6%96%B0,add%E7%A1%AE%E8%AE%A4%E6%B7%BB%E5%8A%A0%E3%80%82)

### 5.5.2 LCM部署测试:

通过UDP发送由于需要主动触发同时由于UDP的通讯机制会导致丢包等问题，因此推荐采用LCM的方式来实现。在确定上述坐标系和obs定义后，首先需要参考仿真迁移C++版本在机器人控制软件中增加LCM接口和对应步态，并调整参数，比较推荐的是通过位置闭环或传统控制实现机器人站立之后通过步态切换的方式进入单独步态采用LCM的输入作为控制输出，LCM的结构体记得如下：

```python theme={null}
struct Request
```

（1）LCM交叉编译

为了实现在嵌入式主控的部署，对于ARM内核如JetsonNano需要完成在嵌入式端对软件进行交叉编译，这也相比UDP直接通讯来说比较麻烦的一个问题：

```python theme={null}
export HOST=aarch64-linux-gnu     
export ROOTFS="/home/pi/Downloads/cross-gcc/${HOST}" 
export CFLAGS="-L${ROOTFS}/lib -I${ROOTFS}/include"
export CC=${HOST}-gcc
export AR=${HOST}-ar
export NM=${HOST}-nm
export LD=${HOST}-ld
export STRIP=${HOST}-strip
export RANLIB=${HOST}-ranlib
export PREFIX=$
```

采用工具链进行交叉编译：

```python theme={null}
./configure --prefix=${PREFIX} --host=$
make 
make install 
```

***

（2）测试验证

在C++代码部分主要完成obs坐标系对应与输出角度的映射，需要依据机器人自身坐标系定义对角度进行交换，另外在输出时网络传输的是action输出需要进一步乘以action\_scale并加上default\_joint才是最终的关节期望角度值。

将服务器网线接入路由器，设置主控IP端口为10000，启动机器人步态控制软件，在站立后再启动网络udp\_publish之后，按键X进入RL模式机器人采用网络数据进行步态控制：

![media](https://pub-7714d99fbd654288a82d7b2f7be01efb.r2.dev/isaac-gym-rl/079-image-image-84.jpg)

最终，模型迁移效果如下，后续可以将网络模型固化在程序中实现更好的实时性控制：

[飞书20240828-121626.mp4](https://pan.baidu.com/s/16SiaTsPg5DgqVBoS_1M1gw)(提取码：d43h)

### 5.5.3 TVM部署测试:

在模型测试无误后我们期望能够实现的是机器人完全脱离服务器独立进行运行，这样我们才能去户外进行更多的测试。通过TVM将模型进行转换采用CPU进行计算，最终测试在Odroid上模型推理需要2ms可以滿足實時性需求，最後總結幾點遷移中的關鍵問題：

（1）保證穩定的網絡推理調用周期；

（2）保證底層的實時性；

（3）保證於仿真一致的參數設置；

采用TVM可以完成模型在OdroidC4和嵌入式处理器上的部署，通过CPU进行计算，同时可以完成快速的模型切换，这里我们提供一个测试脚本，首先完成模型转换工具的安装：

```bash theme={null}
pip install apache-tvm
sudo apt-get install gcc-9-aarch64-linux-gnu
sudo apt-get install g++-9-aarch64-linux-gnu
```

之后可以将jit模型采用如下脚本进行转换：

```bash theme={null}
#!/usr/bin/env python3
import torch
import tvm
from tvm import relay

# 已经jit trace后的模型导入
model=torch.jit.load("./model_jitt.pt")
# print(model)
model=model.float() #确保模型的所有参数使用浮动点精度（float32），这里进行强制转换为浮动点类型。

shape_list = [("input0",(1,39)),("input1",(1,10,39))] #定义输入张量的形状，模型有两个输入
mod,param=relay.frontend.from_pytorch(model,shape_list)#TVM 的一个前端API，用于将PyTorch模型转换为TVM的Relay IR (Intermediate Representation) 格式。不仅转换了模型的计算图，还包括了参数。
# # ==x64=======
target = tvm.target.Target("llvm", host="llvm")#指定目标架构为x64 CPU，llvm是TVM支持的后端编译器工具链，host="llvm" 指定主机也使用LLVM。
with tvm.transform.PassContext(opt_level=3):#指定优化级别为 3（最高优化级别），以尽可能优化模型的执行性能
    lib = relay.build(mod, target=target, params=param)#将 Relay 中间表示编译成目标平台（x64）上可执行的共享库（so文件）
lib.export_library("./policy_x64_cpu.so")#将生成的共享库导出为.so文件，这个文件可以在x64架构的 CPU 上运行
#==arm64=======
target = tvm.target.Target("llvm -mtriple=aarch64-linux-gnu")#指定目标架构为ARM64。-mtriple=aarch64-linux-gnu用于告诉LLVM编译器目标是ARM64(aarch64)平台上的 Linux 系统
with tvm.transform.PassContext(opt_level=3):
    lib = relay.build(mod, target=target, params=param)
lib.export_library("./policy_arm64_cpu.so", cc='/usr/bin/aarch64-linux-gnu-g++-9')#指定了编译器cc参数为aarch64-linux-gnu-g++-9，这是一个适用于ARM64的C++编译器，通常用于交叉编译
```

得到arm和x86架构下的TVM模型，最后将上述模型拷贝到机器人文件下Model文件夹，通过状态机进行调用，下面给出C++下的TVM模型调用方法（下下列程序与UDP版本的代码逻辑一致）：

```bash theme={null}
#if RL_USE_TVM
    #include "tvm2.h"
    #include <iomanip>

    Tvm::tvm2Class tvm;
    vecNf(39) obs1;
    vecNf(39 * 10) obs10;
    // matNf(39,10) obs10;
    vecNf(10) action, actionOld, actionTmp, actionFilt;

    float smooth_rc = 0.03;
    float dead_zone_rc = 0.01;

    float cmd_x = 0.;aa
    float cmd_y = 0.;
    float cmd_rate = 0.;

    float cmd_x_temp = 0.;
    float cmd_y_temp = 0.;
    float cmd_rate_temp = 0.;

    float eu_ang_scale = 1;
    float omega_scale = 0.25;
    float pos_scale = 1.0;
    float vel_scale = 0.05;
    float lin_vel = 2.0;
    float ang_vel = 0.25;

    int id_list[10] = {0,1,2,3,4, 7,8,9,10,11};
    int rl_model_loaded=0;

    if(tvm.init("Model/policy_arm64_cpu.so", 39, 390, 10))
    else
        printf("RL:: Model loaded fail!\n");

void  Gait_RL_Update(float dt)
        else
        cmd_rate_temp=   LIMIT(cmd_rate_temp,-1,1);

        cmd_x = cmd_x * (1 - smooth_rc) + (std::fabs(cmd_x_temp) < dead_zone_rc ? 0.0 : cmd_x_temp) * smooth_rc;
        cmd_y = cmd_y * (1 - smooth_rc) + (std::fabs(cmd_y_temp) < dead_zone_rc ? 0.0 : cmd_y_temp) * smooth_rc;
        cmd_rate = cmd_rate * (1 - smooth_rc) + (std::fabs(cmd_rate_temp) < dead_zone_rc ? 0.0 : cmd_rate_temp) * smooth_rc;

        obs1 <<  vmc_all.att_rate[ROLr] / 57.3 * omega_scale,
                -vmc_all.att_rate[PITr] / 57.3 * omega_scale,
                 vmc_all.att_rate[YAWr] / 57.3 * omega_scale,
                 vmc_all.att[ROLr] / 57.3 * eu_ang_scale,
                -vmc_all.att[PITr] / 57.3 * eu_ang_scale,
                -vmc_all.att[YAWr] / 57.3 * eu_ang_scale,
                 cmd_x * lin_vel,
                 cmd_y * lin_vel,
                 cmd_rate * ang_vel;
        //printf("net_input:%f %f %f\n",cmd_x,cmd_y,cmd_rate);
        for (int i = 0; i < 10; i++)
        obs10.head<39 * 9>() = obs10.tail<39 * 9>();
        obs10.tail<39>() = obs1;

        tvm.in1 = obs1;
        tvm.in2 = obs10;

        tvm.run();
    }
    action = actionOld * 0.2 + tvm.out * 0.8;
    actionOld = tvm.out;

    for (int i = 0; i < 10; i++)
    actionTmp = action;
#if 0
    printf("********************RL ENTERED***********************");
    printf("rl-action:%.3f %.3f %.3f %.3f %.3f| %.3f %.3f %.3f %.3f %.3f\n",
           actionTmp[0],actionTmp[1],actionTmp[2],actionTmp[3],actionTmp[4],
           actionTmp[5],actionTmp[6],actionTmp[7],actionTmp[8],actionTmp[9]);
#endif
    for (int i = 0; i < 10; i++)
#endif
}

```

***

# 阶段6 面向人形机器人RL的介绍

通过上面的教程我们可以将训练框架转向人形机器人平台，这里给出了一个示例后续我们将推出人形机器人专用的教程从MPC开始介绍如何控制人形机器人并最终采用上述RL框架进行部署。

这里采用的是Tinker桌面级开源双足机器人平台为例，Tinker是我设计模仿迪士尼的一个小型机器人，其基本模拟了迪士尼的机器人结构，后续将作为一个开源项目发布在HuggingFace上让所有人都可以测试和部署RL，这边给出一个基础的例子，感兴趣的同学可以自行修改，同时我们也将适配国内外主流的人形机器人框架如星动的PPO，AMP或则跑跳越障和动作模仿的框架，建立一个人形机器人开发者社区，目前Tinker整机组装成本在1.5W以内是一个非常适合快速上手学习的强化学习开发平台：

![media](https://pub-7714d99fbd654288a82d7b2f7be01efb.r2.dev/isaac-gym-rl/080-image-image-86.jpg)

![media](https://pub-7714d99fbd654288a82d7b2f7be01efb.r2.dev/isaac-gym-rl/081-image-image-87.png)

![media](https://pub-7714d99fbd654288a82d7b2f7be01efb.r2.dev/isaac-gym-rl/082-image-image-88.png)

首先还是导出URDF，并通过rviz审查坐标系定义与角度，主要是增加关节上下限以及角速度和最大扭矩，Tinker的URDF和XML文件如下：

[tinker.zip](https://pan.baidu.com/s/16SiaTsPg5DgqVBoS_1M1gw)(提取码：d43h)

```plaintext theme={null}
roslaunch urdf_tutorial display.launch model:=/home/pi/Downloads/LocomotionWithNP3O-master/resources//tinker/urdf/tinker_urdf.urdf
```

![media](https://pub-7714d99fbd654288a82d7b2f7be01efb.r2.dev/isaac-gym-rl/083-image-image-90.png)

![media](https://pub-7714d99fbd654288a82d7b2f7be01efb.r2.dev/isaac-gym-rl/084-image-image-91.png)

确认关节顺序和限制后，修改训练程序，新建新的配置脚本，依次修改：

（1）观测与动作：

```bash theme={null}
    class env(LeggedRobotCfg.env):
        num_envs = 1024  #1024 

        n_scan = 187
        n_priv_latent =  4 + 1 + 12 + 12 + 12 + 6 + 1 + 4 + 1 - 3 + 4 -10
        n_proprio = 39 #原始观测
        history_len = 10
        num_observations = n_proprio  + n_priv_latent  + n_scan + history_len*n_proprio
        amao=1
        num_actions = 10
        en_logger = False #wanda
```

（2）修改原始文件中四足自由度配置，采用2个足端feet\_names与URDF中的link名称一致，这样才可以安装足端传感器：

```bash theme={null}
        feet_names = [s for s in body_names if self.cfg.asset.foot_name in s]
        print("feet_names:",feet_names)
        for s in ["link_l_ankle", "link_r_anlke"]:
            feet_idx = self.gym.find_asset_rigid_body_index(robot_asset, s)
            sensor_pose = gymapi.Transform(gymapi.Vec3(0.0, 0.0, 0.0))
            self.gym.create_asset_force_sensor(robot_asset, feet_idx, sensor_pose)
```

另外，由于腿数量减少还需要再训练脚本中修改相关涉及到腿数量变化的张量初始化部分，最后就是reward中相关关节索引的部分，以hip\_pos为例其约束了侧展在移动中不要偏差太大因此需要修改为：

```python theme={null}
    def _reward_hip_pos(self):
        return  torch.sum(torch.square(self.dof_pos[:, [0,1,  5,6]] - self.default_dof_pos[:, [0,1,  5,6]]), dim=1)* (torch.norm(self.commands[:, :2], dim=1) >  self.cfg.rewards.command_dead)
```

# 阶段7 总结与遗留的问题

通过上述教程，采用自己的机器人模型走过RL过程，增加了对RL全盘技术的了解，里面有很多细节的问题还没有考虑，但是基本掌握了RL的流程，下一步需要深度学习神经网络、PPO、Isacc、TVM等工具链，并且完成面向实物的部署验证，对于本阶段主要的问题如下：

**（1）URDF模型导出如何保障是准确的惯量**

**（2）网络模型改变需要调整迁移部署的结构**

**（3）增加不同和更复杂的课程设计，地形设计**

**（4）在训练和推理中增加更多的可视化功能，方便调试**

上述教程更多是自己一个学习的过程，也有很多B站同学反馈不完善不合理，但是我觉得相比很多其他动辄上一两百的课程，只是拿出别人论文或者CSDN的帖子介绍一遍把官方源码运行一遍的教程，本文确实能帮助大家走过从传统控制向RL迁移最难的一个环节。

另外，欢迎关注后续即将推出的人形机器人相关课程！

# 附录8

## 20250302 V1.1版本软件更新与说明：

全面更新了代码逻辑，将Tinymal、Tinker、Taitan几个不同类型的机器人进行了集成，**并可以在头文件中进行快速的配置**，更新版本代码如下：

[LocomotionWithNP3O-masteroldx0301.zip](https://pan.baidu.com/s/16SiaTsPg5DgqVBoS_1M1gw)(提取码：d43h)

在新版本中代码更新首先在global\_config.py中设置机器人的训练对象与训练好在play文件采用的模型pt文件。

```python theme={null}
#机器人类型： Tinymal  Tinker  Taitan
ROBOT_SEL = 'Tinker'
PLAY_DIR ='XXX/model_20000.pt'
```

**（1）版本新增机器人Taitan**

Taita采用了Tinker的下肢构型设计，**增加了3自由度上肢和1自由度腰部**，其更加满足完整人形机器人的自由度和构型配置，后续可以进一步部署模仿学习AMP、动作重映射等不同的算法，满足舞蹈和拟人动作的开发需求：

![media](https://pub-7714d99fbd654288a82d7b2f7be01efb.r2.dev/isaac-gym-rl/085-image-image-93.png)

![media](https://pub-7714d99fbd654288a82d7b2f7be01efb.r2.dev/isaac-gym-rl/086-image-image-94.gif)

同时，配套其对应的mujoco下的推理部署脚本sim2sim\_taitan.py：

```python theme={null}
# SPDX-License-Identifier: BSD-3-Clause
# 
# Redistribution and use in source and binary forms, with or without
# modification, are permitted provided that the following conditions are met:

import math
import numpy as np
import mujoco, mujoco_viewer
from tqdm import tqdm
from collections import deque
from scipy.spatial.transform import Rotation as R
from global_config import ROOT_DIR
from configs.taitan_constraint_him import TaitanConstraintHimRoughCfg
import torch

default_dof_pos = [0.0,0.1,-0.5,1.14,0.64,  0.0,-0.1,0.5,-1.14,0.64]

class cmd:
    vx = 0.2
    vy = 0.0
    dyaw = 0.0

def quaternion_to_euler_array(quat):
    # Ensure quaternion is in the correct format [x, y, z, w]
    x, y, z, w = quat
    
    # Roll (x-axis rotation)
    t0 = +2.0 * (w * x + y * z)
    t1 = +1.0 - 2.0 * (x * x + y * y)
    roll_x = np.arctan2(t0, t1)
    
    # Pitch (y-axis rotation)
    t2 = +2.0 * (w * y - z * x)
    t2 = np.clip(t2, -1.0, 1.0)
    pitch_y = np.arcsin(t2)
    
    # Yaw (z-axis rotation)
    t3 = +2.0 * (w * z + x * y)
    t4 = +1.0 - 2.0 * (y * y + z * z)
    yaw_z = np.arctan2(t3, t4)
    
    # Returns roll, pitch, yaw in a NumPy array in radians
    return np.array([roll_x, pitch_y, yaw_z])

def get_obs(data):
    '''Extracts an observation from the mujoco data structure
    '''
    q = data.qpos.astype(np.double)
    dq = data.qvel.astype(np.double)
    quat = data.sensor('orientation').data[[1, 2, 3, 0]].astype(np.double)
    r = R.from_quat(quat)
    v = r.apply(data.qvel[:3], inverse=True).astype(np.double)  # In the base frame
    omega = data.sensor('angular-velocity').data.astype(np.double)
    gvec = r.apply(np.array([0., 0., -1.]), inverse=True).astype(np.double)
    return (q, dq, quat, v, omega, gvec)

def pd_control(target_q, q, kp, target_dq, dq, kd):
    '''Calculates torques from position commands
    '''
    return (target_q - q) * kp + (target_dq - dq) * kd

def _low_pass_action_filter(actions,last_actions):
    actons_filtered = last_actions * 0.2 + actions * 0.8
    return actons_filtered
    
def run_mujoco(policy, cfg):
    global default_dof_pos
    """
    Run the Mujoco simulation using the provided policy and configuration.

    Args:
        policy: The policy used for controlling the simulation.
        cfg: The configuration object containing simulation settings.

    Returns:
        None
    """
    model = mujoco.MjModel.from_xml_path(cfg.sim_config.mujoco_model_path)#载入初始化位置由XML决定
    model.opt.timestep = cfg.sim_config.dt
    data = mujoco.MjData(model)
    mujoco.mj_step(model, data)
    viewer = mujoco_viewer.MujocoViewer(model, data)

    target_q = np.zeros((cfg.env.num_actions), dtype=np.double)     # 10
    action = np.zeros((cfg.env.num_actions), dtype=np.double)       # 10
    action_flt = np.zeros((cfg.env.num_actions), dtype=np.double)   # 10
    last_actions = np.zeros((cfg.env.num_actions), dtype=np.double) # 10
    hist_obs = deque()
    for _ in range(cfg.env.history_len):
        hist_obs.append(np.zeros([1, cfg.env.n_proprio], dtype=np.double)) # 39

    count_lowlevel = 0

    for _ in tqdm(range(int(cfg.sim_config.sim_duration / cfg.sim_config.dt)), desc="Simulating..."):

        # Obtain an observation
        q, dq, quat, v, omega, gvec = get_obs(data)#从mujoco获取仿真数据
        #print("q1",q)
        q = q[-cfg.env.num_actions:]
        #print("q2",q)
        dq = dq[-cfg.env.num_actions:]
        
        if 1:
            # 1000hz ->50hz
            if count_lowlevel % cfg.sim_config.decimation == 0:

                obs = np.zeros([1, cfg.env.n_proprio], dtype=np.float32) #1,45

                eu_ang = quaternion_to_euler_array(quat)
                eu_ang[eu_ang > math.pi] -= 2 * math.pi

                cmd.vx=0.2*0
                cmd.vy=0.2*0
                cmd.dyaw= 0.7*-1*0
                #sensor->lcm
                #单次观测
                obs[0, 0] = omega[0] *cfg.normalization.obs_scales.ang_vel
                obs[0, 1] = omega[1] *cfg.normalization.obs_scales.ang_vel
                obs[0, 2] = omega[2] *cfg.normalization.obs_scales.ang_vel
                obs[0, 3] = eu_ang[0] *cfg.normalization.obs_scales.quat
                obs[0, 4] = eu_ang[1] *cfg.normalization.obs_scales.quat
                obs[0, 5] = eu_ang[2] *cfg.normalization.obs_scales.quat
                obs[0, 6] = cmd.vx * cfg.normalization.obs_scales.lin_vel
                obs[0, 7] = cmd.vy * cfg.normalization.obs_scales.lin_vel
                obs[0, 8] = cmd.dyaw * cfg.normalization.obs_scales.ang_vel
                
                obs[0, 9:19] = (q-default_dof_pos) * cfg.normalization.obs_scales.dof_pos #g关节角度顺序依据修改为样机
                obs[0, 19:29] = dq * cfg.normalization.obs_scales.dof_vel
                obs[0, 29:39] = last_actions#上次控制指令
                obs = np.clip(obs, -cfg.normalization.clip_observations, cfg.normalization.clip_observations)

                hist_obs.append(obs) #11,1,45
                hist_obs.popleft() #10,1,45

                n_proprio=cfg.env.n_proprio
                n_priv_latent=cfg.env.n_priv_latent
                n_scan=cfg.env.n_scan
                history_len=cfg.env.history_len
                num_observations= cfg.env.num_observations# cfg.env.n_proprio + cfg.env.history_len*cfg.env.n_proprio

                policy_input = np.zeros([1, num_observations], dtype=np.float16) # 同isaac 完整
                hist_obs_input = np.zeros([1, history_len*n_proprio], dtype=np.float16) # 同isaac 观测buf
                #依据完成模型的顺序实际只采用了前后的观测数据
                policy_input[0,0:n_proprio]=obs
                for i in range(n_priv_latent  + n_scan):#缓存历史观测
                    policy_input[0,n_proprio+i]=0
                for i in range(history_len):#缓存历史观测
                    policy_input[0, n_proprio  + n_priv_latent  + n_scan +i * n_proprio : n_proprio  + n_priv_latent  + n_scan +(i + 1) * n_proprio] = hist_obs[i][0, :]
                #采集模型仅仅使用观测和buf
                for i in range(history_len):#缓存历史观测
                    hist_obs_input[0, i * n_proprio : (i + 1) * n_proprio] = hist_obs[i][0, :]
               
                policy = policy.to('cpu') #policy是half()
                action[:] = policy.act_teacher(torch.tensor(policy_input).half())[0].detach().numpy()#完整模型
                #action[:] = policy(torch.tensor(obs).half(),torch.tensor(hist_obs_input).half())[0].detach().numpy()#jit模型
  
                action = np.clip(action, -cfg.normalization.clip_actions, cfg.normalization.clip_actions)
                #print("action=", action)
                action_flt=_low_pass_action_filter(action,last_actions)
                last_actions=action

                target_q = action_flt * 0.25+ default_dof_pos
   
            target_dq = np.zeros((cfg.env.num_actions), dtype=np.double)
            # Generate PD control
            
            tau = pd_control(target_q, q, cfg.robot_config.kps,
                             target_dq, dq, cfg.robot_config.kds)  # Calc torques
            tau = np.clip(tau, -cfg.robot_config.tau_limit, cfg.robot_config.tau_limit)  # Clamp torques
            data.ctrl = tau
        else:#air mode test
            obs = np.zeros([1, cfg.env.n_proprio], dtype=np.float32) #1,45
            eu_ang = quaternion_to_euler_array(quat)
            eu_ang[eu_ang > math.pi] -= 2 * math.pi
            target_q = default_dof_pos

            target_dq = np.zeros((cfg.env.num_actions), dtype=np.double)
            # Generate PD control
            tau = pd_control(target_q, q, cfg.robot_config.kps,
                            target_dq, dq, cfg.robot_config.kds)  # Calc torques
            tau = np.clip(tau, -cfg.robot_config.tau_limit, cfg.robot_config.tau_limit)  # Clamp torques
            data.ctrl = tau

        mujoco.mj_step(model, data)
        viewer.render()
        count_lowlevel += 1

    viewer.close()

if __name__ == '__main__':
    import argparse

    parser = argparse.ArgumentParser(description='Deployment script.')
    parser.add_argument('--load_model', type=str, default='./modelt.pt',
                        help='Run to load from.')
    parser.add_argument('--terrain', action='store_true', default=False)
    args = parser.parse_args()

    class Sim2simCfg(TaitanConstraintHimRoughCfg):

        class sim_config:
            if args.terrain:
                mujoco_model_path = f'{ROOT_DIR}/resources/taitan/xml/world_terrain.xml'
            else:
                mujoco_model_path = f'{ROOT_DIR}/resources/taitan/xml/world.xml'
            sim_duration = 60.0
            dt = 0.001 #1Khz底层
            decimation = 20 # 100Hz

        class robot_config:
            kp_all = 16.0
            kd_all = 0.6
            kps = np.array([kp_all, kp_all, kp_all, kp_all, kp_all, kp_all, kp_all, kp_all, kp_all, kp_all], dtype=np.double)#PD和isacc内部一致
            kds = np.array([kd_all, kd_all, kd_all, kd_all, kd_all, kd_all, kd_all, kd_all, kd_all, kd_all], dtype=np.double)
            tau_limit = 20. * np.ones(10, dtype=np.double)#nm

    policy = torch.load(args.load_model)# 有一个可能得原因是这个 pt文件里只有权重，而没有网络结构。 所以 只能用 torch.load去加载，不能用torch.jit.load

    run_mujoco(policy, Sim2simCfg())\
```

![media](https://pub-7714d99fbd654288a82d7b2f7be01efb.r2.dev/isaac-gym-rl/087-image-image-95.gif)

![media](https://pub-7714d99fbd654288a82d7b2f7be01efb.r2.dev/isaac-gym-rl/088-image-image-96.png)

**（2）Tinker软件支持行走与站立的独立训练：**

目前代码中新增的站立和行走的2策略方案：

![media](https://pub-7714d99fbd654288a82d7b2f7be01efb.r2.dev/isaac-gym-rl/089-image-image-97.png)

使用时将stand或tort对应的配置文件覆盖原始配置，同时训练奖励函数文件也设置，后续版本中进一步更新一键切换的逻辑：

![media](https://pub-7714d99fbd654288a82d7b2f7be01efb.r2.dev/isaac-gym-rl/090-image-image-98.png)

训练演示，下一版本Tinker将更新支持点足和轮足模式的训练：

![media](https://pub-7714d99fbd654288a82d7b2f7be01efb.r2.dev/isaac-gym-rl/091-image-image-99.png)

如果遇到问题可以微信联系反馈:694373466

If you encounter any problems, please contact us on WeChat at 694373466